How Long For Chicken Leg Quarters In The Oven Recipe
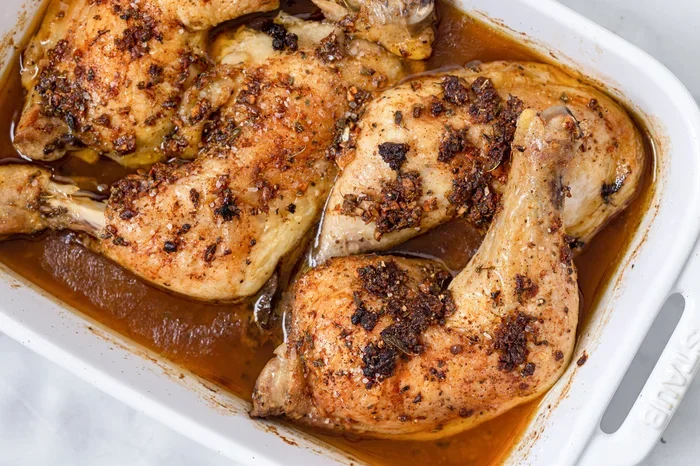
Baking chicken leg quarters in the oven takes about 40 to 50 minutes at 425°F for crispy skin and juicy meat. The key is getting the internal temperature to 165°F for safe eating. This easy oven recipe works for bone-in chicken pieces and delivers restaurant-quality results at home.
Key Takeaways
- Cook Time: Chicken leg quarters need 40-50 minutes at 425°F for perfect doneness.
- Safe Temperature: Always check that the internal temperature reaches 165°F using a meat thermometer.
- Crispy Skin: Pat the chicken dry and use a high oven temp for golden, crunchy skin.
- Seasoning Matters: A simple blend of salt, pepper, garlic powder, and paprika adds big flavor.
- Resting Is Key: Let the chicken rest for 5-10 minutes after baking for juicier meat.
- Bone-In Advantage: Bone-in leg quarters stay moist and flavorful much better than boneless cuts.
- Easy Cleanup: Line your baking sheet with foil or parchment for quick, hassle-free cleanup.
📑 Table of Contents
- How Long For Chicken Leg Quarters In The Oven: The Complete Guide
- Why Chicken Leg Quarters Are Perfect for Oven Baking
- The Perfect Oven Temperature for Chicken Leg Quarters
- How Long To Bake Chicken Leg Quarters in The Oven
- Seasoning and Flavor Ideas for Baked Chicken Legs
- Tips for Crispy Skin and Juicy Meat
- How to Know When Chicken Leg Quarters Are Done
- Serving Suggestions and Side Dishes
- Common Mistakes to Avoid When Baking Chicken Legs
- Storage and Reheating Leftover Baked Chicken
- Conclusion
How Long For Chicken Leg Quarters In The Oven: The Complete Guide
There is nothing quite like a tray of oven baked chicken coming out of the oven. The smell fills the whole kitchen. The skin gets crispy and golden. And the meat stays juicy and tender. If you have ever wondered how long for chicken leg quarters in the oven, you are in the right place.
This guide covers everything you need to know. We will talk about cooking time, oven temperature, seasoning tips, and how to get perfectly crispy skin every single time. Whether you are a beginner cook or someone who makes chicken often, you will find useful tips here. Let us dive right in and make some amazing chicken leg quarters together.
Why Chicken Leg Quarters Are Perfect for Oven Baking
Chicken leg quarters are one of the best cuts to bake in the oven. They include both the thigh and the drumstick connected by a bone. This bone-in structure does something special. It keeps the meat moist and full of flavor during cooking.
Here is why so many home cooks love this cut:
- Affordable: Chicken leg quarters cost less than breasts or wings. You get great value for your money.
- Forgiving: The bone and extra fat protect the meat from drying out. Even if you cook them a little too long, they still taste great.
- Crispy Skin Potential: The skin on leg quarters renders beautifully in a hot oven. It gets crunchy and delicious.
- Versatile: You can season them many different ways. They work for BBQ, herb-roasted, spicy, or simple salt-and-pepper styles.
- Feeds a Crowd: A few quarters go a long way. They make a satisfying meal for the whole family.
Compared to boneless cuts, bone in chicken pieces are much easier to cook well. The bone acts as a natural insulator. It slows down heat transfer and prevents the meat from overcooking quickly. This is a big reason why oven roasted chicken legs turn out so reliably well.
Bone-In vs. Boneless: What Works Better
Some people wonder if they should remove the bone. The short answer is no. Keep the bone in. Here is a quick look at the differences.
| Feature | Bone-In Leg Quarters | Boneless Chicken Thighs |
|---|---|---|
| Moisture Retention | Excellent | Good, but dries faster |
| Flavor | Rich, deep flavor | Good, but less intense |
| Cooking Time | 40-50 minutes | 25-30 minutes |
| Skin Crispiness | Great | Can be tricky |
| Ease of Eating | Needs bone picking | Easy to slice |
| Cost | Budget-friendly | Slightly higher |
As you can see, bone in chicken pieces win for oven baking. They are more forgiving and taste better. The slight extra effort of eating around the bone is totally worth it.
The Perfect Oven Temperature for Chicken Leg Quarters
Getting the oven temperature right is the most important step. Too low and the skin gets soggy. Too high and the outside burns before the inside cooks through. The sweet spot for baked chicken leg quarters is 425°F (220°C).
At this temperature, several great things happen. The skin renders its fat quickly. It becomes crispy and golden brown. The heat penetrates the meat evenly. And the juices stay locked inside the meat. A 425°F oven bake gives you the perfect balance of crispy exterior and moist interior.
Some recipes call for 375°F or 400°F. These lower temperatures work too. But they add extra cooking time. At 425°F, you get faster results with better texture. The chicken cooking time drops significantly at this higher heat.
Why High Heat Works So Well
High heat creates something called the Maillard reaction. This is a fancy term for browning. When the skin hits a hot oven, the proteins and sugars react. This creates that beautiful golden color and complex flavor. Lower temperatures do not trigger this reaction as effectively.
Here is a quick temperature guide for reference:
- 375°F: Slower cook, more moisture loss, softer skin (about 55-60 minutes)
- 400°F: Good balance, slightly crispier (about 45-50 minutes)
- 425°F: Best for crispy skin, juicy meat (about 40-50 minutes)
- 450°F: Very fast, risk of burning skin (about 35-40 minutes, not recommended for beginners)
For most home cooks, 425°F is the ideal oven temperature. It gives you reliable, consistent results every time you bake chicken legs.
How Long To Bake Chicken Leg Quarters in The Oven
Now let us answer the big question: how long for chicken leg quarters in the oven. The answer depends on a few factors. But here is the general rule of thumb.
At 425°F, bone-in chicken leg quarters need about 40 to 50 minutes. The exact time depends on the size of the pieces, your oven, and whether you use a rack or not. Let us break this down further.
Timing by Chicken Size
Not all chicken leg quarters are the same size. A small drumstick will cook faster than a large thigh. Here is what to expect:
- Small leg quarters (under 5 oz each): About 35-40 minutes
- Medium leg quarters (5-7 oz each): About 40-45 minutes
- Large leg quarters (over 7 oz each): About 45-55 minutes
- Extra large or frozen: About 55-65 minutes (thaw first for best results)
The most reliable way to know when your oven baked chicken is done is to use a meat thermometer. Insert it into the thickest part of the meat, not touching the bone. The internal temperature should read 165°F (74°C). This is the safe temperature recommended by food safety experts.
Do You Need to Flip the Chicken?
Here is a great tip that makes a big difference. Flip the chicken leg quarters halfway through cooking. This means at the 20-25 minute mark. Flipping ensures both sides get equally crispy skin. It also promotes even browning across the entire piece.
If you do not flip them, the top side facing the heat source will get much crispier than the bottom. The bottom side may stay pale and soft. A quick flip in the middle solves this problem easily.
Some people skip flipping and place the chicken skin-side up the entire time. This works fine if you use a wire rack. The hot air circulates around the chicken evenly. But flipping is still the best approach for most home ovens.
Seasoning and Flavor Ideas for Baked Chicken Legs
The beauty of oven roasted chicken legs is that they pair well with almost any flavor. A simple seasoning blend can make these taste amazing. You do not need fancy ingredients. A few pantry staples work wonders.
Basic Seasoning Blend
Start with this simple mix for classic seasoned chicken:
- 1 teaspoon salt
- 1 teaspoon black pepper
- 1 teaspoon garlic powder
- 1 teaspoon paprika
- 1/2 teaspoon onion powder
- 1/2 teaspoon cumin
- 1/4 teaspoon cayenne pepper (optional, for heat)
Rub this blend all over the chicken pieces. Make sure to get under the skin too. The skin acts like a wrapper. It holds the seasoning against the meat. This means more flavor in every bite.
Flavor Variations to Try
Want to switch things up? Here are some easy variations:
- BBQ Style: Brush with your favorite BBQ sauce in the last 10 minutes of baking.
- Lemon Herb: Add lemon zest, rosemary, and thyme for a fresh, bright taste.
- Spicy Korean: Mix gochujang, soy sauce, honey, and sesame oil. Marinate for 2 hours before baking.
- Mediterranean: Use oregano, basil, olive oil, and a squeeze of lemon.
- Southern Comfort: Add brown sugar, smoked paprika, and a touch of hot sauce.
For the best results, marinate or season the chicken at least 30 minutes before baking. Overnight marinating in the fridge works even better. The longer the chicken sits with the seasoning, the deeper the flavor goes.
Tips for Crispy Skin and Juicy Meat
Getting crispy skin on chicken drumstick bake dishes is an art. But it is a very easy art to master. Follow these simple tips and your skin will come out perfectly crunchy every time.
Pat the Chicken Dry
This is the number one secret. Before you season the chicken, pat the skin completely dry with paper towels. Moisture is the enemy of crispy skin. The wetter the skin, the more steam it creates in the oven. Steam makes the skin soft and rubbery instead of crispy.
Take a few extra minutes to blot the chicken thoroughly. You will be amazed at the difference this makes. Dry skin crisps up beautifully in a hot oven bake.
Use a Wire Rack
Place the chicken on a wire rack set over a baking sheet. This allows hot air to flow underneath the pieces. The skin on the bottom side gets just as crispy as the top. Without a rack, the chicken sits in its own juices and steams. This leads to soggy skin on the bottom.
A wire rack is a small investment that changes everything. You can find one at any kitchen store for just a few dollars. It is one of the best tools for bake chicken at home enthusiasts.
Let the Chicken Come to Room Temperature
Take the chicken out of the fridge about 20-30 minutes before baking. Cold chicken going into a hot oven cooks unevenly. The outside overcooks while the inside stays raw. Room temperature chicken cooks more evenly from edge to center.
This simple step also reduces the overall chicken cooking time slightly. The oven does not have to work as hard to bring the meat up to temperature.
Do Not Overcrowd the Pan
Give each piece of chicken some space. If you crowd them together, the steam gets trapped. Trapped steam means soggy skin. Leave at least an inch between each piece. If you need to bake a large batch, use two sheet pans or bake in two rounds.
How to Know When Chicken Leg Quarters Are Done
Knowing when chicken leg quarters are fully cooked is crucial. Undercooked chicken is a food safety risk. Overcooked chicken is dry and tough. You want to hit that sweet spot of perfectly cooked, juicy meat.
The Meat Thermometer Method
A meat thermometer is your best friend. It removes all guesswork from chicken baking tips. Insert the probe into the thickest part of the thigh, away from the bone. Wait for the reading to stabilize.
The internal temperature must reach 165°F (74°C). This is the USDA safe temperature for poultry. At this temperature, harmful bacteria are destroyed. The meat is safe to eat.
If the thermometer reads below 165°F, keep baking and check again every 5 minutes. Do not guess. The thermometer never lies.
Visual and Physical Cues
If you do not have a thermometer, look for these signs:
- The juices run clear when you pierce the thickest part
- The meat is no longer pink near the bone
- The skin is deep golden brown, not pale
- The chicken has shrunk slightly away from the bone
- The meat feels firm, not soft or rubbery
These visual cues help, but a thermometer is always more reliable. I strongly recommend investing in a simple instant-read thermometer. They cost under $15 and last for years.
Resting the Chicken
Once your oven roasted chicken legs are done, take them out of the oven. Let them rest on the pan for 5 to 10 minutes. This resting period allows the juices to redistribute throughout the meat. If you cut into the chicken right away, the juices run out and the meat dries out.
Resting is one of the most overlooked chicken baking tips. But it makes a noticeable difference in juiciness and flavor. Use this time to prepare your side dishes or make a quick pan sauce.
Serving Suggestions and Side Dishes
Oven baked chicken leg quarters pair wonderfully with many sides. Here are some ideas to build a complete meal around your chicken:
- Roasted Vegetables: Carrots, potatoes, and broccoli all roast beautifully alongside chicken.
- Rice or Grains: Fluffy white rice, quinoa, or couscous soak up the chicken juices perfectly.
- Salad: A fresh green salad with vinaigrette balances the richness of the chicken.
- Mashed Potatoes: Creamy mashed potatoes are a classic pairing for baked chicken.
- Coleslaw: Cool, crunchy coleslaw adds a nice contrast to hot, crispy chicken.
- Cornbread: Warm cornbread with honey butter is a Southern favorite with baked chicken.
The best part about easy chicken dinner recipes like this is that everything can go in the oven at the same time. Toss some chopped vegetables on a second sheet pan. Season them simply with olive oil, salt, and pepper. They will be done at the same time as the chicken. One pan meal made easy.
Common Mistakes to Avoid When Baking Chicken Legs
Even experienced cooks sometimes make mistakes with chicken leg bake recipes. Here are the most common ones and how to avoid them.
Skipping the Dry Step
As mentioned earlier, wet skin equals soggy skin. Many people rush past the drying step. Do not skip it. Take the extra two minutes to pat the chicken dry with paper towels. This single step is the difference between crispy and soggy.
Not Using a Thermometer
Guessing when chicken is done is risky. You might serve undercooked chicken. Or you might overcook it and dry it out. A thermometer takes the guesswork out completely. Use one every time.
Opening the Oven Door Too Often
Every time you open the oven door, heat escapes. The temperature drops. This slows down cooking and prevents the skin from crisping up. Resist the urge to peek. Check the chicken only when you plan to flip it or test the temperature.
Seasoning Too Late
Seasoning right before baking means the flavors do not penetrate the meat. Salt needs time to work its magic. Ideally, season the chicken at least 30 minutes before it goes in the oven. Even better, season it the night before and refrigerate it uncovered. This also helps dry the skin further.
Using a Cold Pan
Place your baking sheet in the oven while it preheats. A cold pan means the chicken sits in a cold zone for the first few minutes. This delays the start of the cooking process and affects crispiness. A hot pan from the start gives you better results.
Storage and Reheating Leftover Baked Chicken
If you have leftovers (which is rare with this recipe, but it happens), here is how to store and reheat them properly.
Let the chicken cool completely before storing. Place it in an airtight container or zip-lock bag. Refrigerate within two hours of cooking. Properly stored oven baked chicken stays fresh for 3 to 4 days in the fridge.
To reheat, use the oven or an air fryer. Both methods restore the crispy skin. Microwave reheating makes the skin soft and rubbery. Avoid the microwave if you want to maintain that great texture.
For the oven, reheat at 375°F for about 10-15 minutes. For the air fryer, 350°F for 5-8 minutes works perfectly. The chicken will taste almost as good as the first time around.
Conclusion
Baking chicken leg quarters in the oven is one of the easiest and most satisfying meals you can make. The cooking time is simple: 40 to 50 minutes at 425°F. The results are worth every minute of waiting. Crispy golden skin, juicy tender meat, and endless flavor possibilities.
Remember the key points. Pat the chicken dry. Use a wire rack. Flip halfway through. Check the internal temperature with a thermometer. Let the chicken rest before serving. Follow these steps and you will never make bland, soggy baked chicken again.
This chicken leg quarters recipe is perfect for weeknight dinners, Sunday roasts, meal prep, or feeding a crowd. It is budget-friendly, delicious, and incredibly easy. Once you master this basic method, you can experiment with endless seasoning combinations and side pairings.
So next time you are planning dinner, grab some chicken leg quarters and fire up the oven. Your family is going to love this meal. And you will feel proud of the delicious oven baked chicken you created from scratch. Happy cooking!
Frequently Asked Questions
Can I bake chicken leg quarters at 375°F instead of 425°F?
Yes, you can. At 375°F, the cooking time increases to about 55-60 minutes. The lower temperature produces slightly less crispy skin but still yields juicy meat. Just add 10-15 minutes to the chicken cooking time and check that the internal temperature reaches 165°F.
Should I cover chicken leg quarters with foil while baking?
No, leave the chicken uncovered for crispy skin. Covering it with foil traps steam and prevents the skin from crisping up. If the skin is browning too fast, you can loosely tent it with foil for the last 10 minutes only.
Can I use frozen chicken leg quarters in the oven?
Yes, but you must increase the cooking time significantly. Frozen leg quarters may need 60-75 minutes at 425°F. Make sure the internal temperature reaches 165°F before serving. Thawing first is always recommended for more even cooking and better texture.
What is the best way to get crispy skin on baked chicken legs?
The secret is to pat the skin completely dry before seasoning. Use a wire rack over a baking sheet. Bake at 425°F without opening the oven door too often. And make sure the chicken is at room temperature before it goes in the oven. These steps together guarantee crispy, golden skin.
How can I tell if baked chicken leg quarters are fully cooked without a thermometer?
Look for clear juices when you pierce the thickest part. The meat should be white, not pink, near the bone. The skin should be deep golden brown. The chicken should feel firm when pressed. However, a thermometer is the most reliable method and strongly recommended for food safety.
Can I add vegetables to the same baking sheet as the chicken?
Absolutely. Root vegetables like potatoes, carrots, and onions roast beautifully alongside chicken leg quarters. Cut the vegetables into similar-sized pieces so they cook at the same rate. Add them to the pan about 15 minutes after the chicken goes in, so they do not overcook.