How To Make A Porterhouse Steak In The Oven Like A Pro
Making a porterhouse steak in the oven is easier than you think. This guide walks you through every step, from picking the right cut to serving a perfectly cooked meal. You will learn how to achieve a crispy steak crust while keeping the inside juicy and tender. Whether you are a beginner or a seasoned cook, these oven steak tips will transform your cooking. Follow along and impress everyone at your table.
There is something truly special about a porterhouse steak cooked in the oven. It is one of those meals that feels fancy but is actually quite simple once you know the steps. Many people think you need a grill to get restaurant-quality results, but your oven can do wonders. A bone-in steak like the porterhouse combines two beloved cuts of beef into one impressive dish. The tenderloin side stays buttery soft while the strip side offers that bold, beefy flavor you love.
Whether you are cooking for a special occasion or just treating yourself on a Tuesday night, oven-baked steak is a game-changer. You get full control over the heat, which means fewer surprises and more consistency. In this guide, we will walk you through every single step. You will learn how to pick the right steak, what tools you need, and exactly how to cook it to perfection. By the end, you will feel confident enough to make this restaurant-quality steak at home anytime you want.
The reverse sear method is the secret weapon here. Instead of blasting a cold steak with high heat right away, you start low and slow in the oven. This approach cooks the steak evenly from edge to edge. Then, a quick sear in a hot pan adds that golden-brown crust everyone loves. It sounds fancy, but the process is straightforward and forgiving. Even if you are new to cooking steak, this method will give you amazing results.
Key Takeaways
- Choose thick-cut steak: A bone-in porterhouse at least 1.5 inches thick gives you the best results for oven cooking.
- Use the reverse sear method: Slow-cooking in the oven followed by a hot sear creates an even doneness from edge to edge.
- Rest your steak: Letting the steak rest for 5 to 10 minutes after cooking keeps all those juices locked inside.
- Invest in a meat thermometer: This is the single most important tool for hitting your perfect level of steak doneness every time.
- Season simply but well: Quality salt, fresh pepper, and a touch of garlic go a long way with a great cut of beef.
- Use cast iron for searing: A cast iron skillet holds heat perfectly and gives you that beautiful brown crust.
- Slice against the grain: This simple step makes every bite more tender and easier to chew.
📑 Table of Contents
Why Oven-Cooked Porterhouse Steak Stands Out
You might wonder why bother cooking steak in the oven when a grill works so well. The truth is, an oven gives you something a grill cannot always provide: consistent, even heat. When you place a thick-cut steak on a grill, the outside can burn before the inside is done. The oven solves this problem completely.
Here are a few reasons why oven-roasted steak is worth trying:
- Even cooking: The heat surrounds the steak on all sides, which means no hot spots or uneven doneness.
- Better control: You can set the exact temperature and trust that it will stay there.
- Less stress: You do not have to worry about flare-ups or managing multiple burners at once.
- Perfect for thick cuts: A 1.5-inch porterhouse benefits greatly from the gentle, steady heat of an oven.
- Year-round cooking: Rain or shine, hot or cold, your oven works the same every single day.
Another big advantage is the reverse sear technique. This method starts with a low oven temperature to bring the steak up to your target internal temperature slowly. Then you finish with a blazing-hot sear for just a minute or two on each side. The result is a steak with a perfect pink center and a crispy, caramelized exterior. It is the kind of steak that makes people stop talking and just start eating.
Choosing the Best Porterhouse Steak
Not all porterhouse steaks are created equal. The quality of your steak before it ever hits the oven matters a lot. Taking the time to pick the right cut will make a huge difference in the final result. Here is what to look for when you are shopping.
Understanding Beef Quality Grades
The USDA grades beef based on marbling, which is the white fat running through the meat. Prime grade beef has the most marbling and is what you want for a bone-in porterhouse. It is found mostly at higher-end grocery stores and butcher shops. Choice grade is also excellent and more widely available. Both will give you a juicy, flavorful steak when cooked properly.
You should also look for steaks that are at least 1.5 inches thick. Thinner cuts tend to overcook quickly in the oven. A thicker steak gives you a bigger margin for error and allows the reverse sear method to work its magic. If you can find a steak that is 2 inches thick, even better.
Porterhouse vs. Other Steaks
People often confuse the porterhouse steak with the ribeye or the filet mignon. The porterhouse is actually a combination of two cuts. On one side of the bone, you get the tenderloin, which is the same cut used for filet mignon. On the other side, you get the strip steak, also known as the sirloin strip. This dual nature is what makes the porterhouse so special.
A ribeye is fattier and more heavily marbled, which gives it a rich, beefy flavor. A filet mignon is leaner and extremely tender but milder in flavor. The porterhouse gives you the best of both worlds. You get the tenderness of the tenderloin and the robust flavor of the strip. It is truly the best of both cuts in one beautiful package.
Preparing Your Steak for the Oven
Preparation is where most people rush, but this step is crucial. Taking just a few extra minutes to properly prep your steak will lead to noticeably better results. Good preparation sets the foundation for everything that follows.
Bringing the Steak to Room Temperature
Take your steak out of the refrigerator about 30 to 45 minutes before cooking. This might seem like a small detail, but it matters a lot. A cold steak going into a hot oven will cook unevenly. The outside will be done while the inside is still cold. By letting the steak warm up a bit, you get more even cooking throughout.
Place the steak on a plate and leave it uncovered on the counter. This also helps dry the surface slightly, which contributes to a better steak crust during searing. Do not leave it out for more than an hour though, as food safety matters.
Seasoning Your Porterhouse
Keep it simple. A great porterhouse steak does not need a complicated marinade. All you really need is kosher salt, freshly cracked black pepper, and a little garlic powder if you like. About 45 minutes before cooking, sprinkle both sides generously with salt and pepper.
The salt does something magical. It draws out a little moisture at first, then that moisture gets reabsorbed along with the salt. This process seasons the meat all the way through and helps create a beautiful crispy crust when you sear it. Some people like to add a light coating of olive oil before cooking, which helps the seasoning stick and promotes even browning.
Avoid using too much seasoning. The porterhouse is already a flavorful cut. You want to enhance its natural taste, not mask it. A little goes a long way with quality beef.
The Best Oven Method for Perfect Steak
This is where the magic happens. The reverse sear method is the gold standard for cooking thick-cut steak in the oven. It might feel counterintuitive to start low and slow, but trust the process. The results speak for themselves.
Step-by-Step Oven Cooking Instructions
Follow these steps carefully and you will nail it every single time:
- Preheat your oven to 275°F (135°C). This low temperature is key. It gently cooks the steak without drying it out.
- Place a wire rack over a baking sheet. The wire rack allows air to circulate around the steak, which promotes even cooking and a better crust later.
- Place the seasoned steak on the rack. Make sure it is not touching the pan. You want air flowing freely around it.
- Insert a probe thermometer into the thickest part. This helps you monitor the internal temperature without opening the oven door constantly.
- Cook until the internal temperature reaches about 110°F to 115°F for medium-rare. This usually takes about 20 to 30 minutes depending on thickness. Use your thermometer as your guide.
- Remove the steak and preheat a cast iron skillet on high heat. While the oven does its work, get your skillet ripping hot. A cast iron skillet is the best tool for this job because it holds heat incredibly well.
- Add a high smoke-point oil to the skillet. Avocado oil or grapeseed oil work great because they can handle high temperatures without burning.
- Sear the steak for about 1 to 2 minutes per side. You want a deep, golden-brown crust to form. Do not move the steak around during this time. Let it do its thing.
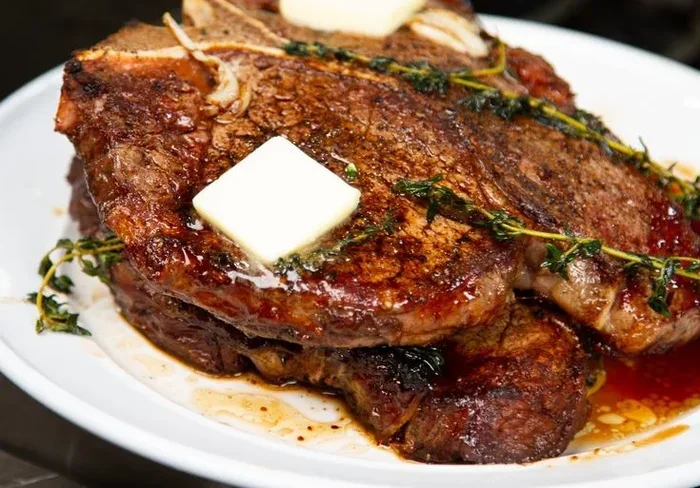
- Add butter, garlic, and fresh thyme for a finishing baste. Tilt the skillet slightly and spoon the melted butter over the steak repeatedly. This butter baste adds incredible flavor and richness.
- Remove the steak and let it rest. This step is just as important as the cooking itself.
Steak Doneness and Internal Temperatures
Knowing your target internal temperature is the difference between a good steak and a great one. Here is a simple reference guide for steak doneness:
- Rare: 120°F to 125°F. Very red and cool in the center. Best for those who love a very soft, juicy steak.
- Medium Rare: 130°F to 135°F. Warm red center. This is the sweet spot for most steak lovers and the recommended doneness for porterhouse.
- Medium: 140°F to 145°F. Pink center with a firmer texture. Still very good but less juicy than medium rare.
- Medium Well: 150°F to 155°F. Slightly pink center. This is where some people like their steak, though it loses some juiciness.
- Well Done: 160°F and above. Gray throughout with very little juiciness. Not recommended for a quality porterhouse.
Remember that the temperature will rise about 5 degrees after you remove the steak from the pan. This is called carryover cooking. So if you want a medium-rare steak, pull it off the heat at about 125°F to 130°F.
Slicing and Serving Your Porterhouse
You have cooked your steak to perfection, and now it is time to serve it. How you slice and present the steak matters more than most people realize. A few simple steps will make your meal look and taste even better.
Resting the Steak
Before you cut into that beautiful steak, give it time to rest. Place it on a cutting board and let it sit for at least 5 to 10 minutes. During cooking, the juices get pushed toward the center of the steak. Resting allows those juices to redistribute evenly throughout the meat.
If you cut into it immediately, all those juices will run out onto the cutting board instead of staying in the steak. That means a dry, less flavorful bite. Trust the rest. It only takes a few minutes and makes a noticeable difference in every single bite.
Slicing Against the Grain
The porterhouse has two different types of meat on either side of the bone. The tenderloin side has very fine, delicate muscle fibers. The strip side has slightly thicker fibers. To get the most tender results, always slice against the grain. This means cutting perpendicular to the direction of the muscle fibers, which shortens them and makes each bite easier to chew.
Use a sharp steak knife for clean cuts. A dull knife will tear the meat instead of slicing it, which affects both the texture and the appearance of your plated steak.
Serving Suggestions
A great porterhouse steak shines on its own, but a few sides can elevate the whole meal. Here are some ideas:
- A simple side salad with a bright vinaigrette cuts through the richness of the beef.
- Roasted garlic mashed potatoes are a classic pairing that everyone loves.
- Grilled asparagus or broccolini adds a fresh, crispy contrast.
- A glass of red wine like a Cabernet Sauvignon or Malbec complements the bold flavor beautifully.
- A pat of compound butter on top of the sliced steak adds an extra layer of richness.
Common Mistakes to Avoid When Cooking Steak in the Oven
Even experienced cooks make mistakes sometimes. Being aware of common pitfalls helps you avoid them and get better results every time. Here are the most frequent errors people make when cooking a bone-in steak in the oven.
Skipping the Thermometer
This is the number one mistake. Relying on time alone or guessing the doneness by pressing the steak with your finger is unreliable. A digital meat thermometer is inexpensive and takes all the guesswork out of cooking steak. It removes the stress and gives you confidence. Every single time.
Not Letting the Steak Rest
We mentioned this already, but it deserves repeating. Cutting into a hot steak right out of the pan is tempting, but it costs you flavor and juiciness. Patience pays off here. Set a timer if you need to, and wait those extra minutes.
Using the Wrong Pan
A thin, flimsy pan will not hold enough heat to create a proper steak crust. You need a heavy-bottomed pan, and a cast iron skillet is the gold standard. It retains heat incredibly well and distributes it evenly across the surface. If you do not have cast iron, a stainless steel skillet works well too. Avoid non-stick pans for searing steak, as they do not get hot enough.
Overcrowding the Pan
If you are cooking more than one steak at a time, give each piece plenty of room. Overcrowding the pan drops the temperature and causes the steak to steam instead of sear. You want a deep brown crust, not a gray, soggy surface. Cook in batches if necessary. The extra few minutes are worth it.
Cooking the Steak Straight from the Fridge
We touched on this earlier, but it is worth emphasizing again. A cold steak going into a hot oven will have an overcooked exterior and a cold center. The reverse sear method works best when the steak starts at or near room temperature. That 30 to 45 minutes on the counter makes a real difference.
Expert Tips for the Perfect Oven Steak
Here are some bonus tips from professional chefs and experienced home cooks that will take your oven-baked steak to the next level:
- Dry brine overnight: Salt your steak and leave it uncovered in the fridge overnight. This draws out moisture, which gets reabsorbed, seasoning the meat deeply and drying the surface for an even better crust.
- Use compound butter: Mix softened butter with minced garlic, fresh herbs like rosemary and thyme, and a pinch of salt. Place a dollop on top of your sliced steak and let it melt over the meat.
- Let the cast iron skillet heat up fully: Give your pan at least 3 to 5 minutes on high heat before adding the steak. The pan should be smoking hot for the best sear.
- Do not skip the baste: Spooning the hot butter, garlic, and herbs over the steak during the final sear adds incredible flavor and helps cook the top of the steak evenly.
- Slice and serve immediately: Once your steak has rested and been sliced, get it to the table right away. Steak waits for no one, and it tastes best when it is hot.
Cooking a porterhouse steak in the oven is one of the most satisfying things you can do in the kitchen. It does not require fancy equipment or years of experience. All it takes is a good cut of beef, a little patience, and the right technique. The reverse sear method gives you the confidence to cook steak exactly the way you like it, every single time.
Remember to choose a thick, well-marbled steak, season it simply, and use a meat thermometer to track your progress. Let the steak rest before slicing, and always cut against the grain for the most tender results. With these steps, you will serve a juicy, restaurant-quality porterhouse that will have everyone asking for seconds.
The beauty of oven-cooked steak is that it is forgiving and consistent. You do not need to stand over a hot grill worrying about flare-ups. Your oven does the work for you while you focus on the finishing touches that make all the difference. A hot cast iron skillet, a good butter baste, and a sharp knife are all you need to elevate your steak game.
So the next time you are craving a perfect porterhouse steak, skip the grill and let your oven do the heavy lifting. Follow the steps in this guide, trust the process, and enjoy every bite of that beautifully cooked, crispy, juicy, and flavorful steak. You have got this, and your taste buds are going to thank you.
Frequently Asked Questions
What temperature should I cook a porterhouse steak in the oven?
Preheat your oven to 275°F for the reverse sear method. This low temperature gently cooks the steak evenly. After the oven phase, you will finish with a high-heat sear in a cast iron skillet for about 1 to 2 minutes per side to develop a crispy crust.
How long should I cook a porterhouse steak in the oven?
Cooking time depends on the thickness of your steak. A 1.5-inch porterhouse typically takes 20 to 30 minutes at 275°F. A 2-inch steak may take 30 to 40 minutes. Always use a meat thermometer and check the internal temperature rather than relying on time alone.
Should I sear a porterhouse steak before putting it in the oven?
No, the reverse sear method works best when you skip the initial sear. Start with a low oven temperature to cook the steak evenly, then finish with a hot sear at the end. This approach gives you the most even doneness from edge to edge with a beautiful crust on the outside.
What is the best internal temperature for a porterhouse steak?
For medium-rare, which is the recommended doneness for porterhouse, aim for an internal temperature of 130°F to 135°F. Remember that the temperature will rise about 5 degrees after you remove the steak from the pan due to carryover cooking. Pull the steak off the heat at about 125°F to 130°F for a perfect medium-rare result.
Do I need to let my porterhouse steak rest after cooking?
Yes, absolutely. Letting the steak rest for 5 to 10 minutes after cooking is essential. During cooking, the juices get pushed toward the center of the steak. Resting allows them to redistribute evenly, which means every bite will be juicy and flavorful instead of dry.
Can I use a regular baking sheet instead of a wire rack?
A wire rack is highly recommended because it allows air to circulate around the steak during the low oven phase. This promotes even cooking and helps the surface dry out slightly for a better sear later. If you only have a baking sheet, you can place a cooling rack on top of it to achieve a similar effect.
=== CONCLUSION ===
Making a porterhouse steak in the oven is a skill anyone can learn. With the reverse sear method, a quality cut of beef, and a basic meat thermometer, you can consistently cook a steak that rivals your favorite steakhouse. The key is patience, simple seasoning, and respecting the process. Let the oven do the slow, gentle work, and then finish with a blazing-hot sear for that perfect crust. Rest your steak, slice it against the grain, and serve it with confidence. Once you master this technique, you will never look at your oven the same way again. Your kitchen is now your best steakhouse, and every porterhouse steak you cook will be better than the last.