How Long To Cook Frozen Coconut Shrimp In Your Oven
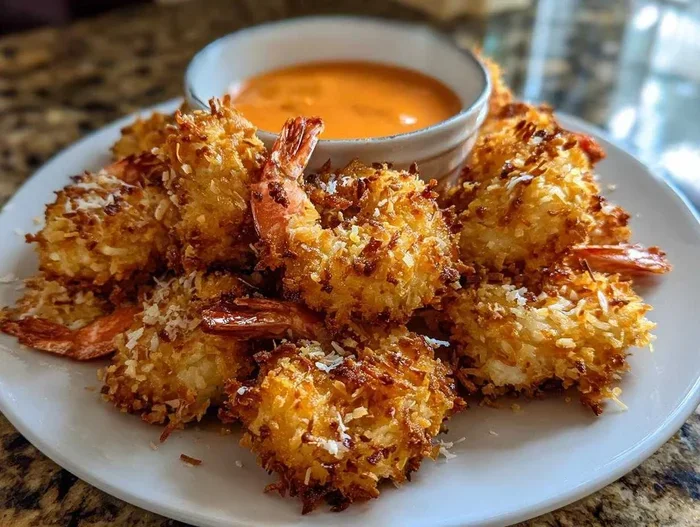
Cooking frozen coconut shrimp in your oven is quick, easy, and delivers restaurant-quality crunch at home. You will learn the exact time, temperature, and simple steps to get golden, crispy coconut shrimp straight from the freezer. This guide covers everything from prep to plating so you can enjoy oven-baked shrimp with confidence.
There is something magical about pulling a tray of crispy coconut shrimp out of the oven. The aroma fills the kitchen, the outside is golden brown, and the inside stays tender and juicy. If you have ever wondered how long to cook frozen coconut shrimp in oven, you are in the right place.
This guide walks you through everything you need to know. From the ideal oven temperature to the best brands of frozen shrimp, we cover it all. Whether you are meal prepping for the week or hosting a dinner party, oven-baked shrimp is a game changer. You will get crunchy, flavorful results without the hassle of deep frying.
Let us dive into the details so you can make perfect coconut shrimp at home every single time.
Key Takeaways
- Perfect Temperature: Bake frozen coconut shrimp at 400°F for 15-18 minutes for the best texture.
- No Thawing Needed: You can cook shrimp straight from the freezer for convenience.
- Crispy Results: A light spray of oil and proper rack placement make all the difference.
- Healthy Alternative: Oven-baking cuts the grease of deep-frying while keeping the flavor.
- Quick Prep: Most recipes take under 5 minutes of hands-on time before baking.
- Versatile Dish: Serve as an appetizer, salad topping, or main course with ease.
📑 Table of Contents
- Why Oven-Baked Coconut Shrimp Is a Better Choice
- How Long To Cook Frozen Coconut Shrimp In Oven
- Ingredients and Coating Options
- Comparison: Oven-Baked vs. Deep-Fried Coconut Shrimp
- Common Mistakes to Avoid
- Serving Suggestions and Pairings
- Expert Insights for the Best Coconut Shrimp
- Frequently Asked Questions
- Final Thoughts
Why Oven-Baked Coconut Shrimp Is a Better Choice
Health Benefits Over Deep Frying
Deep-fried shrimp tastes amazing, but it comes with extra oil and calories. Oven-baked shrimp gives you that same satisfying crunch with far less fat. You use a light coating of oil spray instead of submerging the shrimp in hot oil. This makes healthy shrimp recipes much more realistic for everyday eating.
When you bake frozen coconut shrimp in the oven, the coconut flakes and breadcrumb coating toast evenly. You get a crispy shell without absorbing excess grease. Many people say the oven version tastes just as good, if not better, than the deep-fried kind.
Why Frozen Shrimp Works So Well
You might think fresh shrimp is always better. But frozen shrimp has some real advantages. It is flash-frozen at sea, which locks in freshness and flavor. Frozen shrimp is also more affordable and available year-round.
When you cook frozen coconut shrimp directly from the freezer, the ice crystals help create a steam barrier. This keeps the shrimp moist while the outside becomes perfectly crispy. It is one of the easiest seafood recipes you can make with minimal effort.
How Long To Cook Frozen Coconut Shrimp In Oven
The Ideal Oven Temperature
The sweet spot for baking frozen coconut shrimp is 400°F (200°C). This high heat quickly crisps the coating without overcooking the shrimp inside. Preheating your oven is essential. Always give it at least 10 minutes to reach the right temperature before placing the shrimp inside.
If your oven runs hot or cold, you may need to adjust slightly. Some ovens perform better at 425°F for a faster cook. But 400°F is the most reliable temperature for even golden brown shrimp every time.
Step-by-Step Cooking Instructions
Here is exactly what to do when you want to make oven-baked coconut shrimp from frozen:
- Preheat your oven to 400°F.
- Line a baking sheet with parchment paper or a silicone mat.
- Arrange the frozen shrimp in a single layer. Do not overlap them.
- Lightly spray the shrimp with cooking oil. This helps the coating crisp up.
- Place the baking sheet on the middle oven rack.
- Bake for 15 to 18 minutes.
- Flip the shrimp halfway through for even browning.
- Check that the internal temperature reaches 145°F.
- Remove and let them rest for 2 minutes before serving.
Following these steps ensures your coconut shrimp recipe turns out flawless every time. The total hands-on time is only about 5 minutes, and the oven does all the work for you.
Quick Tips for Perfect Results
- Do not overcrowd the pan. Space the shrimp apart so hot air circulates freely.
- Use a wire rack. Placing shrimp on a rack over the baking sheet improves airflow and crispiness.
- Spray, do not pour. A light mist of oil spray prevents the coating from getting soggy.
- Flip halfway. This simple step ensures both sides turn golden brown.
- Check the package instructions. Some brands have specific cooking times for frozen shrimp listed on the bag.
Ingredients and Coating Options
Store-Bought vs. Homemade Coating
You have two main options when it comes to the coconut coating. Store-bought frozen shrimp often come pre-breaded with a coconut and panko breadcrumb mixture. These are incredibly convenient and taste great straight from the freezer.
Homemade coatings give you more control over flavor and texture. A simple mix of shredded coconut, panko breadcrumbs, a pinch of salt, and a dash of paprika works wonderfully. You can also add garlic powder or a squeeze of lime for extra zing. Either approach works beautifully for oven-baked shrimp.
Best Brands for Frozen Coconut Shrimp
Not all frozen shrimp are created equal. Here are some popular brands that deliver great results in the oven:
- Sea Bear: Known for their crispy coconut shrimp bites. They bake up golden in about 15 minutes.
- Angels Envy: Offers a lighter, less greasy coating that crisps well in the oven.
- Hook’d: A favorite for breaded seafood with a satisfying crunch.
- Store brand options: Many grocery stores carry their own frozen coconut shrimp at a lower price point.
No matter which brand you choose, always check the cooking instructions on the package as a starting point. The times in this guide work as a reliable baseline for most brands.
Comparison: Oven-Baked vs. Deep-Fried Coconut Shrimp
| Feature | Oven-Baked | Deep-Fried |
|---|---|---|
| Cooking Time | 15-18 minutes | 3-4 minutes |
| Oil Used | Light spray | 2-3 cups of oil |
| Calories (per serving) | Lower | Higher |
| Crispiness | Good to great | Excellent |
| Ease of Cleanup | Very easy | Messy |
| Hands-On Time | 5 minutes | 10 minutes |
| Best For | Everyday cooking | Special occasions |
As you can see, oven-baked coconut shrimp wins on convenience and health. Deep frying is faster in terms of actual cook time, but the prep and cleanup add up. For most home cooks, the oven method is the clear winner.
Common Mistakes to Avoid
Skipping the Preheat
This is the number one mistake people make. Putting shrimp into a cold oven leads to uneven cooking and soggy coating. Always preheat to 400°F before placing the tray inside. This small step makes a huge difference in your final result.
Overcrowding the Baking Sheet
It is tempting to fit as many shrimp as possible on one pan. But overcrowding traps steam and prevents the coating from crisping. Give each shrimp enough space. If you need to cook a large batch, use two baking sheets and rotate them halfway through.
Not Flipping the Shrimp
Baking on one side only can leave the bottom pale and soft. Flipping the shrimp at the halfway mark ensures both sides turn golden brown and crispy. It takes just a few seconds and makes a noticeable difference.
Using Too Much Oil
A light spray is all you need. Drizzling or pouring oil makes the coating greasy and heavy. The goal is a thin, even layer that helps the coconut flakes toast without making the shrimp soggy.
Serving Suggestions and Pairings
Crispy coconut shrimp is incredibly versatile. Here are some delicious ways to serve them:
- With a dipping sauce: Mango salsa, sweet chili sauce, or a light lime mayo all pair beautifully.
- On a salad: Slice the shrimp and toss them over a tropical greens salad for a protein boost.
- In a taco: Use coconut shrimp as a filling for fish tacos with cabbage slaw and lime crema.
- As an appetizer: Serve them on a platter with lemon wedges for a crowd-pleasing starter.
- Over rice or noodles: A bowl of jasmine rice with coconut shrimp makes a quick, satisfying meal.
The possibilities are endless. Oven-baked shrimp pairs well with almost any side dish, so feel free to get creative with your presentation.
Expert Insights for the Best Coconut Shrimp
Professional chefs share a few secrets that take frozen coconut shrimp from good to outstanding:
- Let them sit at room temperature for 5 minutes before baking. This takes the deep chill off the shrimp and promotes more even cooking.
- Add a pinch of sugar to the coating mixture. It caramelizes in the oven and adds a subtle sweetness that complements the coconut.
- Use fresh-shredded coconut if making homemade coatings. Pre-shredded coconut from the bag tends to be drier and does not cling as well.
- Place a second rack below the baking sheet. This creates a convection effect that helps the coating crisp up faster.
- Serve immediately. Coconut shrimp is best when fresh and hot. The coating stays crispy for about 10 minutes after coming out of the oven.
These small tips from experienced cooks can elevate your coconut shrimp recipe to restaurant quality. You do not need fancy equipment or advanced skills. Just a few simple adjustments make a big impact.
Frequently Asked Questions
Can I cook frozen coconut shrimp without thawing them first?
Yes, absolutely. Frozen coconut shrimp can go straight from the freezer to the oven. Thawing is not necessary and can actually make the coating soggy. Cooking from frozen is the recommended method for the best texture and crunch.
What temperature should I set my oven to for coconut shrimp?
Set your oven to 400°F (200°C). This temperature cooks the shrimp through while crisping the coconut coating perfectly. Always preheat the oven before placing the shrimp inside for the most consistent results.
How do I know when the shrimp are done?
The shrimp should be golden brown on the outside and reach an internal temperature of 145°F. The flesh should be opaque and firm to the touch. If you are unsure, cut into one shrimp to check that it is fully cooked through.
Can I use an air fryer instead of an oven?
Yes, an air fryer works great for coconut shrimp. Cook them at 400°F for 8 to 10 minutes, flipping halfway through. The air fryer produces even crispier results in less time. It is a fantastic alternative if you want to make a smaller batch.
How long do cooked coconut shrimp last in the fridge?
Cooked coconut shrimp can be stored in an airtight container in the refrigerator for up to 3 days. Reheat them in the oven at 350°F for 5 to 7 minutes to maintain the crispy coating. The microwave tends to make them soggy, so the oven is the best reheating method.
What is the best dipping sauce for oven-baked coconut shrimp?
Sweet chili sauce, mango salsa, and a light garlic aioli are all excellent choices. For a healthier option, try a yogurt-based dipping sauce with lime juice and fresh herbs. The sauce adds moisture and flavor that complements the crunchy coconut coating perfectly.
Final Thoughts
How long to cook frozen coconut shrimp in oven is a question with a simple answer: about 15 to 18 minutes at 400°F. But the real magic is in the details. The right temperature, proper spacing, a light spray of oil, and flipping halfway through are what separate good shrimp from great shrimp.
Oven-baking frozen coconut shrimp is one of the easiest and most rewarding things you can cook at home. It is fast, healthy, and incredibly delicious. Whether you are a beginner in the kitchen or a seasoned home cook, this coconut shrimp recipe will become a staple in your rotation.
Now that you know the time, the temperature, and the tips for success, it is time to put this knowledge into action. Grab a bag of frozen shrimp from your freezer, preheat the oven, and enjoy crispy, golden coconut shrimp tonight. Your taste buds will thank you.
Remember, oven-baked shrimp is not just a shortcut. It is a smart, delicious, and practical way to enjoy one of the best seafood recipes out there. Give it a try and see for yourself.