How To Cook Small Turkey In Oven With These Simple Tips
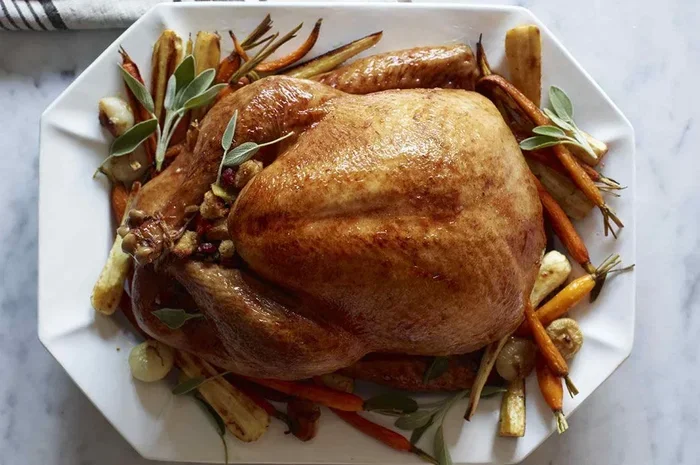
Learning how to cook small turkey in oven is easier than you think. With the right temperature, seasoning, and timing, you can roast a tender, juicy bird that impresses everyone at the table. This guide walks you through every step, from choosing the perfect bird to slicing it for serving.
Cooking a small turkey in the oven is one of the most rewarding things you can do in the kitchen. Whether it is for a cozy family dinner or a holiday gathering, a perfectly roasted turkey brings everyone together. The good news is that a smaller bird is actually easier to handle than a big one. It cooks faster, fits in most ovens without a fuss, and is far less intimidating for beginners.
If you have been wondering how to cook small turkey in oven like a pro, you are in the right place. This guide covers everything you need to know. We will walk through choosing the bird, preparing it, seasoning it, cooking it, and serving it. By the end, you will feel confident enough to roast a turkey that is juicy, flavorful, and absolutely delicious.
The beauty of a small turkey is that it does not require special equipment or years of experience. You just need a reliable oven, a few simple ingredients, and a little patience. Let us dive into the details and make your next turkey roast a success.
Key Takeaways
- Choose the Right Size: A small turkey (under 12 pounds) cooks faster and more evenly, making it ideal for ovens of all sizes.
- Brine for Moisture: Brining your turkey overnight keeps the meat juicy and adds flavor deep into the muscle fibers.
- Use a Meat Thermometer: The internal temperature must reach 165°F in the thickest part of the thigh for safe, perfectly cooked turkey.
- Rest Before Carving: Letting the turkey rest for 20 to 30 minutes allows the juices to redistribute for a moist, tender result.
- Low and Slow Works Best: Cooking at 325°F ensures even roasting without drying out the bird.
- Season Simply but Effectively: Butter, herbs, garlic, and citrus create classic, crowd-pleasing flavor without complicated techniques.
📑 Table of Contents
- Choosing the Right Small Turkey
- Preparing Your Turkey for the Oven
- Seasoning and Flavoring Your Turkey
- Cooking Time and Temperature Guide for Small Turkey
- Checking Doneness and Resting the Turkey
- Carving and Serving Your Roasted Turkey
- Common Mistakes to Avoid When Roasting Turkey
- Expert Tips for the Perfect Oven Roasted Turkey
- Storing and Reheating Leftover Turkey
- Frequently Asked Questions
- Conclusion
Choosing the Right Small Turkey
Before you even turn on the oven, selecting the right bird matters a lot. A small turkey typically weighs between 8 and 12 pounds. This size range is perfect for most home ovens because it fits comfortably on a roasting pan without crowding the space.
Fresh vs. Frozen Turkey
You can buy fresh or frozen turkey for your roast. Fresh turkey tends to have better texture and flavor, but it costs more and must be cooked within a day or two of purchase. Frozen turkey is more affordable and lasts much longer in the freezer. If you go frozen, plan ahead to thaw it properly in the refrigerator for about 24 hours per 4 to 5 pounds of weight.
Self-Basting vs. Heritage Turkey
Most grocery store turkeys are self-basting, which means they have been injected with a salt solution. This helps them stay moist during cooking. Heritage turkeys are raised more slowly and have a richer flavor, but they can dry out faster if you are not careful. For oven roasting, a self-basting bird is a great choice for beginners.
Breast vs. Whole Bird
Some people prefer turkey breast only because it cooks faster and is easier to carve. But a whole bird gives you the classic roast experience with both white and dark meat. If you want the full experience, go with a whole small turkey. The bone-in structure helps keep the meat moist and adds more flavor to your cooking juices.
Preparing Your Turkey for the Oven
Proper preparation is the secret to a great roast. Taking the time to prep your bird correctly makes a huge difference in the final result. This step is where many people cut corners, but it really matters.
Thawing Your Turkey Safely
If your turkey is frozen, never thaw it at room temperature. Bacteria can grow quickly on the outer surface while the inside is still frozen. Instead, place the wrapped turkey on a tray in the refrigerator and let it thaw slowly. For a small turkey, this usually takes two to three days. You can also thaw it in cold water, changing the water every 30 minutes, which takes about 4 to 6 hours for a bird under 12 pounds.
Brining for Extra Juiciness
Brining is one of the best things you can do for your turkey. A basic brine is just water, salt, and sugar. Some people add bay leaves, peppercorns, or citrus zest for extra flavor. Submerge the turkey in the brine for 12 to 24 hours in the refrigerator. The salt helps the meat retain moisture during cooking, which is especially helpful for leaner birds.
If you do not have time to brine, dry brining works too. Simply rub salt all over the turkey and let it sit uncovered in the fridge overnight. This draws out moisture, which then gets reabsorbed into the meat, seasoning it deeply and improving the texture.
Patting Dry and Bringing to Room Temperature
After brining, remove the turkey from the liquid and pat it completely dry with paper towels. Moisture on the surface creates steam instead of crisp skin. Then, let the turkey sit at room temperature for about 30 to 60 minutes before roasting. This helps the bird cook more evenly from edge to center.
Seasoning and Flavoring Your Turkey
Seasoning is where you can get creative. A simple approach works beautifully, but you can also experiment with flavors that suit your taste. The goal is to enhance the natural flavor of the turkey without overpowering it.
The Classic Butter Herb Rub
Start with softened butter mixed with minced garlic, chopped fresh herbs like rosemary, thyme, and sage, and a pinch of salt and pepper. Gently loosen the skin over the breast and rub some butter underneath. Then spread the rest over the outside of the bird. This creates a golden, crispy skin and infuses the meat with rich flavor from the inside out.
Citrus and Aromatic Additions
Adding citrus to your turkey is a game changer. Cut an orange or lemon in half and stuff it inside the cavity along with a few sprigs of fresh herbs. The citrus oils release steam as the bird cooks, adding a bright, fresh note to the meat. You can also place onion quarters, garlic cloves, and celery pieces inside the cavity for extra aroma.
Dry Rub Alternative
If you prefer a dry rub, mix smoked paprika, garlic powder, onion powder, cumin, salt, and black pepper. Rub this all over the turkey, including under the skin. A dry rub creates a beautifully textured, deeply flavored crust on the outside. It is also faster to prepare than a wet brine, making it a great option for weeknight cooks.
Cooking Time and Temperature Guide for Small Turkey
Getting the temperature and timing right is the most important part of how to cook small turkey in oven. Too high and the outside burns before the inside is done. Too low and the bird takes forever to roast. The sweet spot for most small turkeys is 325°F.
Recommended Oven Temperature
Set your oven to 325°F for a steady, even roast. This moderate temperature allows the turkey to cook through gently without drying out the breast meat. If you prefer crispier skin, you can start at 425°F for the first 20 minutes and then reduce to 325°F for the remainder of cooking. This trick gives you a beautiful golden exterior while keeping the inside moist.
General Cooking Time Chart
Cooking time depends on the weight of your turkey. Here is a simple guide to follow:
- 8 to 10 pounds: About 2.5 to 3 hours at 325°F
- 10 to 12 pounds: About 3 to 3.5 hours at 325°F
These times are approximate. Always use a meat thermometer to check for doneness rather than relying solely on the clock. The turkey is safe to eat when the internal temperature reaches 165°F in the thickest part of the thigh, not touching bone.
Roasting Pan and Rack Tips
Place your turkey on a V-rack or roasting rack inside a roasting pan. Elevating the bird allows hot air to circulate around it evenly, which promotes crispy skin on all sides. If you do not have a rack, you can use chopped onions and carrots as a bed to lift the turkey off the bottom of the pan. This also adds flavor to the drippings, which you can use for gravy.
Basting for Moisture
Basting your turkey every 45 minutes to one hour helps keep the surface moist and builds flavor. Use a bulb baster or a large spoon to scoop up the pan juices and pour them over the bird. Some cooks skip basting to avoid opening the oven door and losing heat, but for a small turkey, the extra few minutes of open-door time will not significantly affect cooking time.
Checking Doneness and Resting the Turkey
Knowing when your turkey is done is critical for both food safety and taste. Undercooked turkey can be a health risk, while overcooked turkey turns dry and tough. Getting this step right separates a good roast from a great one.
Using a Meat Thermometer
A digital instant-read thermometer is your best friend when roasting turkey. Insert it into the thickest part of the thigh, making sure the probe does not touch the bone. The temperature should read 165°F for safe consumption. Check the breast as well, aiming for the same 165°F target. If the thigh is at 165°F but the breast is slightly below, you can tent the breast with foil and give it a few more minutes.
Some cooks prefer to pull the turkey out at 160°F because the temperature will continue to rise during resting. This technique, called carryover cooking, prevents overcooking and keeps the meat juicy.
The Importance of Resting
Once the turkey reaches the right temperature, take it out of the oven and let it rest for at least 20 to 30 minutes. This resting period is just as important as the cooking itself. During resting, the juices inside the meat relax and redistribute evenly throughout the bird. If you carve too soon, all those juices run out onto the cutting board instead of staying in the meat.
Tent the turkey loosely with aluminum foil while it rests. This keeps it warm without trapping too much steam, which would soften the crispy skin you worked so hard to achieve.
Carving and Serving Your Roasted Turkey
Carving a turkey can feel intimidating, but it is actually quite simple once you know the basics. A sharp knife and a steady hand are all you need.
Basic Carving Steps
- Remove the twine and any cavity stuffing.
- Cut along the joint connecting the thigh to the body and pull the leg away.
- Slice through the joint to separate the drumstick from the thigh.
- Make horizontal cuts along the breast and then slice downward at a slight angle for clean, even pieces.
- Remove the wings in the same way as the legs, cutting at the joint.
Making Gravy from Pan Drippings
Do not throw away the drippings in the roasting pan. They are pure gold for making gravy. Pour off the excess fat, leaving the browned bits at the bottom. Add a cup or two of chicken broth and scrape up the fond with a wooden spoon. Simmer the mixture, thicken it with a cornstarch slurry or flour, and season with salt and pepper. Homemade turkey gravy elevates the entire meal.
Serving Suggestions
Serve your roasted turkey alongside classic sides like mashed potatoes, cranberry sauce, green beans, dinner rolls, and stuffing. The combination of flavors and textures makes for a memorable meal. Leftover turkey makes excellent sandwiches, soups, and casseroles the next day, so plan ahead if you want to enjoy it for days after.
Common Mistakes to Avoid When Roasting Turkey
Even experienced cooks make mistakes sometimes. Knowing what to avoid saves you time, money, and a lot of frustration.
- Skipping the thermometer: Relying on time alone often leads to undercooked or overcooked turkey. Always use a meat thermometer.
- Cooking at too high a temperature: High heat dries out the breast meat before the thighs are fully cooked. Stick to 325°F for best results.
- Not letting the turkey rest: Cutting into the bird immediately after it comes out of the oven causes the juices to escape, leaving dry meat.
- Overcrowding the pan: Make sure the turkey has room to breathe in the oven. Crowding blocks airflow and leads to uneven cooking.
- Forgetting to season underneath the skin: Placing butter and herbs under the skin is one of the easiest ways to add serious flavor to the breast meat.
Expert Tips for the Perfect Oven Roasted Turkey
Here are a few extra tips from experienced cooks that will take your turkey to the next level. These small adjustments make a big difference in flavor, texture, and overall success.
First, rub the outside of the turkey with a thin layer of olive oil before applying your seasoning. Oil helps the skin crisp up and turn golden brown in the oven. Second, place a few pats of butter under the skin over the breasts. This bastes the meat from the inside and adds incredible richness. Third, if you have time, let the turkey sit uncovered in the refrigerator overnight after brining. The dry surface promotes even crispier skin during roasting.
Another pro tip is to tent the breast with foil during the last 30 to 45 minutes of cooking if it is browning too fast. This protects the lean breast meat from drying out while the darker thigh meat continues to develop flavor. Remove the foil during the last 10 minutes to let the skin finish crisping up.
Finally, do not forget to save the drippings. Even if you are not planning to make gravy right away, refrigerate the drippings and use them later in soups, stews, or risotto. They add a deep, savory turkey flavor that store-bought broth simply cannot match.
Storing and Reheating Leftover Turkey
If you have leftovers, proper storage keeps the turkey fresh and safe to eat. Let the cooked turkey cool to room temperature within two hours of cooking. Store it in an airtight container in the refrigerator for up to four days. For longer storage, wrap the turkey tightly in freezer-safe packaging and freeze it for up to three months.
When reheating, add a splash of broth or water to keep the meat from drying out. Cover with foil and warm in the oven at 325°F for about 20 to 30 minutes, or until heated through. A microwave works in a pinch but can make the skin soggy, so the oven is the best method for maintaining texture and flavor.
Frequently Asked Questions
How long does it take to cook a small turkey in the oven?
A small turkey weighing 8 to 12 pounds typically takes between 2.5 and 3.5 hours at 325°F. The exact time depends on the weight of the bird, whether it is stuffed, and your specific oven. Always use a meat thermometer to confirm doneness rather than relying on time alone.
What is the best temperature to cook a small turkey?
The recommended temperature for cooking a small turkey is 325°F. This moderate heat allows the bird to cook evenly throughout without drying out the breast meat. The turkey is safe to eat when the internal temperature reaches 165°F in the thickest part of the thigh.
Should I cover my turkey with foil while roasting?
You do not need to cover the turkey for the entire cook. However, tenting the breast with foil during the last 30 to 45 minutes can prevent it from over-browning or drying out. Remove the foil during the final 10 minutes to allow the skin to crisp up nicely.
Do I need to brine a small turkey before roasting?
Brining is not strictly necessary, but it significantly improves moisture and flavor. A wet brine of water, salt, and sugar for 12 to 24 hours works wonders. If you do not have time, a dry brine with just salt rubbed on the surface and left overnight in the fridge is a quick and effective alternative.
How do I know if my turkey is done without a thermometer?
While a thermometer is the most reliable method, you can check by piercing the thickest part of the thigh. If the juices run clear and not pink, the turkey is likely done. However, this method is less accurate, and a thermometer takes the guesswork out completely.
Can I cook a stuffed small turkey in the oven?
Yes, you can cook a stuffed turkey, but it will take longer because the stuffing needs to reach a safe internal temperature of 165°F as well. Stuff the turkey loosely right before cooking, and be sure to check the temperature of both the meat and the stuffing before serving.
Conclusion
Learning how to cook small turkey in oven is a skill that anyone can master with a little practice and the right guidance. From choosing the perfect bird to seasoning it well, roasting it at the right temperature, and letting it rest properly, every step contributes to a delicious outcome. The process may seem daunting at first, but once you try it, you will see how manageable and rewarding it really is.
A small turkey is the ideal choice for home cooks. It fits in standard ovens, cooks in a reasonable timeframe, and delivers incredible flavor with minimal effort. Whether you are preparing a holiday feast or a simple weekend dinner, the tips and techniques in this guide will help you achieve consistently great results.
So go ahead and give it a try. Choose a good bird, season it with care, and let your oven do the work. With these simple tips, you will be serving up juicy, flavorful turkey that your family and friends will love. Happy cooking!