How To Dry Pinecones In Oven For Home Decor Projects
Drying pinecones in the oven is the fastest and most reliable way to prepare them for home decor projects. This simple method removes moisture, prevents pests, and makes pinecones safe to use indoors. Whether you want to craft wreaths, centerpieces, or ornaments, oven-dried pinecones are a game-changer for your DIY toolkit.
Have you ever walked through a pine forest and picked up a beautiful pinecone, only to have it release sap or bring tiny bugs into your home? That frustrating experience happens to the best of us. How to dry pinecones in oven is one of the simplest and most effective solutions to this common problem.
Whether you are planning a holiday wreath, a rustic centerpiece, or a festive garland, drying pinecones in the oven gives you clean, pest-free, and beautifully preserved cones ready for any project. This guide walks you through every step with clear instructions and practical tips. You will learn why oven drying works so well, how to prep your pinecones, and what to do once they are dry.
By the end of this article, you will feel confident enough to gather pinecones from your yard or a local park and turn them into stunning home decor pieces. Let us get started!
Key Takeaways
- Oven drying is the quickest method: It takes just 2 to 3 hours at a low temperature.
- Low heat is essential: Keep your oven between 200°F and 250°F to avoid burning.
- Proper prep makes a big difference: Cleaning pinecones before drying removes dirt and insects.
- Dried pinecones last for years: They won’t release sap or attract bugs once fully dried.
- Endless decor possibilities: Use dried pinecones for wreaths, centerpieces, ornaments, and more.
- Safety matters: Always monitor pinecones in the oven and let them cool completely before handling.
📑 Table of Contents
- Why Dry Pinecones in the Oven?
- How to Prep Pinecones Before Drying
- Step-by-Step Guide: How to Dry Pinecones in Oven
- Tips for Perfect Oven-Dried Pinecones
- Creative Home Decor Projects with Dried Pinecones
- Common Mistakes to Avoid When Drying Pinecones
- How to Preserve and Store Dried Pinecones
- Safety Tips for Drying Pinecones in the Oven
- Conclusion
Why Dry Pinecones in the Oven?
There are many ways to dry pinecones. You can air-dry them on a shelf for days or use a dehydrator. But the oven method stands out for several important reasons. How to dry pinecones in oven techniques offer speed, reliability, and peace of mind.
When you air-dry pinecones, they can take several days to fully dry. During that time, they may attract insects or develop mold. The oven method speeds up the process dramatically and kills any hidden bugs or larvae at the same time. Here is why so many crafters choose this approach:
- Speed: Oven drying takes just 2 to 3 hours instead of days.
- Pest elimination: The heat kills any insects or eggs hiding inside the scales.
- Sap removal: Heat causes the sap to melt and drip away, leaving clean cones.
- Scales open up: Oven heat naturally opens the pinecone scales for a fuller look.
- Consistent results: Every pinecone dries evenly when you follow the right temperature.
Oven Drying vs. Air Drying vs. Dehydrator
Not sure which drying method is best for you? Here is a quick comparison of the three most popular approaches to drying pinecones for home decor projects.
| Method | Time Required | Pest Prevention | Ease of Use | Best For |
|---|---|---|---|---|
| Oven Drying | 2-3 hours | Yes, heat kills bugs | Very easy | Quick projects and bulk drying |
| Air Drying | 3-7 days | No, risk of insects | Easiest | Small batches with no rush |
| Dehydrator | 4-8 hours | Yes, heat kills bugs | Easy | Frequent crafters with dehydrators |
As you can see, oven drying pinecones offers the best balance of speed and effectiveness. You do not need any special equipment beyond your kitchen oven. It is the go-to method for most DIY enthusiasts and seasonal decorators.
How to Prep Pinecones Before Drying
Proper preparation is the secret to great results. Skipping this step can lead to dirty, sap-covered, or bug-infested cones in your finished decor. Before you learn how to dry pinecones in oven, take the time to prep them right.
Step 1: Gather and Inspect Your Pinecones
Start by collecting pinecones from your yard, a local park, or a craft store. Look for cones that are fully closed and feel dry to the touch. Avoid cones that are already open and brittle, as they may be too old or damaged. Give each cone a quick visual inspection for visible insects or debris.
Step 2: Clean the Pinecones
Cleaning removes dirt, pollen, and any hidden critters. You have two great options for this step:
- Brush method: Use a soft-bristle brush to gently remove loose dirt and debris from each cone.
- Vinegar soak: Mix equal parts white vinegar and warm water in a basin. Soak the pinecones for 20 to 30 minutes, then rinse them under clean water.
The vinegar soak is especially effective at killing surface bacteria and removing sticky sap. After soaking, lay the pinecones on a towel and pat them dry gently.
Step 3: Soak in Vinegar (Optional but Recommended)
Many experienced crafters recommend a vinegar soak before oven drying. This step does three important things:
- Kills hidden insects: The acidic solution eliminates any bugs or eggs inside the scales.
- Removes sap residue: Vinegar helps dissolve sticky sap that can be hard to wipe off.
- Brightens the color: Soaking can make the natural brown and tan tones of the pinecone pop.
After the soak, let the pinecones drain on a wire rack for about 30 minutes. They do not need to be bone dry before going into the oven because the heat will finish the job.
Quick Tips for Prep
- Wear gloves if you have sensitive skin. Pinecone sap can be sticky and irritating.
- Do not soak pinecones for too long. Over 30 minutes can make them waterlogged.
- Use a baking sheet lined with parchment paper for easy cleanup later.
Step-by-Step Guide: How to Dry Pinecones in Oven
Now for the main event. How to dry pinecones in oven is straightforward, but paying attention to temperature and timing makes all the difference. Follow these steps carefully for perfect results every single time.
Step 1: Preheat Your Oven
Set your oven to the lowest possible temperature. Most ovens can go as low as 170°F, but the ideal range is between 200°F and 250°F. This low heat slowly drives out moisture without burning or charring the pinecone. Avoid using the broiler setting, as direct high heat will ruin the cones.
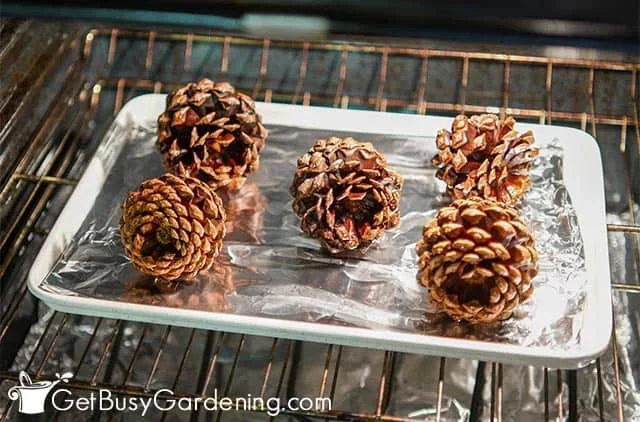
While the oven preheats, line a baking sheet with parchment paper or aluminum foil. This prevents sap from sticking to the pan and makes cleanup a breeze.
Step 2: Arrange Pinecones on the Baking Sheet
Place the pinecones on the lined baking sheet. Leave space between each cone so hot air can circulate freely around them. Do not stack or overlap the pinecones. If you have a lot of cones, use two baking sheets and rotate them halfway through the drying process.
For best results, place the pinecones with the pointed ends facing up. This position allows sap to drip away naturally during the drying process.
Step 3: Place in the Oven and Set a Timer
Put the baking sheet on the middle rack of your oven. Set a timer for 2 to 3 hours. The drying time depends on the size of the pinecones and how moist they are. Smaller cones may be ready in 90 minutes, while larger ones could need the full 3 hours.
Here is a helpful reference guide for different pinecone sizes:
- Small pinecones (2-3 inches): 1.5 to 2 hours
- Medium pinecones (3-5 inches): 2 to 2.5 hours
- Large pinecones (5+ inches): 2.5 to 3 hours
Step 4: Check and Rotate Halfway Through
After about 1 to 1.5 hours, open the oven and check the pinecones. You should see the scales starting to open up slightly. Use oven mitts to rotate each pinecone and swap the positions of the baking sheets if you are using two. This ensures even drying on all sides.
Step 5: Cool Completely Before Handling
Once the pinecones look dry and the scales are fully open, turn off the oven. Leave them inside with the door slightly cracked for about 30 minutes. Then transfer them to a wire rack and let them cool to room temperature. Do not handle warm pinecones because the scales may still be flexible and could close back up.
Fully cooled pinecones feel light, dry, and rigid. The scales should stay open and look beautifully textured. At this point, your oven-dried pinecones are ready for any craft project you have in mind.
Tips for Perfect Oven-Dried Pinecones
Even with a simple method like this, a few pro tips can elevate your results. These insights come from experienced crafters who dry pinecones regularly for seasonal decor and craft projects.
Use Parchment Paper, Not Wax Paper
This is a common mistake people make. Wax paper can melt or stick to pinecones at oven temperatures. Always use parchment paper or a silicone baking mat. These materials withstand heat and prevent any unwanted sticking.
Keep the Oven Door Slightly Cracked
Cracking the oven door about 2 inches allows moisture to escape during the drying process. This prevents steam from building up inside the oven, which could make the pinecones damp again. If your oven does not stay cracked open easily, prop the door with a wooden spoon handle.
Line the Bottom of the Oven
Pinecone sap can drip and make a mess inside your oven. To protect the bottom of your oven, place a layer of aluminum foil or a silicone mat on the rack below the pinecones. This catches any drips and makes post-baking cleanup effortless.
Add Essential Oils for Scent (Optional)
One of the best things about dried pinecones is their natural woody, foresty scent. But you can make them smell even more amazing. After the pinecones cool, lightly spritz them with a mix of water and a few drops of your favorite essential oil. Cinnamon, clove, or pine oil work beautifully for a holiday fragrance.
Expert Insight: The Sap Factor
According to craft experts, the sap inside pinecones is the biggest challenge when drying them. Oven heat melts the sap and causes it to drip away from the cone. This is actually a good sign. If you see sap pooling on your parchment paper, that means the drying process is working correctly. Just replace the paper between batches if needed.
Creative Home Decor Projects with Dried Pinecones
Now that your pinecones are perfectly dry, the fun really begins. Dried pinecones for home decor offer endless creative possibilities. These natural beauties add warmth, texture, and a rustic charm to any room in your home.
Pinecone Wreath
A pinecone wreath is one of the most popular seasonal decorations. Start with a foam or grapevine wreath base. Hot glue the dried pinecones onto the wreath, layering them in a circular pattern. You can add ribbons, faux berries, or eucalyptus sprigs for extra flair. Hang it on your front door or above a mantel for an instant cozy feel.
Pinecone Centerpiece
Create a stunning table centerpiece by arranging dried pinecones in a wooden bowl or on a tray. Mix in candles, dried oranges, and sprigs of greenery for a beautiful holiday tablescape. This type of natural centerpiece decoration works for Thanksgiving, Christmas, or any fall gathering.
Pinecone Ornaments
Turn small pinecones into charming ornaments for your Christmas tree. Tie a ribbon around the top of each cone and hang it from branches. For a more polished look, spray the pinecones with gold or silver paint before they dry. These handmade ornaments make thoughtful gifts for friends and family.
Pinecone Garland
String dried pinecones together with twine or thin wire to create a rustic garland. Drape it along a fireplace mantel, a staircase railing, or a window frame. You can alternate pinecones with dried orange slices or cinnamon sticks for a beautiful seasonal display.
Pinecone Bird Feeders
Dried pinecones also make excellent bird feeders. Spread peanut butter all over the cone, then roll it in birdseed. Hang it from a tree branch with twine and watch the birds flock to your yard. This is a wonderful family-friendly activity that brings nature closer to home.
Common Mistakes to Avoid When Drying Pinecones
Even a simple process like oven drying can go wrong if you are not careful. Here are the most common mistakes people make, and how to avoid them.
Setting the Oven Too Hot
This is the number one mistake. Temperatures above 250°F can scorch pinecones, turning them dark brown or black. The goal is gentle, low heat that slowly draws out moisture. Stick to the 200°F to 250°F range and be patient. Rushing the process with higher heat will ruin your pinecones.
Skipping the Cleaning Step
Some people toss pinecones straight into the oven without cleaning them first. This can bring dirt, mold spores, and insects into your home. Always clean your pinecones thoroughly before drying. A quick vinegar soak takes minutes but saves you from a big headache later.
Overcrowding the Baking Sheet
Crowding pinecones on the baking sheet blocks airflow and leads to uneven drying. Some cones may dry while others stay damp and sticky. Give each pinecone enough space. If you need to dry a large batch, use multiple baking sheets and rotate them in the oven.
Not Letting Pinecones Cool Fully
Handling warm pinecones can cause the scales to close up or snap off. Always let them cool completely on a wire rack before you start crafting. Patience at this stage pays off with beautiful, intact cones that hold their shape perfectly.
Storing Dried Pinecones Improperly
Once dried, pinecones can absorb moisture from the air and become damp again. Store them in airtight containers or sealed plastic bags with a packet of silica gel to absorb any residual moisture. Proper storage keeps your dried pinecones for crafts ready to use for months or even years.
How to Preserve and Store Dried Pinecones
Dried pinecones can last for a very long time if you store them correctly. The key is keeping moisture out, because humidity is the natural enemy of dried pinecones.
For short-term storage, place dried pinecones in a decorative basket or bowl in a dry room. For long-term storage, follow these steps:
- Place pinecones in a large zip-lock bag or airtight container.
- Add a few silica gel packets to absorb any remaining moisture.
- Store in a cool, dry place away from direct sunlight.
- Check periodically for any signs of moisture or mold.
If you notice a pinecone has absorbed moisture and the scales are closing up, you can pop it back in the oven at 200°F for 30 minutes to re-dry it. This simple trick brings them back to their original beauty.
Another preservation option is to spray dried pinecones with a clear acrylic sealer. This creates a protective barrier that locks in the color and texture. Sealed pinecones also shed less pollen, which is great if you have allergies. Many crafters use this technique for resin pinecone crafts and other projects where longevity matters.
Safety Tips for Drying Pinecones in the Oven
While oven drying pinecones is generally safe, a few precautions keep you and your home protected during the process.
- Never leave the oven unattended: Pinecones can produce smoke if they get too hot. Stay nearby and check on them regularly.
- Use a well-ventilated kitchen: The drying process can release a mild resinous smell. Opening a window or turning on the range hood helps keep the air fresh.
- Keep children and pets away: The hot baking sheet and oven pose a burn risk. Set up a safe zone while the pinecones are drying.
- Dispose of any drippings safely: Pinecone sap can be flammable. Clean up any drips on the parchment paper promptly to avoid buildup.
Following these simple safety guidelines ensures a smooth and worry-free experience. Once you see how easy and rewarding how to dry pinecones in oven truly is, you will want to make it a seasonal tradition in your home.
Conclusion
How to dry pinecones in oven is one of the simplest and most satisfying DIY skills you can learn. In just a few hours, you can transform raw pinecones into clean, beautiful, and ready-to-use craft supplies. Whether you are making a holiday wreath, a rustic centerpiece, or a unique gift, oven-dried pinecones bring natural warmth and charm to any space.
The process is easy to master, requires minimal supplies, and delivers consistent results every time. Clean your pinecones well, keep the oven temperature low, and let them cool completely before crafting. Follow these steps and you will have gorgeous dried pinecones for home decor that last for years.
Now it is your turn. Gather some pinecones, preheat your oven, and start creating. Your home decor projects are about to get a whole lot more beautiful and personal. Happy crafting!
Frequently Asked Questions
Can I dry pinecones in the oven at 200 degrees?
Yes, 200°F is an ideal temperature for drying pinecones in the oven. It is low enough to prevent burning while effectively removing moisture. Simply place the pinecones on a parchment-lined baking sheet and monitor them for 2 to 3 hours.
How long does it take to dry pinecones in the oven?
Most pinecones take between 2 and 3 hours to dry fully in the oven. Smaller cones may be ready in 90 minutes, while larger cones can take up to 3 hours. Check them periodically and rotate the pan for even drying.
Do dried pinecones attract bugs?
No, properly dried pinecones do not attract bugs. The oven heat kills any insects or larvae hiding inside the scales. As long as you store them in airtight containers, they remain pest-free for months.
Can I use any type of pinecone for oven drying?
Most pinecone varieties work well for oven drying. Look for cones that are closed and feel dry. Avoid cones that are already open, brittle, or visibly damaged, as they may not dry as nicely or hold their shape.
Is it safe to dry pinecones in the oven indoors?
Yes, it is safe as long as you follow basic precautions. Keep the oven temperature low, stay nearby while the pinecones dry, and ensure your kitchen is well-ventilated. Pinecones can produce a mild resinous smell, which is normal and not harmful.
Can I spray paint dried pinecones after oven drying?
Absolutely! Spray painting dried pinecones is a popular craft technique. Let the cones cool completely first, then apply a light coat of spray paint in a well-ventilated area. Gold, silver, and white are favorite colors for holiday decorations and seasonal crafts.