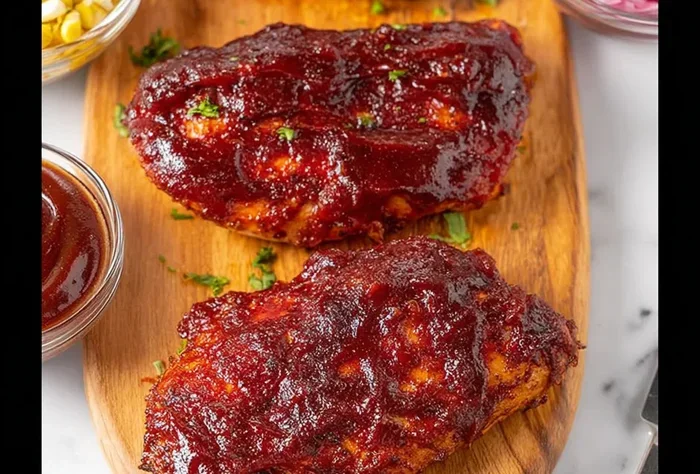
How To Make Bbq Chicken Breast In Oven With Juicy Results
Making BBQ chicken breast in the oven is simple, fast, and delivers big flavor. This guide walks you through every step from prep to plating so your chicken stays juicy and tender. You will learn the best temperature, timing, marinade tips, and common mistakes to avoid. Whether you are a beginner or a seasoned cook, this method guarantees delicious oven-baked chicken that the whole family will love.
There is something magical about a perfectly baked BBQ chicken breast. The aroma fills the kitchen, the edges get just slightly caramelized, and the inside stays moist and tender. Yet so many people struggle with dry, bland chicken coming out of their oven.
If you have ever wondered how to make BBQ chicken breast in oven that actually tastes amazing, you are in the right place. This guide covers everything from choosing the right cut to nailing the perfect internal temperature. By the end, you will have all the tools and tricks to make BBQ chicken breast in oven that rivals your favorite restaurant. Let us dive in.
Key Takeaways
- Brine or marinate first: Soaking chicken breast in a BBQ-flavored marinade for at least 30 minutes locks in moisture and adds deep flavor to your oven-baked chicken.
- Bake at 400°F for best results: This high temperature creates a slightly crispy exterior while keeping the inside tender and juicy.
- Use a meat thermometer: Internal temperature of 165°F is the single most important factor for perfectly cooked BBQ chicken breast.
- Let it rest before cutting: Resting the chicken for 5-10 minutes after baking keeps the juices inside instead of losing them on the cutting board.
- Homemade BBQ sauce beats store-bought: A quick DIY sauce with ketchup, vinegar, and smoked paprika gives your chicken a restaurant-quality finish.
- Avoid overcooking: Thin chicken breasts can dry out fast, so timing and temperature monitoring are essential for moist results.
- Add wood chips for smoky flavor: A simple hack to get that grilled BBQ taste right from your oven without any special equipment.
📑 Table of Contents
- Why Oven-Baked BBQ Chicken Breast Is a Game Changer
- Choosing the Right Chicken Breast for Oven BBQ
- Preparing Your BBQ Chicken Breast for the Oven
- The Perfect Oven Temperature and Timing
- Making Your Own BBQ Sauce for the Best Flavor
- Step-by-Step Recipe for Juicy BBQ Chicken Breast
- Common Mistakes That Ruin BBQ Chicken Breast
- Quick Tips for Next-Level Results
- Serving Suggestions and Meal Ideas
- Expert Insights on Perfect Oven BBQ Chicken
- Storing and Reheating Leftover BBQ Chicken
- Conclusion
Why Oven-Baked BBQ Chicken Breast Is a Game Changer
Grilling chicken outside is great when the weather cooperates. But baking BBQ chicken breast in oven gives you consistent results no matter the season. You do not need a grill, charcoal, or even a backyard. Your oven handles everything.
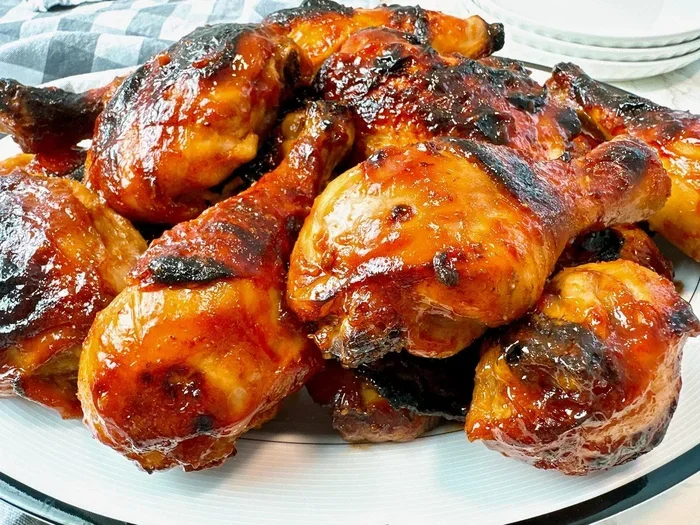
The beauty of oven baking is the even heat distribution. Unlike a grill where hot spots can burn one side, your oven surrounds the chicken with consistent warmth. This means juicy chicken breast with a beautiful charred glaze on every piece. Plus, cleanup is way easier than dealing with a greasy grill.
Another big reason people love oven baked chicken is flexibility. You can prep the night before, pop it in the oven when you get home, and have dinner ready in under 45 minutes. It fits busy schedules perfectly.
Health Benefits of Baking Over Frying
Baking chicken instead of frying cuts down on a lot of unnecessary fat. You still get that rich, smoky flavor without the extra oil. For anyone watching their calorie intake, oven roasted chicken is a smart choice that does not sacrifice taste.
Chicken breast is already a lean protein powerhouse. Baking it with a light coating of BBQ sauce keeps the nutritional profile strong. You get protein, flavor, and satisfaction all in one dish.
Choosing the Right Chicken Breast for Oven BBQ
Not all chicken breasts are created equal. The cut you choose makes a huge difference in how your final dish turns out. Here is what you need to know.
Bone-In vs Boneless
Boneless chicken breasts cook faster and are easier to eat. They are great for quick weeknight dinners. Bone-in breasts, on the other hand, have more flavor and stay juicier during cooking because the bone retains moisture.
If you are short on time, go with boneless. If you want maximum flavor and do not mind a slightly longer cook, bone-in is the way to go. Both work beautifully for BBQ chicken breast in oven recipes.
Thickness Matters
Evenly thick chicken breasts cook more predictably. Look for pieces that are about 1 to 1.5 inches thick. Thin breasts dry out fast, while very thick ones can leave the center undercooked if you are not careful.
If your chicken is uneven, you can pound the thicker parts with a meat mallet. This simple step ensures tender chicken breast throughout every bite.
Preparing Your BBQ Chicken Breast for the Oven
Preparation is where the magic starts. Taking a few extra minutes here makes a massive difference in the final result. Skipping this step is the number one reason people end up with dry chicken.
Brining for Maximum Moisture
Brining is the secret weapon of juicy chicken breast. A simple brine of water, salt, and sugar works wonders. The salt helps the muscle fibers retain moisture during cooking. Even a quick 30-minute brine makes a noticeable difference.
To brine your chicken, dissolve 1/4 cup salt and 1/4 cup sugar in 4 cups of cold water. Submerge the breasts and refrigerate for 30 minutes to 2 hours. Pat them dry before seasoning or marinating.
Marinating for Deep BBQ Flavor
After brining (or if you skip brining), a good marinade adds layers of flavor. For the best BBQ chicken breast marinade, combine your favorite BBQ sauce with a splash of apple cider vinegar and a drizzle of honey.
Marinate the chicken for at least 30 minutes. Overnight is even better if you have time. The acid in the vinegar helps tenderize the meat while the sugars in the sauce caramelize during baking.
Seasoning Beyond the Sauce
Do not rely on BBQ sauce alone for flavor. A dry rub underneath adds complexity. Mix smoked paprika, garlic powder, onion powder, black pepper, and a pinch of cayenne. Rub this generously over the chicken before adding any sauce.
This two-layer approach, dry rub plus wet sauce, creates a flavorful baked chicken experience that is hard to beat. The dry rub forms a beautiful crust while the sauce adds sweetness and tang.
The Perfect Oven Temperature and Timing
Getting the temperature right is the most critical step in making BBQ chicken breast in oven. Too low and the chicken takes forever. Too high and the outside burns before the inside cooks through.
Recommended Temperature: 400°F
400°F is the sweet spot for baking chicken breast. It is hot enough to create a nice sear on the outside but not so hot that it dries out the inside. Preheat your oven and give it at least 10 minutes to reach the target temperature.
If you prefer a slower cook, 375°F works too. Just add a few extra minutes to the baking time. The lower temperature is more forgiving for thicker cuts.
Baking Time Guide
Timing depends on the thickness of your chicken and whether it is bone-in or boneless. Here is a general guide:
- Boneless, 1-inch thick: 20 to 25 minutes at 400°F
- Boneless, 1.5-inch thick: 25 to 30 minutes at 400°F
- Bone-in, 1-inch thick: 25 to 30 minutes at 400°F
- Bone-in, 1.5-inch thick: 30 to 35 minutes at 400°F
These times are starting points. Always check the internal temperature with a meat thermometer. That is the only reliable way to know your chicken breast temperature is safe and perfect.
The Importance of a Meat Thermometer
A meat thermometer is the single best tool for cooking chicken. It removes all the guesswork. Insert it into the thickest part of the breast, avoiding the bone if present. You are aiming for 165°F internally. This is the USDA safe temperature and it also ensures the meat is fully cooked but not overdone.
Some cooks pull the chicken at 160°F and let carryover cooking bring it up to 165°F. This technique can result in even juicier meat. Either way, a thermometer is non-negotiable for perfect oven baked chicken.
Making Your Own BBQ Sauce for the Best Flavor
Store-bought BBQ sauce works in a pinch. But making your own takes your BBQ chicken breast in oven to a whole new level. It is surprisingly easy and gives you control over sweetness, tang, and spice.
Quick Homemade BBQ Sauce Recipe
Here is a simple sauce you can whip up in 10 minutes:
- 1/2 cup ketchup
- 2 tablespoons apple cider vinegar
- 1 tablespoon honey or brown sugar
- 1 teaspoon smoked paprika
- 1 teaspoon Worcestershire sauce
- 1/2 teaspoon garlic powder
- Salt and pepper to taste
Mix everything in a small saucepan and simmer for 5 minutes. This gives the flavors time to meld together. Brush the sauce on during the last 10 minutes of baking so it caramelizes without burning.
Smoky vs Sweet: Finding Your Style
Some people love a smoky BBQ sauce with bold spice. Others prefer a sweeter, milder version. You can adjust the recipe to match your taste. Add chipotle powder for extra smoke. Add more honey for sweetness. The beauty of homemade sauce is you make it exactly how you like it.
For an extra layer of flavor, try a honey BBQ glaze. Mix your base sauce with an extra tablespoon of honey and brush it on during the final 5 minutes. This creates a sticky, caramelized coating that looks and tastes incredible.
Step-by-Step Recipe for Juicy BBQ Chicken Breast
Now let us put it all together. Here is a complete walkthrough for making BBQ chicken breast in oven with juicy results.
Step 1: Prep the Chicken
Remove the chicken from the refrigerator 20 minutes before cooking. Letting it come to room temperature helps it cook more evenly. Pat it dry with paper towels and season with your dry rub.
Step 2: Preheat and Prep
Preheat your oven to 400°F. Line a baking sheet with foil or parchment paper for easy cleanup. Place a wire rack on top if you have one. The rack allows air to circulate around the chicken, which helps the skin get crispy.
Step 3: Bake
Place the chicken on the rack or baking sheet. Bake for 20 to 30 minutes depending on thickness. At the 20-minute mark, open the oven and brush the first layer of BBQ sauce on each piece. This early coat starts building flavor.
Bake for another 5 to 10 minutes. Check the internal temperature. Once it hits 165°F, pull the chicken out and brush on a second layer of sauce.
Step 4: Rest and Serve
Let the chicken rest for 5 to 10 minutes before cutting. This step is crucial. During resting, the juices redistribute throughout the meat. If you cut too early, those juices run out and you end up with drier chicken.
Serve with extra sauce on the side, some coleslaw, and cornbread. This makes a complete BBQ chicken dinner that everyone will enjoy.
Common Mistakes That Ruin BBQ Chicken Breast
Even experienced cooks make mistakes with oven-baked chicken. Knowing what to avoid saves you from dry, disappointing results.
Skipping the Rest Period
Cutting into chicken right after it comes out of the oven is the fastest way to lose moisture. Those juices need time to settle back into the meat. Be patient and let it rest.
Using Too Much Sauce Too Early
Applying BBQ sauce at the beginning of cooking causes it to burn. The sugars in the sauce caramelize and then char, creating a bitter taste. Always add sauce in the last 10 to 15 minutes of baking.
Not Pounding to Even Thickness
Uneven chicken breasts cook unevenly. Thin parts dry out while thick parts stay undercooked. Taking two minutes to pound the chicken to an even thickness saves you from a frustrating cooking experience.
Overcrowding the Pan
Squeezing chicken pieces too close together traps steam. Steam makes the surface soggy instead of crispy. Give each piece space so hot air can flow freely around them.
Quick Tips for Next-Level Results
Want to take your oven baked chicken from good to great? Try these expert tips.
- Add wood chips to a foil packet: Toss a handful of hickory or applewood chips in a foil packet and place it in the oven while the chicken bakes. It adds a subtle smoky flavor that mimics grilling.
- Butter baste halfway through: Melt some butter with garlic and brush it over the chicken at the halfway point. This adds richness and helps the skin brown beautifully.
- Double dip the sauce: Apply sauce at the 20-minute mark and again at the 28-minute mark. Two thin layers create a better glaze than one thick coat.
- Let the chicken finish in the sauce: After baking, simmer the chicken pieces in a warm pan of BBQ sauce for 2 to 3 minutes. This infuses extra flavor right at the end.
- Use a cast iron skillet: Baking on cast iron gives you a better sear and more even heat distribution than a regular baking sheet.
Serving Suggestions and Meal Ideas
BBQ chicken breast pairs beautifully with a wide range of sides. Here are some ideas to build a complete meal around your flavorful baked chicken.
For a light meal, serve with a fresh garden salad and some crusty bread. The acidity of a vinaigrette cuts through the richness of the BBQ sauce perfectly. For a heartier option, pair with coleslaw, baked beans, and corn on the cob. This is classic BBQ fare that never disappoints.
You can also use leftover oven roasted chicken in sandwiches, wraps, or salads the next day. Shredded BBQ chicken in a tortilla with some coleslaw and extra sauce makes an amazing lunch. It tastes even better the next day as the flavors meld together.
For meal prep, bake a large batch on Sunday and portion it out for the week. BBQ chicken breast in oven reheats well in the microwave or oven. It is one of the most versatile proteins you can cook.
Expert Insights on Perfect Oven BBQ Chicken
Professional chefs and food scientists agree on a few key principles that separate great chicken from mediocre chicken. Here is what the experts have to say.
First, always start with quality chicken. Free-range or organic chicken breast tends to have better flavor and texture than mass-produced options. The difference may be subtle, but it adds up over time.
Second, do not be afraid of salt. Salt is the foundation of flavor in any BBQ chicken breast recipe. The brining step uses salt intentionally to improve moisture retention. Even if you skip brining, seasoning the chicken well with salt before baking makes a noticeable difference.
Third, understand carryover cooking. The internal temperature of the chicken will rise 3 to 5 degrees after you pull it from the oven. This is why many experts recommend pulling the chicken at 160°F instead of waiting for 165°F. It accounts for this rise and prevents overcooking.
Finally, trust your instincts and tools. A meat thermometer, a good timer, and a well-tested recipe are all you need. Once you nail the basics of baking chicken in oven, you can experiment with different sauces, rubs, and techniques to make the dish your own.
Storing and Reheating Leftover BBQ Chicken
Leftover chicken is a bonus meal, but only if you store it properly. Let the chicken cool to room temperature within 2 hours of cooking. Store it in an airtight container in the refrigerator for up to 4 days.
To reheat, place the chicken in an oven-safe dish, cover it with foil, and warm it at 325°F for 10 to 15 minutes. This gentle reheating method keeps the chicken moist. Microwaving works in a pinch but can make the edges rubbery.
For freezer storage, wrap the chicken tightly in plastic wrap and then aluminum foil. It keeps well for up to 3 months. Thaw overnight in the refrigerator before reheating.
Conclusion
Making BBQ chicken breast in oven does not have to be complicated. With the right temperature, timing, and a little prep work, you can achieve juicy, flavorful results every single time. The key is to brine or marinate, bake at 400°F, use a meat thermometer, and let the chicken rest before serving.
This method gives you restaurant-quality oven baked chicken without any special equipment or skills. Whether you are cooking for yourself, your family, or a dinner party, this approach delivers consistently delicious BBQ chicken dinner ideas that everyone will love.
Start with the basic recipe, experiment with your own sauce flavors, and soon you will have a go-to meal that never fails. The best part is, once you learn how to make BBQ chicken breast in oven with juicy results, you will never go back to dry, boring chicken again.
Frequently Asked Questions
Can I use frozen chicken breast for this recipe?
Yes, you can, but thaw it completely before baking for even cooking. Frozen chicken will cook unevenly and may result in dry edges while the center stays raw. Thaw overnight in the refrigerator for the best results with your BBQ chicken breast in oven recipe.
How do I know when BBQ chicken breast is done in the oven?
The only reliable way is to use a meat thermometer. Insert it into the thickest part of the breast and look for 165°F. The chicken should also be white throughout with clear juices, not pink. This ensures your oven baked chicken is both safe and perfectly cooked.
Can I make BBQ sauce from scratch without ketchup?
Absolutely. You can use tomato paste, molasses, or even fruit preserves as a base. Mix with vinegar, honey, and spices for a custom BBQ chicken breast recipe that suits your taste. Homemade sauce often tastes better and lets you control the sweetness and spice levels.
What is the best way to keep chicken breast moist in the oven?
Brining is the single best technique. A saltwater soak for 30 minutes to 2 hours helps the meat retain moisture during baking. Also, avoid overcooking by pulling the chicken at 165°F and letting it rest for 5 to 10 minutes before cutting. These steps make a huge difference for juicy chicken breast.
Can I add vegetables to the same pan as the chicken?
Yes, you can. Vegetables like bell peppers, onions, and sweet potatoes pair wonderfully with BBQ chicken. Place them around the chicken on the pan and bake together. Just note that vegetables may need slightly different timing, so cut them into small, even pieces for consistent cooking.
How long can I marinate chicken breast for BBQ?
30 minutes is the minimum for flavor absorption, but overnight marinating works best for deep flavor. Just do not marinate for more than 24 hours, as the acid in the marinade can start to break down the meat and make it mushy. A 2 to 12 hour window is the sweet spot for flavorful baked chicken.