How To Light Ge Gas Oven The Very Quick And Easy Guide
Learning how to light a GE gas oven is simpler than most people think. Whether your oven uses a traditional pilot light or an electronic ignition system, this guide walks you through every step clearly and safely. You will also learn how to troubleshoot common problems, when to replace parts, and how to keep your GE gas oven running smoothly for years to come.
Have you ever stood in front of your GE gas oven, turned the knob, and waited… and waited… for the flame to appear? It can be frustrating, especially when you are hungry and just want to start cooking. The good news is that how to light a GE gas oven is a skill anyone can learn in just a few minutes.
GE gas ovens are built to be reliable and efficient. They come with either a traditional pilot light or a modern electronic ignition system. Both systems are designed to light quickly and safely, but sometimes they need a little help. This guide will show you exactly how to light your GE gas oven the right way, every time. We will also cover common problems, safety tips, and simple maintenance steps to keep your oven working perfectly.
Whether you are a first-time oven user or someone who has been cooking for years, this guide has something for you. We will break everything down into simple steps with clear explanations. No confusing jargon. No complicated diagrams. Just straightforward advice that gets results. Let us get started.
Key Takeaways
- Know your ignition type: GE gas ovens use either a pilot light or an electronic spark igniter, and the lighting process differs for each.
- Safety comes first: Always check for gas smells, ensure proper ventilation, and follow manufacturer guidelines before lighting.
- Common issues are fixable: Most problems like a failed igniter, clogged burner, or faulty spark electrode are easy to diagnose and resolve.
- Replacement is straightforward: Replacing a GE gas oven igniter is a DIY task that saves money and time.
- Regular maintenance helps: Cleaning burners and checking the gas supply line prevents most ignition problems.
- When in doubt, call a pro: Complex gas issues or persistent problems should be handled by a qualified technician.
📑 Table of Contents
Understanding Your GE Gas Oven Ignition System
Before you try to light your oven, it helps to understand how the ignition system works. GE gas ovens use one of two main ignition methods. Knowing which one you have makes the process much easier and safer.
How the Igniter Works
The ignition system is the part of your oven that creates the spark or flame to light the gas. Without it, your oven simply will not work. The two most common systems in GE gas ovens are the pilot light and the electronic igniter.
A pilot light is a small, continuous flame that stays lit inside the oven. When you turn on the oven, gas flows to the burner and the pilot light ignites it. This system has been used in ovens for decades and is still found in some older GE models.
An electronic igniter, on the other hand, creates a spark when you turn the oven on. The most common type is the glow bar igniter. It heats up and glows bright orange when the oven is turned on. Once it reaches the right temperature, the gas valve opens and the burner lights. This is the system you will find in most modern GE gas ovens.
Types of Ignition Systems in GE Ovens
Here is a quick look at the two main ignition types found in GE gas ovens:
- Pilot Light System: Found in older models. Uses a small flame that is always on. Lights the gas burner when you turn the oven on. Very reliable but uses a small amount of gas continuously.
- Electronic Igniter (Spark Ignition): Found in most modern GE ovens. Creates a spark to light the gas. More energy-efficient and safer than a pilot light.
- Glow Bar Igniter: A type of electronic igniter that uses a heated filament to open the gas valve. Very common in current GE models.
To find out which system your oven uses, check your user manual. You can also look at the oven model number on the inside of the door frame or on the back of the unit. GE makes it easy to look up your model online and find detailed specifications.
Step-by-Step: How to Light GE Gas Oven
Now that you know what type of ignition system your oven uses, let us walk through the actual lighting process. Follow these steps carefully for safe and successful results.
Step 1: Prepare the Oven
Before you do anything, make sure your kitchen is well-ventilated. Open a window or turn on the range hood fan. This ensures any gas that may be lingering disperses quickly. Check the area around the oven to make sure nothing is blocking the vents or the burner.
Next, remove the oven racks if they are in the way. You want clear access to the oven floor and the burner area. This makes it easier to see what you are doing and prevents any items from getting in the way.
Step 2: Locate the Ignition Area
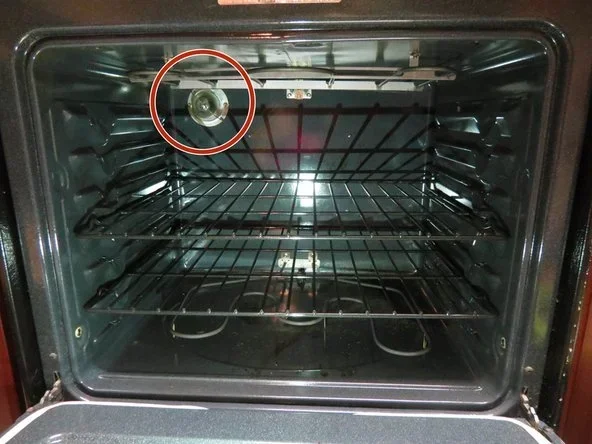
Open the oven door and look at the bottom of the oven cavity. You will see the bake burner and the igniter. The igniter is usually a small metal piece near the burner. In pilot light models, you will see a small flame near the front of the oven.
For electronic ignition models, look for the spark electrode. This is the part that creates the spark. It is usually located near the back of the burner. Do not touch the igniter or electrode with your bare hands, as oils from your skin can affect performance.
Step 3: Turn the Oven On
Set your oven to the desired temperature using the oven control knob or the digital control panel. If your oven has a knob, turn it to the bake setting. You should hear a clicking sound if your oven has an electronic igniter. That clicking is the spark electrode working.
For pilot light models, you may need to press and hold the knob for a few seconds before the pilot light ignites the main burner. Hold the knob down for about 30 seconds after the flame appears to let the thermocouple heat up.
Step 4: Check the Flame
Once you have turned the oven on, watch the burner carefully. You should see a steady blue flame across the bake burner. A blue flame means the gas is burning correctly and efficiently.
If the flame is yellow or orange, that is a sign of incomplete combustion. This can be dangerous and should be addressed immediately. A yellow flame may indicate a problem with the gas supply or the burner ports being clogged.
Step 5: Close the Oven Door and Wait
After the flame is lit and burning steadily, close the oven door. Give the oven a few minutes to reach the set temperature. Most GE gas ovens heat up quickly, but it can take 5 to 10 minutes to reach the target temperature.
You can use an oven thermometer to check the internal temperature if you want to be sure. This is especially helpful if you are baking something that requires precise temperature control.
Common Problems When Your GE Gas Oven Won’t Light
Sometimes, even when you follow all the steps, your GE gas oven will not light. This is more common than you might think, and the good news is that most causes are easy to fix. Let us look at the most common problems and how to solve them.
Igniter Failure
The most common reason a GE gas oven will not light is a failed igniter. Over time, the igniter can wear out or weaken. When this happens, it may glow but not get hot enough to open the gas valve. You might hear the clicking sound but see no flame.
To check the igniter, open the oven and look at the glow bar. If it glows dimly or takes a very long time to light the oven, the igniter is likely failing. Replacing a GE gas oven igniter is one of the most common and least expensive repairs you can do yourself.
Gas Supply Issues
If the igniter is working fine but the oven still will not light, the problem might be with the gas supply. Check to make sure the gas valve is fully open. The valve is usually located behind or near the oven.
Also, check the gas supply line for any kinks or blockages. If you recently moved the oven or had work done in your kitchen, the line may have been disturbed. A simple reset of the gas valve can often solve this problem.
Faulty Spark Electrode
In electronic ignition models, the spark electrode can become dirty or damaged. Grease and food debris can build up on the electrode and prevent it from creating a proper spark. Clean the electrode gently with a dry cloth or a small brush.
If cleaning does not help, the electrode may need to be replaced. Spark electrodes are inexpensive and easy to find at most appliance parts stores. Make sure you get the correct model for your specific GE oven.
Clogged Burner Ports
The burner ports are the small holes where the gas comes out. If these get clogged with food debris or grease, the flame will not light properly or will burn unevenly. Use a toothpick or a small needle to gently clean out each port.
Do not use anything sharp that could damage the burner. Be gentle and thorough. After cleaning, wipe the burner area clean and try lighting the oven again.
Thermocouple Problems
In pilot light models, the thermocouple is a safety device that senses whether the pilot light is on. If the thermocouple is not heated properly, it will shut off the gas supply. This is a safety feature and it is there to protect you.
If your pilot light keeps going out, the thermocouple may need to be adjusted or replaced. You can try bending the thermocouple closer to the pilot light to see if that fixes the issue. If not, a replacement thermocouple is an affordable and easy fix.
How to Replace a GE Gas Oven Igniter
If you have determined that your igniter is the problem, replacing it is a straightforward process. You do not need to be a professional technician to do this. With the right tools and a little patience, you can handle it yourself.
Signs You Need a Replacement
Here are the signs that your GE gas oven igniter needs to be replaced:
- The igniter glows but the oven does not light within 5 to 10 minutes.
- The igniter glows very dimly or not at all.
- The oven takes much longer than usual to heat up.
- You smell gas but the oven does not ignite.
- The igniter has visible cracks or damage.
DIY Replacement Steps
Follow these steps to replace your GE gas oven igniter safely:
- Turn off the power: Unplug the oven or turn off the circuit breaker. Safety always comes first.
- Turn off the gas supply: Locate the gas shut-off valve and turn it to the closed position.
- Remove the oven racks and bottom panel: Take out the racks and any screws holding the bottom panel in place.
- Locate the igniter: It is usually mounted near the back of the oven, close to the bake burner.
- Disconnect the wires: Carefully remove the wires connected to the igniter. Take a photo before disconnecting so you can reference the wiring later.
- Remove the old igniter: Unscrew or unclip the old igniter and set it aside.
- Install the new igniter: Mount the new igniter in the same position and reconnect the wires exactly as they were.
- Reassemble: Replace the bottom panel and oven racks.
- Restore power and gas: Turn the gas valve back on and plug the oven in.
- Test the oven: Turn it on and verify that the igniter works and the oven lights properly.
Always make sure you purchase the correct replacement part for your specific GE oven model. You can find the model number on the rating plate inside the oven door frame or on the back of the unit.
Safety Tips for Lighting and Operating Your GE Gas Oven
Safety should always be your top priority when working with any gas appliance. GE gas ovens are designed with safety features, but you still need to follow proper procedures. Here are some important safety tips to keep in mind.
Preventive Maintenance
Regular maintenance goes a long way in keeping your GE gas oven safe and efficient. Here are some simple things you can do:
- Clean the oven regularly: Wipe up spills and crumbs after they cool. Food debris can clog burner ports and affect the flame.
- Check the gas supply line: Inspect the line periodically for cracks, leaks, or wear. A damaged gas line is a serious safety hazard.
- Test the igniter: If you notice the oven taking longer to heat up, check the igniter early. Replacing a worn igniter before it fails completely prevents frustration.
- Keep the area clear: Make sure nothing flammable is stored near the oven. This includes towels, paper, and cleaning supplies.
When to Call a Professional
While many oven issues can be fixed with simple DIY steps, some problems require professional help. Call a qualified appliance technician if:
- You smell gas and cannot find the source.
- The oven ignites but the flame is yellow or uneven.
- You hear a hissing sound coming from the oven.
- The gas valve is not working properly.
- You are uncomfortable working with gas connections.
Never try to repair gas lines or gas valve components yourself unless you are trained to do so. Gas leaks can be extremely dangerous and should always be handled by a professional.
Using the Self-Clean Cycle Safely
Many GE gas ovens come with a self-clean cycle. This feature uses high heat to burn off food residue inside the oven. While convenient, the self-clean cycle can put extra stress on the igniter and other components.
Use the self-clean cycle sparingly and only when necessary. Before starting the cycle, remove any large pieces of food debris. After the cycle is complete and the oven has cooled, wipe out the ash residue with a damp cloth. This keeps the oven clean and the bake burner functioning properly.
GE Gas Oven Maintenance for Long-Lasting Performance
A well-maintained GE gas oven will last for many years and perform reliably every time. Maintenance does not have to be complicated or time-consuming. A few simple habits can make a big difference.
Cleaning Tips
Keeping your oven clean is one of the best things you can do for its performance. Here are some cleaning tips:
- Clean the oven interior regularly with a mild oven cleaner or a baking soda and water solution.
- Wipe the oven door glass with a non-abrasive cleaner to keep it clear and streak-free.
- Clean the bake burner and the area around the igniter to prevent grease buildup.
- Remove the oven racks and soak them in warm soapy water to remove baked-on residue.
- Avoid using abrasive scrubbers or harsh chemicals that can damage the oven surfaces.
Regular Check-Ups
Just like any appliance, your GE gas oven benefits from regular check-ups. Here is a simple checklist you can follow every few months:
- Check that the oven lights properly and reaches the correct temperature.
- Inspect the burner ports for clogs and clean them if needed.
- Look at the igniter for any signs of wear or damage.
- Verify that the gas supply line is secure and leak-free.
- Test the oven door seal to make sure it closes tightly.
- Listen for any unusual sounds during operation.
Following this simple checklist can help you catch small problems before they become big ones. It also ensures your oven operates at peak efficiency, which can save energy and lower your utility bills.
Understanding Oven Temperature Accuracy
Over time, the temperature sensor in your GE gas oven may drift out of calibration. This means the oven may not heat to the exact temperature you set. This can affect your cooking results, especially for baking.
If you suspect your oven temperature is off, you can use an oven thermometer to check. Place the thermometer in the center of the oven and preheat to 350 degrees Fahrenheit. Compare the thermometer reading to the oven display. If there is a significant difference, you may need to recalibrate the oven sensor or have it checked by a professional.
Conclusion
Knowing how to light a GE gas oven is an essential skill for any home cook. Whether your oven uses a pilot light or an electronic ignition system, the process is straightforward and safe when you follow the right steps. We have covered everything from understanding your ignition system to troubleshooting common problems, replacing parts, and maintaining your oven for long-lasting performance.
The key takeaway is that most oven lighting issues are simple to fix. A little knowledge and the right tools can save you time, money, and frustration. Always prioritize safety, keep your oven clean, and do not hesitate to call a professional when needed.
With this guide, you are now equipped to handle your GE gas oven with confidence. Light it up, preheat it right, and get cooking. Your next meal is just a few minutes away.
Frequently Asked Questions
Why won’t my GE gas oven light even after I turn the knob?
This is usually caused by a faulty igniter or a problem with the gas supply. The igniter may be worn out and unable to open the gas valve. Check if the igniter glows when you turn the oven on. If it does not glow at all, it likely needs to be replaced. Also, make sure the gas supply valve is fully open and there are no blockages in the gas line.
How long should it take for a GE gas oven to light?
In most cases, a GE gas oven should light within 30 to 60 seconds after you turn it on. If your oven has an electronic igniter, you may hear clicking sounds as the spark electrode works. If the oven takes longer than two minutes to light, the igniter may be failing or there may be a gas supply issue that needs attention.
Is it safe to light a GE gas oven manually?
Yes, it is safe as long as you follow the proper steps. Always ensure the kitchen is ventilated, check for gas smells before lighting, and follow the manufacturer’s instructions in your user manual. Never use an open flame to check for gas leaks. If you smell gas, do not attempt to light the oven and contact a professional immediately.
Can I replace the GE gas oven igniter myself?
Absolutely. Replacing a GE gas oven igniter is one of the most common DIY appliance repairs. You will need a screwdriver, the correct replacement igniter for your model, and about 30 minutes of time. Always disconnect the power and gas supply before starting the replacement. If you are not comfortable working with gas connections, call a qualified technician.
What does a yellow flame in my GE gas oven mean?
A yellow or orange flame instead of a steady blue flame indicates incomplete combustion. This can be caused by clogged burner ports, a problem with the gas supply, or an issue with the air-to-gas mixture. A yellow flame can produce carbon monoxide, which is dangerous. Clean the burner ports first and check for proper ventilation. If the flame remains yellow, contact a professional technician for assistance.
How often should I clean my GE gas oven igniter area?
You should clean the igniter area and burner ports at least once every few months. Grease and food debris can build up over time and affect ignition performance. If you notice the oven taking longer to light or the flame burning unevenly, it is a good time to clean the area. Regular cleaning helps prevent most ignition problems and keeps your oven running efficiently.