Cooking Ribs with Aluminum Foil in Your Kitchen Oven
Cooking ribs with aluminum foil in your oven is one of the simplest ways to get restaurant-quality barbecue ribs at home. This method traps moisture, keeps the meat tender, and lets the flavors develop deeply without constant attention. Whether you prefer baby back ribs or spare ribs, the foil wrap technique delivers juicy, fall-off-the-bone results with minimal effort. You will learn the best temperatures, timing, and pro tips to master this approach in your own kitchen.
There is something magical about cooking ribs with aluminum foil in your oven. The kitchen fills with a rich, smoky aroma. The meat slowly transforms into something tender and juicy. And the best part? You do not need a fancy smoker or hours of babysitting the grill.
Many people think ribs are only for backyard barbecues. But the truth is, your kitchen oven can produce ribs that rival any competition smoker. The secret lies in a simple tool you already have: aluminum foil. When you wrap ribs in foil inside the oven, you create a mini steaming environment. This traps moisture, softens the meat, and concentrates the flavors beautifully.
In this guide, we will walk you through everything you need to know about oven-baked ribs with foil. From choosing the right cut to the final brush of sauce, you will have a clear path to perfect ribs. Whether you are a beginner or a seasoned home cook, these tips will help you serve ribs your family will rave about.
Key Takeaways
- Foil wrapping locks in moisture: The aluminum foil creates a sealed environment that steams the ribs, making them incredibly tender and juicy.
- Low and slow is the key: Cooking ribs at 275°F to 300°F ensures the meat breaks down properly without drying out.
- You do not need a smoker: Your kitchen oven can produce smoked-style ribs with the right foil technique and a little patience.
- A meat thermometer is essential: Internal temperature of 195°F to 205°F tells you when ribs are perfectly done.
- Resting matters: Letting ribs rest after cooking redistributes juices and improves texture significantly.
- Dry rub and sauce make the difference: A good seasoning and a finishing glaze elevate simple oven ribs into something special.
📑 Table of Contents
- Why Cooking Ribs with Aluminum Foil Works So Well
- What You Need Before You Start
- Step-by-Step Guide to Cooking Ribs in the Oven with Foil
- Tips for Perfectly Tender Ribs Every Time
- Common Mistakes to Avoid When Cooking Ribs with Foil in the Oven
- How to Know When Your Ribs Are Done
- Comparing Foil-Wrapped vs. Unwrapped Oven Ribs
- Adding a Smoky Flavor Without a Smoker
- Serving Suggestions for Your Oven Ribs
- Storing and Reheating Leftover Ribs
- Frequently Asked Questions
Why Cooking Ribs with Aluminum Foil Works So Well
The foil wrap method is a game-changer for oven-baked ribs. It is not just a shortcut. It is a science-backed technique that produces consistently great results. Here is why it works so well.
The Science Behind Foil Wrapping
When you wrap ribs tightly in aluminum foil, you create what cooks call a “moisture chamber.” The heat circulates around the meat. The foil traps steam. This steam gently cooks the ribs from all sides. The result is meat that becomes soft, juicy, and full of flavor.
Without foil, ribs in an oven can lose moisture quickly. The dry heat of an oven can toughen the outer layer before the inside is fully cooked. Foil solves this problem by balancing the heat and keeping the natural juices locked inside.
Benefits of the Foil Method
- Juicier meat: The foil traps all the juices and steam, so nothing escapes during cooking.
- More tender results: The gentle steam helps break down the connective tissues in the ribs faster.
- Less monitoring needed: You can set the ribs and forget them for a few hours.
- Even cooking: The foil distributes heat evenly around the rack of ribs.
- Flavor concentration: Seasonings and marinades stay inside the foil, soaking deeply into the meat.
Many pitmasters use a variation of this method called the 3-2-1 technique. It involves smoking ribs for three hours, wrapping in foil for two hours, and then unwrapping with sauce for one hour. You can adapt this same idea for your oven. The foil stage is where the magic really happens for tender, fall-off-the-bone ribs.
What You Need Before You Start
Before you begin cooking ribs with aluminum foil in your oven, gather your ingredients and tools. Having everything ready makes the process smooth and enjoyable.
Choosing the Right Ribs
Not all ribs are the same. Here are the most popular options for oven-baked ribs:
- Baby back ribs: These come from the top of the pig’s ribcage. They are leaner, smaller, and cook faster. They are a great choice for beginners.
- Spare ribs: These come from the belly side. They are fattier, meatier, and have a richer flavor. They take a bit longer to cook but are incredibly satisfying.
- St. Louis-style ribs: These are spare ribs that have been trimmed into a neat, uniform shape. They cook evenly and are a favorite for oven-baked ribs.
For the best results, look for bone-in pork ribs with a good layer of meat. Avoid ribs that look thin or dried out at the store.
Essential Tools and Ingredients
Here is what you will need:
- Aluminum foil: Heavy-duty foil works best. It holds up better against the juices and heat.
- A rimmed baking sheet or roasting pan: This catches drips and keeps your oven clean.
- A rib rack (optional but helpful): It elevates the ribs for better air circulation.
- A meat thermometer: This is the single most important tool for checking doneness.
- A sharp knife and cutting board: For trimming and serving.
- Your favorite dry rub: A blend of brown sugar, paprika, garlic powder, onion powder, salt, and pepper works beautifully.
- Barbecue sauce: Choose one you love for the finishing glaze.
Step-by-Step Guide to Cooking Ribs in the Oven with Foil
Now let us get into the heart of the process. Follow these steps for perfect oven ribs wrapped in foil every single time.
Step 1: Prep the Ribs
Start by removing the membrane from the back of the ribs. This thin, papery layer can be tough and chewy. Use a butter knife to loosen it at one edge, then grip it with a paper towel and peel it off. This step makes a big difference in texture.
Next, pat the ribs dry with paper towels. This helps the dry rub stick better. Apply a generous layer of your seasoning mix all over the ribs. Press it into the meat gently. Let the ribs sit at room temperature for about 30 minutes before cooking.
Step 2: Wrap in Foil
Tear off a large sheet of heavy-duty aluminum foil. Place the ribs in the center, bone side down. Fold the foil tightly around the ribs, creating a sealed packet. Make sure there are no gaps or openings. The goal is to trap all the moisture inside.
Some cooks like to add a splash of apple cider vinegar or a small amount of broth inside the foil. This adds extra moisture and flavor. It is a simple trick that elevates your foil-wrapped ribs to the next level.
Step 3: Set the Oven Temperature
Preheat your oven to 275°F. This low temperature is the sweet spot for low and slow cooking. It allows the collagen in the ribs to break down slowly, turning tough connective tissue into gelatin. This is what makes ribs so tender and succulent.
Place the foil-wrapped ribs on a baking sheet. If you have a rib rack, use it. It keeps the ribs elevated and promotes even cooking. Slide the tray into the oven.
Step 4: Cook for the Right Amount of Time
Baby back ribs typically need about 2.5 to 3 hours at 275°F. Spare ribs and St. Louis-style ribs may need 3 to 4 hours. The size and thickness of the ribs matter here.
Do not open the foil during cooking. Every time you unwrap the ribs, you release the steam and lose moisture. Trust the process. The kitchen will smell incredible, and the wait is worth it.
Step 5: Unwrap and Glaze
After the cooking time is up, carefully remove the ribs from the oven. Use oven mitts. The foil will be hot and full of steam. Open it slowly, pointing away from your face.
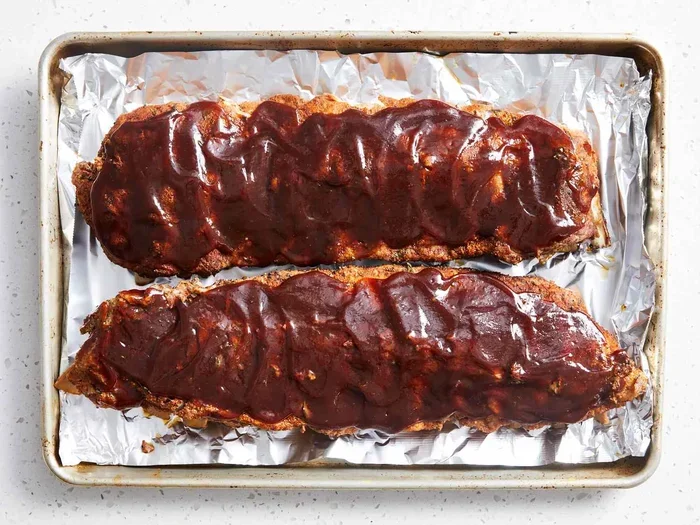
Increase the oven temperature to 375°F or 400°F. Brush a layer of barbecue sauce over the ribs. Place them back in the oven, uncovered, for 10 to 15 minutes. This step caramelizes the sauce and gives the ribs a beautiful, glossy finish.
Step 6: Rest and Serve
Remove the ribs from the oven and let them rest for 10 minutes. This allows the juices to redistribute throughout the meat. Slice between the bones and serve with extra sauce on the side.
Tips for Perfectly Tender Ribs Every Time
Even with the foil method, small details can make or break your ribs. Here are some expert tips to ensure perfectly tender ribs every time you cook.
Use a Meat Thermometer
The best way to know if your ribs are done is with a meat thermometer. Insert it into the thickest part of the meat, avoiding the bone. You are looking for an internal temperature of 195°F to 205°F. At this range, the collagen has fully broken down, and the meat will be incredibly tender.
Do not rely solely on cooking time. Every oven is different. The thermometer takes the guesswork out of the equation and gives you confidence.
Do Not Skip the Resting Period
Resting ribs after cooking is just as important as the cooking itself. When you cut into ribs right out of the oven, the juices run out immediately. The meat can end up dry. Giving the ribs 10 minutes to rest lets the juices settle back into the muscle fibers. The result is juicier, more flavorful ribs.
Experiment with Flavors
One of the joys of oven-baked ribs is the freedom to experiment. Try different dry rub combinations. Add a little heat with cayenne pepper or chipotle powder. Try a honey-based barbecue sauce for a sweet glaze. You can even add wood chips to the foil for a subtle smoky flavor.
Use the Two-Zone Method
If your oven runs hot or cold, consider using the two-zone method. Place the ribs on one side of the oven and set the temperature accordingly. This gives you more control over the cooking environment and prevents burning.
Common Mistakes to Avoid When Cooking Ribs with Foil in the Oven
Even with the best recipe, mistakes can happen. Here are the most common ones and how to avoid them.
Wrapping the Foil Too Tightly
You want a snug seal, but do not crush the ribs. Overly tight foil can flatten the meat and change the texture. Leave a little room for the steam to circulate inside the packet.
Using Regular Aluminum Foil
Regular thin foil tears easily and does not hold up well against the juices. Heavy-duty foil is stronger and creates a better seal. It also resists punctures, which means less mess and more moisture retention.
Opening the Foil Too Often
Every time you open the foil, you release steam and moisture. This slows down the cooking and can dry out the ribs. Resist the urge to peek. Trust the process and let the foil do its job.
Skipping the Final Unwrapped Bake
The last 10 to 15 minutes of uncovered baking is crucial. This step firms up the bark, caramelizes the sauce, and adds a slight crispness to the surface. Without it, the ribs can feel soft and saucy all the way through.
Cooking at Too High a Temperature
It is tempting to crank up the heat to speed things along. But high heat dries out ribs before the connective tissue has time to break down. Stick with 275°F. The low and slow approach is the foundation of great oven-baked ribs.
How to Know When Your Ribs Are Done
Knowing when ribs are perfectly cooked takes a little practice. Here are the three best ways to check.
The Bend Test: Pick up the rack of ribs from one end with tongs. If the meat cracks slightly on the surface and bends, they are done. If the meat tears apart, they may be overcooked.
The Meat Thermometer Test: Check the internal temperature. 195°F to 205°F is the target range. The meat should pull back from the bone slightly, exposing about a quarter inch of bone.
The Toothpick Test: Insert a toothpick or skewer into the thickest part of the meat. If it goes in with little resistance, the ribs are tender and ready.
Using all three methods together gives you the most reliable result. Once you do this a few times, you will develop an instinct for perfectly done ribs.
Comparing Foil-Wrapped vs. Unwrapped Oven Ribs
You might wonder if the foil method is really worth it. Here is a quick comparison of foil-wrapped ribs versus unwrapped ribs cooked in the oven.
| Feature | Foil-Wrapped Ribs | Unwrapped Ribs |
|---|---|---|
| Moisture level | Very high | Moderate |
| Tenderness | Fall-off-the-bone | Chewier texture |
| Cooking time | 2.5 to 4 hours | 3 to 5 hours |
| Bark formation | Softer bark | Crispier bark |
| Ease of cooking | Very easy | Requires more attention |
| Best for | Juicy, tender ribs | Smoky, crispy ribs |
Both methods produce delicious results. The foil method is ideal for those who prioritize tenderness and moisture. If you prefer a crunchier bark, you might try skipping the foil or using it only for part of the cook.
Adding a Smoky Flavor Without a Smoker
One of the biggest advantages of cooking ribs with aluminum foil in your oven is the ability to add smoky flavor without a smoker. Here are a few simple ways to do it.
- Smoked paprika: Add this to your dry rub for a natural smoky taste.
- Liquid smoke: A few drops in your barbecue sauce adds a deep, smoky note.
- Wood chips in the foil: Soak wood chips in water, place them in the foil packet before wrapping the ribs, and the steam will carry the smoky flavor into the meat.
- Smoked salt: Use this in place of regular salt for an extra layer of smokiness.
These simple additions transform your oven ribs into something that tastes like it came straight off a barbecue pit. Your guests will never guess you cooked them inside.
Serving Suggestions for Your Oven Ribs
Once your ribs are done, the fun part is serving them. Here are some classic and creative pairing ideas:
- Classic coleslaw: The crunch and coolness of coleslaw pairs perfectly with rich, tender ribs.
- Cornbread: A warm slice of cornbread soaks up the barbecue sauce beautifully.
- Baked beans: A hearty side that complements the smoky flavor of ribs.
- Grilled corn on the cob: A summer favorite that adds a nice charred contrast.
- Pickles and onion rings: These add a tangy crunch that cuts through the richness of the meat.
Set up a rib bar with sauces, sides, and drinks. It makes for a fun and memorable meal that everyone will enjoy.
Storing and Reheating Leftover Ribs
Leftover ribs are just as delicious the next day. Store them in an airtight container in the refrigerator for up to 3 days. To reheat, wrap the ribs in foil and warm them in the oven at 300°F for about 15 minutes. This keeps them moist and prevents the meat from drying out.
You can also freeze cooked ribs for up to 3 months. Wrap them tightly in foil and then in plastic wrap. Thaw overnight in the refrigerator before reheating.
Frequently Asked Questions
Can I use thin aluminum foil for cooking ribs in the oven?
It is best to use heavy-duty aluminum foil. Thin foil tears easily when you wrap the ribs and can leak juices during cooking. Heavy-duty foil holds up better and creates a tighter seal, which keeps more moisture inside the packet.
How long does it take to cook ribs in the oven with foil?
Baby back ribs typically take 2.5 to 3 hours at 275°F. Spare ribs and St. Louis-style ribs take 3 to 4 hours. The exact time depends on the size and thickness of the ribs. Always use a meat thermometer to check for doneness rather than relying on the clock alone.
Do I need to flip the ribs when cooking them in foil?
No, you do not need to flip the ribs when they are wrapped in foil. The steam inside the packet cooks the meat evenly from all sides. When you unwrap the ribs for the final glaze, you can flip them if you want to brown both sides evenly.
Can I cook ribs on a baking sheet without a rib rack?
Yes, you absolutely can. A rib rack makes it easier to handle the ribs and promotes better air circulation, but it is not required. You can place the ribs directly on a baking sheet lined with foil or parchment paper. Just make sure to flip them once during cooking for even results.
What temperature should ribs reach inside when done?
The ideal internal temperature for cooked ribs is 195°F to 205°F. At this range, the collagen in the meat has fully broken down, making the ribs tender and juicy. A reliable meat thermometer is the best tool to check this accurately.
Can I add barbecue sauce before wrapping the ribs in foil?
It is better to add the sauce during the final unwrapped stage of cooking. Sauce contains sugar and can burn if exposed to prolonged heat. Applying it during the last 10 to 15 minutes of baking gives you a glossy, caramelized finish without the risk of scorching.