How To Dry Limes In The Oven And Preserve Their Flavor
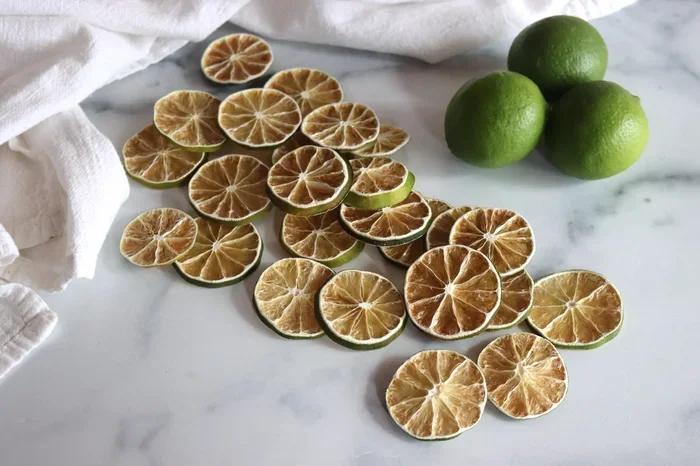
Drying limes in the oven is one of the simplest ways to preserve their intense flavor and use them all year round. You just slice, bake at a low temperature, and wait for the magic to happen. Whether you want dried lime slices for cooking, baking, or cocktails, this method works beautifully and requires almost no special equipment.
There is something truly special about the bright, tangy punch that fresh limes bring to any dish or drink. But what happens when your limes are about to go bad, or you want that zesty flavor available year round? The answer is simple. You dry them in the oven. How to dry limes in the oven is a question many home cooks ask, and the process is far easier than you might think.
Drying limes concentrates their flavor and turns them into a powerful ingredient you can use in cooking, baking, cocktails, and even tea. The method is affordable, requires no fancy equipment, and works with any standard oven. Once you learn this technique, you will never let another lime go to waste again.
In this guide, we walk you through every step of the process. From picking the right limes to storing your finished product, we have you covered. You will also discover creative ways to use your dried limes and learn common mistakes to avoid. Let us get started.
Key Takeaways
- Easy oven method: Drying limes in the oven takes minimal effort and uses tools you already own in your kitchen.
- Low and slow is key: Keeping your oven temperature low ensures the limes dry evenly without burning or losing their vibrant color.
- Versatile uses: Dried limes work in cooking, baking, cocktails, teas, and as beautiful garnishes for dishes and drinks.
- Proper storage matters: Storing your dried limes correctly in airtight containers keeps them flavorful for several months.
- No dehydrator needed: Your regular home oven works just as well as a food dehydrator for making dried lime slices and powder.
- Multiple forms: You can dry whole limes, lime slices, or even blend dried limes into a fine lime powder for seasoning.
📑 Table of Contents
Why Dry Limes In The Oven?
You might wonder why anyone would go through the trouble of drying limes. The answer lies in flavor, convenience, and versatility. When you dehydrate limes in the oven, you remove the moisture while locking in the essential oils and citrus aroma. The result is a concentrated burst of tangy, sour flavor that elevates countless recipes.
Fresh limes are wonderful, but they have a short shelf life. Within a week or two, they start to dry out, get mushy, or grow mold. By drying them, you extend their usable life from weeks to months. This makes it a smart move for anyone who likes to buy limes in bulk or grows their own citrus trees.
Another big reason is cost savings. Dried limes are sold in specialty stores for surprisingly high prices. Making your own oven dried lime slices at home costs a fraction of that and often tastes better. You control the quality, the sweetness, and the drying process entirely.
Flavor Concentration
When water leaves the lime, the sugars and acids become more intense. Think of it like reducing a sauce on the stove. The flavor becomes deeper and more complex. Dried lime slices can add a subtle tang to soups, stews, and marinades that fresh lime juice simply cannot replicate. They also make a stunning visual addition to drinks and plates.
Shelf Life Extension
Properly dried and stored limes can last for six months or more. This makes them a pantry staple you can reach for anytime. Unlike frozen limes, which can lose texture, dried limes hold their shape and flavor beautifully over time.
What You Will Need To Get Started
One of the best things about how to dry limes in the oven is that you need very few supplies. Most people already have everything in their kitchen right now. Here is a simple list of what you will want to gather before you begin.
Essential Supplies
- Fresh limes: Choose firm, heavy limes with smooth skin. Organic limes work great because you do not need to worry about wax coatings.
- A sharp knife: A good chef’s knife or a thin paring knife makes slicing easy and precise.
- A cutting board: Any stable surface will do. A board with a juice groove helps keep your counter clean.
- Baking sheets: Use rimmed baking sheets to catch any juice drips during the drying process.
- Parchment paper or silicone mats: These prevent the lime slices from sticking to the baking sheet.
- A cooling rack (optional): Placing limes on a rack over the baking sheet allows air to circulate better, which speeds up drying.
Optional But Helpful Tools
- A mandoline slicer: This helps you cut uniform, thin slices quickly and evenly. Uniform slices dry at the same rate, which is important for consistent results.
- A food processor or spice grinder: If you want to make dried lime powder, you will need something to grind the dried slices into a fine dust.
- Airtight containers: Glass jars with tight lids work perfectly for storing your finished dried limes.
- A kitchen towel: Use this to pat the lime slices dry before baking, which removes excess surface moisture.
Step-By-Step Guide To Drying Limes In The Oven
Now for the fun part. The actual process of how to dry limes in the oven is straightforward and takes about two to three hours depending on your oven and the thickness of your slices. Follow these steps carefully for the best results.
Step One: Prep Your Limes
Start by washing your limes thoroughly under cool running water. Even if you plan to peel them, washing removes any dirt, bacteria, or residue from the surface. If you are using non-organic limes, consider using a produce brush to gently scrub the skin.
Next, pat the limes completely dry with a clean kitchen towel. Any moisture left on the surface will extend the drying time. Now it is time to slice. Cut off both ends of each lime first. Then slice the lime into rounds that are about one-eighth to one-quarter inch thick. Thinner slices dry faster and more evenly, but they can become brittle. Thicker slices take longer but hold their shape better.
Try to make all your slices the same thickness. This is the single most important step for even drying. If you use a mandoline, set it to your desired thickness and go slowly for safety.
Step Two: Arrange The Slices On Your Baking Sheet
Line your baking sheets with parchment paper or a silicone baking mat. Lay the lime slices out in a single layer with space between each piece. Do not overlap them. Overlapping slices trap moisture and will not dry properly.
If you have a cooling rack that fits inside your baking sheet, place the rack on top and arrange the slices on it. This allows hot air to flow around both sides of the slices, cutting your drying time significantly.
Step Three: Set Your Oven Temperature
Preheat your oven to its lowest setting. Most ovens can go as low as 170 degrees Fahrenheit, but 200 degrees Fahrenheit is the sweet spot for drying limes. The goal is gentle, consistent heat that removes moisture without cooking the lime or turning it brown.
Here is a quick reference for oven temperatures and drying times:
- 170 degrees Fahrenheit: Best for very thin slices. Takes about 2.5 to 3 hours.
- 200 degrees Fahrenheit: The most common setting. Works well for standard thickness slices. Takes about 2 to 2.5 hours.
- 225 degrees Fahrenheit: Use only if your oven does not go lower. Check slices more frequently to prevent burning.
Never go above 250 degrees Fahrenheit. Higher temperatures will cook the lime instead of drying it, which changes the flavor and texture in a bad way.
Step Four: Place The Limes In The Oven
Put the baking sheets on the middle rack of your oven. If you have two racks, you can rotate them halfway through the drying time for even results. Set your timer and resist the urge to open the oven door too often. Every time you open the door, you release heat and moisture, which slows down the process.
After about one hour, open the oven and check the slices. They should feel dry to the touch and look slightly curled at the edges. If the center still feels moist, keep drying and check again every 30 minutes.
Step Five: Cool And Test For Dryness
Once the lime slices look dry and feel leathery but not moist, remove them from the oven. Let them cool completely on the baking sheet. They will become slightly crisper as they cool. To test if they are fully dry, break a piece in half. It should snap cleanly, not bend or feel soft in the middle.
If any slices are still moist in the center, put them back in the oven for another 30 to 60 minutes. It is better to dry them a little longer than to store them while they are still damp, which can lead to mold growth.
Step Six: Store Or Process
Once fully cooled, you have two main options. You can store the dried lime slices whole, or you can grind them into dried lime powder. For whole slices, place them in an airtight glass jar and store in a cool, dark place. For powder, pulse the dried slices in a spice grinder or food processor until you reach your desired consistency. Sift out any larger pieces and grind them again if needed.
Tips For Perfect Dried Limes Every Time
Even though the process is simple, a few pro tips can make a big difference in the quality of your dried limes. Here are some tried-and-true tricks that experienced home cooks swear by.
Use the Best Limes You Can Find
Start with ripe, fresh limes that feel heavy for their size. Heavy limes have more juice, which means more concentrated flavor once dried. Avoid limes that are soft, wrinkled, or have brown spots. The skin should be smooth and slightly glossy.
Pat Slices Dry Before Baking
This small step often gets overlooked. After slicing, use a paper towel or clean kitchen towel to gently pat each slice dry. Removing surface moisture helps the limes dry faster and more evenly in the oven.
Rotate Your Trays
Most ovens have hot spots. To account for this, rotate your baking sheets 180 degrees halfway through the drying time. If you are using two trays, swap their positions from top to bottom as well.
Do Not Rush The Process
It can be tempting to raise the oven temperature to speed things up. Resist that urge. High heat cooks the lime rather than drying it, which ruins the texture and mutes the flavor. Low and slow is the way to go.
Save Your Lime Seeds
If you want to use dried limes whole in cooking, leave the seeds in. They add a subtle bitter note that complements the citrus flavor. Just be sure to remove the seeds before grinding them into powder, as they can taste bitter when finely ground.
Creative Ways To Use Dried Limes
Now that you know how to dry limes in the oven, let us talk about what to do with them. Dried limes are incredibly versatile, and once you start using them, you will find new uses all the time.
In Cooking And Soups
Dried lime slices are a staple in Middle Eastern and Persian cooking. They are often added whole to soups, stews, and rice dishes, where they release a deep, tangy flavor as they simmer. You can drop a whole dried lime into a pot of lentil soup, chicken broth, or even a pot of beans. The flavor it adds is complex and hard to replicate with fresh lime juice alone.
In Baking And Desserts
Crushed dried lime works beautifully in baked goods. Add a teaspoon of dried lime powder to cookies, cakes, or muffins for a bright citrus kick. It pairs wonderfully with chocolate, coconut, and white chocolate. You can also use dried lime slices as a garnish for cupcakes and desserts.
In Cocktails And Drinks
Dried lime wheels make gorgeous garnishes for cocktails. They look stunning on the rim of a glass or floating in a drink. You can also steep dried lime slices in hot water to make dried lime tea, which has a refreshing, citrusy taste. Add honey and a pinch of ginger for a warming drink on a cold day.
As A Seasoning And Spice Blend
Grind your dried limes into a fine powder and mix them with salt, garlic powder, and a touch of chili flakes. This makes an amazing homemade lime seasoning that you can sprinkle on tacos, avocado toast, roasted vegetables, or grilled fish. It also works as a lime powder substitute for store-bought seasoning blends.
In Potpourri And Home Fragrance
Dried lime slices have a pleasant, fresh scent. Place them in a bowl on your counter or toss them into a pot of simmering water with cinnamon sticks and cloves. They make a natural, chemical-free air freshener for your kitchen.
Storing Your Dried Limes Properly
Proper storage is what keeps your dried limes flavorful for months. If you skip this step, all your hard work could go to waste.
Store dried lime slices in an airtight glass jar or a sealed plastic bag. Squeeze out as much air as possible before sealing. Keep the container in a cool, dark, and dry place like a pantry or cupboard. Avoid storing them near the stove or in direct sunlight, as heat and light can degrade the flavor over time.
Dried lime powder should be stored in the same way but in a smaller, airtight spice jar. Ground citrus loses its potency faster than whole slices, so try to use your lime powder within three to four months for the best flavor.
You can also freeze dried lime slices for longer storage. Place them in a freezer-safe bag, remove the air, and store in the freezer. They will keep for up to a year. Thaw at room temperature before using.
How To Tell If Your Dried Limes Have Gone Bad
Check your dried limes periodically for any signs of spoilage. Throw them out if you notice any of the following:
- A musty or off smell
- Visible mold or discoloration
- Soft or moist spots that were not there before
- An unpleasant or sour taste that is different from the normal concentrated lime flavor
Common Mistakes To Avoid When Drying Limes
Even a simple process like drying limes can go wrong if you make a few common errors. Here is what to watch out for.
Slicing Them Too Thick Or Too Thin
Thick slices take much longer to dry and may still feel moist in the center after two hours. Very thin slices can become brittle and difficult to handle. Aim for that one-eighth to one-quarter inch range for the best balance of texture and drying time.
Overlapping The Slices
It might be tempting to fit more slices on one baking sheet, but overlapping creates pockets of trapped moisture. Each slice needs air circulation around it to dry properly. Use multiple baking sheets if you need to.
Setting The Oven Too Hot
High heat will cook the lime and turn the slices brown and bitter. Stick to 170 to 200 degrees Fahrenheit for the best results. If your oven runs hot, use an oven thermometer to check the actual temperature inside.
Skipping The Parchment Paper
Lime juice is sticky and sugary. Without parchment paper or a silicone mat, your slices will fuse to the baking sheet and may tear when you try to remove them. Do not skip this simple step.
Not Drying Them Long Enough
It is better to dry limes a little longer than to pull them out too early. Slices that feel even slightly soft in the center can develop mold during storage. Always do the snap test before taking them out of the oven.
Frequently Asked Questions
Can I dry limes in the oven without parchment paper?
Yes, you can, but it is not recommended. Lime juice is very sticky and sugary, and the slices will likely fuse to the bare baking sheet. Parchment paper or a silicone baking mat makes cleanup much easier and prevents sticking. If you have neither, lightly grease the sheet with a thin layer of oil, though this is not ideal for drying.
How long do dried limes last in storage?
When stored properly in an airtight container in a cool, dark place, dried lime slices can last for six months to a year. Dried lime powder has a shorter shelf life of about three to four months because the increased surface area causes it to lose flavor faster. Always check your dried limes before using them and discard any that show signs of mold or off smells.
Can I use a dehydrator instead of an oven?
Absolutely. A food dehydrator is actually the preferred tool for drying citrus fruits because it provides consistent airflow and temperature. However, using your oven works just fine and requires no extra equipment. If you have a dehydrator, set it to 135 degrees Fahrenheit and dry the slices for about eight to twelve hours.
What is the difference between dried lime slices and dried lime powder?
Dried lime slices are whole or partial rounds of dehydrated lime that you can add to dishes whole or steep in liquid. Dried lime powder is made by grinding those slices into a fine dust. Powder is more convenient for seasoning and mixing into spice blends, while slices are better for visual presentation and slow-cooked dishes.
Do dried limes taste the same as fresh limes?
Not exactly. Dried limes have a more concentrated, complex flavor that is less bright and more deep and tangy. The drying process removes the water content, which intensifies the natural sugars and acids. Many cooks actually prefer dried limes for certain recipes because they add a richer, more nuanced citrus flavor that fresh lime juice cannot provide.
Can I dry limes with the peel on or should I remove it?
Leave the peel on. The peel contains most of the aromatic essential oils that give limes their distinctive scent and flavor. Removing the peel would strip away a huge part of what makes dried limes so valuable. Just make sure you wash the limes thoroughly before slicing and drying them.
Final Thoughts
How to dry limes in the oven is one of those kitchen skills that pays off in ways you might not expect. Once you start making dried limes at home, you will find yourself adding them to more and more recipes. They bring a depth of flavor that fresh limes simply cannot match, and they last for months in your pantry.
The process is forgiving and beginner-friendly. You do not need special equipment or advanced cooking skills. A sharp knife, a baking sheet, and your oven are all you need to get started. The key is patience and keeping the temperature low so the limes dry gently without cooking.
Try this method with your next batch of limes and see how easy it is. You can use them in soups, bake them into cookies, drop them into cocktails, or simply enjoy them as a tangy snack. The possibilities are truly endless once you know how to dry limes in the oven and preserve their flavor the right way.
Start small if you like. Dry a few limes on your first try, experiment with how you use them, and build from there. Before long, dried limes will become a regular part of your kitchen routine. And you will wonder how you ever cooked without them.