Can You Put A Roaster Pan In The Oven Without Ruining It
Can you put a roaster pan in the oven? Yes, you can, as long as you follow a few simple rules. Using a roaster pan in the oven is safe when you check the material, stay within temperature limits, and avoid sudden shocks. This guide shows you exactly how to roast, bake, and broil without ruining your pan.
So, can you put a roaster pan in the oven? The short answer is yes, but you need to know the right way. Can you put a roaster pan in the oven without ruining it? Absolutely, if you pick the right pan and follow simple rules. Using a roaster pan in the oven makes cooking roasts, chickens, and casseroles a breeze. But some pans are not oven-safe, and using the wrong one can cause damage.
In this guide, I’ll share everything you need to know. I’ll cover materials, temperatures, and common mistakes. You’ll learn how to keep your pan safe for years. I’ll also give you quick tips and expert advice. By the end, you’ll know exactly how to use your roaster pan in the oven with confidence.
Key Takeaways
- Always check the label: Look for an oven-safe rating before placing any roaster pan in a hot oven.
- Know your material: Aluminum, enameled steel, glass, and ceramic each have different heat limits and care needs.
- Avoid thermal shock: Never move a cold roaster pan directly into a hot oven or onto a cold surface.
- Stay under max temperature: Most roaster pans handle up to 400–450°F, but always verify with the manufacturer.
- Hand wash for longevity: Dishwashers and harsh scouring can damage nonstick coatings and enamel over time.
- Use proper utensils: Wooden or silicone tools prevent scratches on nonstick and ceramic surfaces.
- Preheat with care: Place the pan in the oven before preheating or after a short warm-up to reduce stress.
📑 Table of Contents
Can You Put A Roaster Pan In The Oven?
The short answer is yes, but the full answer depends on your pan. A roaster pan is designed to go from stovetop to oven or directly into a hot oven. However, not every pan handles heat the same way. The key is to match the pan material with your cooking needs.
When you ask, can you put a roaster pan in the oven, you’re really asking two things. First, is the pan safe for oven use? Second, will it survive the heat without cracking, warping, or releasing harmful chemicals? Both questions matter. I’ll help you answer them clearly.
What Makes a Roaster Pan Oven-Safe?
An oven-safe roaster pan can handle dry heat up to a certain temperature. Most manufacturers print this limit on the bottom or back of the pan. Look for words like “oven-safe,” “heat resistant,” or a maximum temperature rating. If you see those, your pan is ready for the oven.
Some pans come with a glass lid. Glass lids often have a lower heat limit than the pan itself. Always check both pieces. Using a lid that isn’t oven-safe can cause it to shatter. That’s a dangerous and messy situation you want to avoid.
Quick Tip: When in doubt, contact the manufacturer. A quick email or phone call can save you from a ruined pan. Most companies list their oven-safe guidelines on their website too.
Types of Roaster Pans and Their Oven Limits
Not all roaster pans are the same. The material decides how much heat it can take. Here’s a quick look at the most common types you’ll find in kitchens today.
| Roaster Pan Type | Oven-Safe Max Temp | Best For |
|---|---|---|
| Aluminum Roaster Pan | 400–450°F | Roast chicken, beef roast, everyday baking |
| Enameled Steel Roaster | 450–500°F | Slow roasting, stovetop-to-oven cooking |
| Glass Roaster (like Pyrex) | 425–450°F | Baking, casseroles, visual checking of food |
| Ceramic Roaster | 350–400°F | Slow baking, serving at the table |
| Disposable Aluminum Roaster | Up to 400°F | One-time use, large gatherings |
| Cast Iron Roaster | 500°F+ | High-heat searing, deep roasting |
As you can see, the roaster pan you choose changes everything. Aluminum is lightweight and heats fast. Enameled steel offers durability and even heat. Glass lets you watch your food brown. Ceramic looks beautiful on the table but needs gentler handling. Cast iron is the heavyweight champion for heat retention.
Aluminum Roaster Pans
Thin aluminum roaster pans are common in grocery stores. They work well for roasting a chicken or a beef roast at standard temperatures. But they can warp if you crank the oven too high. Avoid temperatures above 450°F with thin aluminum. Warping ruins the pan and causes uneven cooking.
Thicker, heavy-gauge aluminum pans handle more heat. These are often used in restaurants. They resist warping and distribute heat evenly. If you’re buying an aluminum roaster for home use, look for the thickest gauge you can afford.
Enameled Steel and Porcelain Roasters
Enameled steel roasters are a popular choice. They combine the strength of steel with a smooth, easy-to-clean coating. Most can handle up to 500°F. You can use them on the stovetop to sear meat, then transfer them straight to the oven. That’s a huge time-saver.
Porcelain-coated roasters look elegant and cook evenly. They’re great for slow-cooking recipes. But the coating can chip if you drop the pan or use metal utensils. Once the coating chips, the underlying steel can rust. Treat your porcelain roaster gently, and it will last for years.
Glass and Ceramic Roasters
Glass roasters like Pyrex are oven-safe up to about 425°F. They’re perfect for casseroles and baked dishes. The clear glass lets you monitor browning without opening the oven door. That helps you avoid heat loss and keeps cooking time consistent.
Ceramic roasters are beautiful and retain heat wonderfully. They’re ideal for table-side serving. But they’re more fragile than metal. Sudden temperature changes can cause them to crack. Always let a ceramic roaster come to room temperature before placing it in a hot oven. This prevents thermal shock, which is the number one killer of glass and ceramic bakeware.
Expert Insight: Many people don’t realize that a disposable roaster can go in the oven too. These thin aluminum pans work fine for one-time use at moderate temperatures. Just don’t reuse them too many times, and never exceed 400°F. They’re not built for heavy-duty, repeated roasting.
Temperature Guidelines: How Hot Can You Go?
Temperature is the biggest factor when using a roaster pan in the oven. Every pan has a limit. Exceeding it can cause warping, discoloration, or even release harmful fumes. I’ll break down the safe ranges so you can cook with confidence.
Safe Oven Temperatures for Most Roaster Pans
For everyday cooking, most roaster pans work perfectly between 350°F and 425°F. This range covers roasting chicken, baking lasagna, and cooking casseroles. It’s the sweet spot for even browning and juicy results.
If you’re planning a high-heat roast, stick to 450°F or below for standard pans. Cast iron and enameled steel can sometimes handle 500°F, but always check the manufacturer’s guidelines. The roasting pan you use for a Sunday beef roast should be rated for the temperature you plan to use.
Quick Tips for Temperature Safety:
- Never preheat an empty nonstick roaster pan. The coating can degrade at high temperatures.
- Place the pan in the oven before preheating if you’re doing a long, slow roast.
- Use an oven thermometer to verify your oven’s actual temperature. Many ovens run hot or cold.
- If your recipe calls for 475°F and your pan says max 450°F, lower the oven temperature or choose a different pan.
Broiling and High-Heat Cooking
Broiling uses direct top heat, which can be intense. Most aluminum roaster pans are not broiler-safe. The direct flame or heating element can warp the thin metal or scorch the surface. Enameled steel and cast iron are better choices for broiling, but still check the label.
If you want to broil in a roaster, use a cast iron or heavy-gauge stainless steel pan. These can handle the direct heat. Keep a close eye on your food because broiling cooks fast. A few minutes can make the difference between perfect char and a burnt mess.
Common Mistake: Some people put a glass roaster under the broiler. This is risky. Glass can crack under intense, direct heat. Even oven-safe glass is usually not rated for broiling. Stick to metal pans for broiling tasks.
Step-by-Step: Using a Roaster Pan in the Oven
Now that you know what’s safe, let’s walk through the actual steps. Using a roaster pan correctly helps you get great results and keeps the pan in good shape for years.
Preheating the Pan
You have two options when preheating. You can place the empty pan in the oven as it heats up, or you can add the food to a cold pan and put it all in together. Both methods work, but they give different results.
For a crispy, browned roast, preheating the pan is best. The hot metal sears the outside of the meat immediately. This locks in juices and creates a flavorful crust. Just make sure your pan is dry and free of moisture before it goes into the hot oven.
For a more even cook, start with a cold pan. This is gentler on the pan and on the food. It’s a great choice for thicker cuts of beef or pork that need slow, steady heat. The pan heats up gradually with the oven, reducing the risk of warping.
Adding Food and Liquid
When you add your roast or chicken, leave space for heat to circulate. Overcrowding the pan leads to uneven cooking and longer cooking time. If you’re roasting vegetables, spread them in a single layer. Don’t pile them too high.
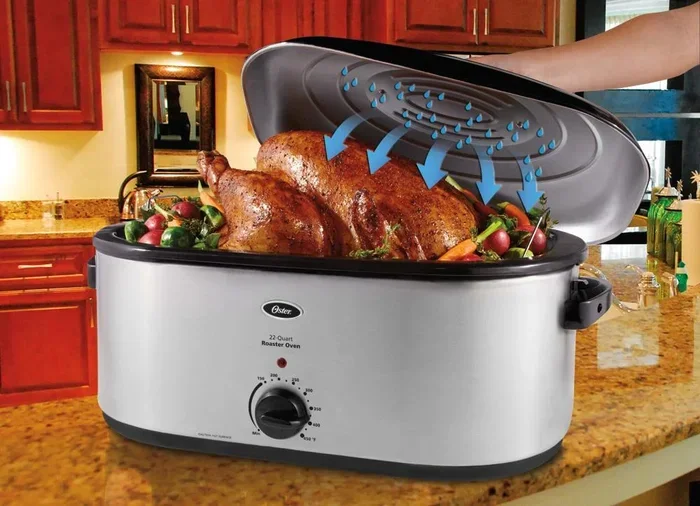
Adding liquid like broth, wine, or water to the bottom of the pan creates steam. This keeps meat moist and makes cleanup easier. The liquid also prevents drippings from burning. Just don’t fill the pan more than one-third full. You want room for the steam to move around.
Expert Insight: If you’re using a disposable aluminum roaster, skip the sharp knives and metal tongs directly on the surface. Use wooden or silicone tools to preserve the lining. Even though disposable pans aren’t meant for reuse, treating them gently still helps them hold up for the full cook.
Timing and Resting
Roasting times vary based on the size of the meat and the oven temperature. A general rule is 20 minutes per pound for beef roast at 350°F. Chicken roasts usually take about 1.5 to 2 hours at 400°F. Use a meat thermometer to check doneness. It’s the most reliable way to know your food is safe and perfectly cooked.
Once the roast is done, let it rest for 10 to 15 minutes before slicing. This lets the juices redistribute. The meat stays moist and tender. While the roast rests, you can turn off the oven and let the pan cool inside. Never plunge a hot roaster pan into cold water. That’s a quick way to cause warping or cracking.
Common Mistakes That Ruin Roaster Pans
Even with the best intentions, people make mistakes that shorten the life of their roaster pan. I’ve seen these errors many times, and they’re all preventable. Here’s what to watch out for.
Thermal Shock: The Silent Pan Killer
Thermal shock happens when a pan experiences a sudden, extreme temperature change. For example, taking a hot roaster pan from the oven and placing it on a cold granite countertop. The rapid cooling causes the metal or glass to expand and contract unevenly. That leads to cracks, warps, or shattered glass.
To avoid thermal shock, always set hot pans on a wooden board, a dry towel, or a cooling rack. Never place a hot pan in the sink or on a cold surface. Let it cool naturally for at least 15 to 20 minutes before washing. This one habit can double the life of your roaster pan.
Using the Wrong Utensils
Metal forks, knives, and whisks can scratch nonstick and ceramic surfaces. Once the coating is scratched, it can peel and flake into your food. That’s not just bad for the pan, it’s bad for your health. Use wooden spoons, silicone spatulas, or nylon tools instead.
If you need to flip a roast, use two large spoons or a sturdy spatula. Avoid piercing the meat with sharp metal tools directly in the pan. The juices will escape, and the pan surface can get scored. Treat your pan gently, and it will reward you with better cooking results.
Ignoring Manufacturer Instructions
Every roaster pan comes with a label or a booklet. These instructions tell you exactly what the pan can handle. Some pans are oven-safe but not broiler-safe. Some are dishwasher-safe but not microwave-safe. Reading the manual takes five minutes and saves you from costly mistakes.
Common Mistake: People assume all metal pans are the same. A thin aluminum pan and a thick stainless steel pan behave very differently in the oven. The thin one warps at 450°F, while the thick one handles 500°F just fine. Know your specific pan’s limits and respect them.
Cleaning and Caring for Your Roaster Pan
Proper cleaning keeps your roaster pan looking good and performing well. A well-maintained pan cooks better and lasts longer. I’ll share the best methods for different materials.
Hand Wash vs. Dishwasher
Most experts agree that hand washing is the safest way to clean a roaster pan. Dishwashers use harsh detergents and high heat that can degrade nonstick coatings and cause enamel to chip over time. Hand washing with warm water and mild dish soap is gentle and effective.
If you must use a dishwasher, place the pan on the top rack. Use a mild detergent and avoid the heated dry cycle. Let the pan air dry completely before storing it. Moisture trapped in a cabinet can cause rust, especially on steel pans with small chips in the coating.
Quick Tip: For stuck-on food, soak the pan in warm, soapy water for 20 to 30 minutes. A soft sponge or nylon scrubber removes most residue without scratching. Avoid steel wool and abrasive pads on any coated or glass surface.
Removing Stains and Burnt-On Food
Burnt drippings are a common frustration. For aluminum pans, a paste of baking soda and water works wonders. Spread the paste over the stain, let it sit for an hour, then scrub gently. For enameled steel, avoid abrasive cleaners. A mixture of vinegar and water heated in the pan can loosen burnt residue without damaging the finish.
Glass roasters often develop a cloudy film from hard water or overheating. Soak the pan in a solution of equal parts water and white vinegar for 30 minutes. This clears the cloudiness and restores shine. Never use a scouring pad on glass, as it will create permanent scratches.
Expert Insight: If you’re dealing with a stained roasting pan, try a self-cleaning oven cycle on the pan itself. Place the empty pan in a cold oven, set it to self-clean, and let it run. The extreme heat burns off all organic residue. Let the pan cool completely in the oven before removing it. This method works best on cast iron and stainless steel, not on nonstick or glass.
Key Takeaways for Roaster Pan Oven Safety
Using a roaster pan in the oven is simple once you know the basics. Always check the oven-safe rating, match the material to your cooking method, and avoid sudden temperature changes. Hand wash your pan when possible, use gentle utensils, and store it in a dry place. These habits keep your pan in top shape for decades.
Remember, a roaster pan is a kitchen workhorse. It roasts chickens, bakes casseroles, and even serves as a beautiful table centerpiece. Treat it right, and it will serve you well through countless meals. The next time you wonder, can you put a roaster pan in the oven, you’ll know the answer with confidence.
Final Thought: The joy of cooking comes from using the right tools correctly. Your roaster pan is one of those tools. By following the tips in this guide, you’ll get delicious results every time and protect your investment for the long haul. Happy roasting!
Frequently Asked Questions
Can I put a glass roaster pan in the oven?
Yes, most glass roaster pans are oven-safe up to 425°F. Always check the manufacturer’s label for the exact temperature limit. Never place a cold glass roaster directly into a hot oven, as sudden heat can cause it to shatter.
Is it safe to put a disposable roaster pan in the oven?
Disposable aluminum roaster pans are safe for oven use up to about 400°F. They’re designed for one-time use, so avoid reusing them at high temperatures. They work well for large family meals and potlucks.
Can a roaster pan go from the fridge to the oven?
No, never put a cold roaster pan straight from the fridge into a hot oven. This causes thermal shock, which can crack glass, warp metal, or chip enamel. Let the pan come to room temperature first.
What temperature is too hot for a roaster pan?
Most standard roaster pans should not exceed 450°F. Cast iron and heavy-duty enameled steel can handle higher temperatures, but always check the label. Exceeding the max temperature can warp the pan or damage nonstick coatings.
Can you put a roaster pan with a plastic handle in the oven?
Only if the handle is explicitly labeled oven-safe. Many roaster pans have removable or heat-resistant handles, but some plastic parts can melt. Remove any plastic handles or knobs before placing the pan in a hot oven.
How do I know if my roaster pan is oven-safe?
Look for an oven-safe symbol or text on the bottom of the pan. It may show a temperature number or a picture of an oven. If you can’t find it, check the manufacturer’s website or contact customer service for guidance.