How Long To Bake Bacon Oven Style For Crispy Perfection
How long to bake bacon oven style is a question many home cooks ask when they want perfectly crispy strips without the mess of stovetop splatter. Baking bacon in the oven delivers even cooking, minimal effort, and consistent results every single time. This guide covers exact temperatures, cooking times, and simple tips to help you achieve perfect bacon every time with almost no work.
There is something deeply satisfying about pulling a tray of oven baked bacon out of the oven. The smell fills the kitchen. The strips are perfectly crisp. And you barely had to lift a finger. If you have ever stood over a hot skillet, dodging grease splatters while trying to flip bacon strips one by one, you know exactly what I mean. The how long to bake bacon oven method changes everything. It is simpler, cleaner, and gives you more consistent results than any other cooking method.
Baking bacon in the oven has become the go-to method for home cooks, meal preppers, and even professional chefs. Whether you are making breakfast for a crowd or preparing crispy bacon for the week ahead, the oven does the heavy lifting. You simply lay the strips on a pan, pop it in the oven, and let the heat work its magic. But the question everyone asks is: how long does it actually take? The answer depends on a few factors, and this guide will walk you through every detail.
In this article, you will learn the exact temperatures and times for baking bacon in oven settings. You will discover how cut thickness affects cooking time. You will get a step-by-step process that anyone can follow. And you will find tips that take your oven baked bacon from good to absolutely perfect. Let us dive in.
Key Takeaways
- 400°F is the sweet spot: Most bacon bakes perfectly at 400°F for 15 to 20 minutes.
- Use a wire rack: It lifts the bacon off the pan for even crispiness on both sides.
- Thin slices cook faster: Thin bacon takes about 15 minutes while thick cut may need 20 to 25 minutes.
- Line your pan with parchment paper: This makes cleanup a breeze and prevents sticking.
- Save your bacon grease: It is a flavorful cooking fat you can use for days.
- Check bacon early and often: Ovens vary, so start checking at the 12-minute mark.
- Let bacon rest on paper towels: This removes excess grease and keeps it crispy.
📑 Table of Contents
Understanding Oven Baked Bacon Basics
Why Oven Bacon Beats Stovetop
When you bake bacon in oven mode, you are using even, surrounding heat. This is very different from a stovetop skillet, where the heat comes from below only. Stovetop cooking often leaves you with greasy ends and overcooked middles. The oven method solves this problem completely. Hot air circulates around every strip, cooking them evenly from all sides.
Another big advantage is hands-off cooking. With stovetop bacon, you need to watch it closely. You flip strips. You manage splatter. You adjust heat as needed. With the oven method, you set a timer and walk away. You can prep other breakfast items while your crispy bacon cooks to perfection. This is why so many people have switched to the bacon oven method for everyday cooking.
The oven also lets you cook large batches at once. A standard sheet pan holds about four to six strips comfortably. If you need more, just use a second pan. No overcrowding a skillet. No cooking in batches. This makes the oven method ideal for family breakfasts, holiday mornings, and meal prep sessions.
Quick Tip: Always preheat your oven before placing the bacon inside. Cold oven starts lead to uneven cooking and longer bake times.
The Right Temperature for Bacon
The oven temperature for bacon is one of the most important factors. Too low, and your bacon will take forever and turn out chewy. Too high, and it will burn before the fat has a chance to render properly. Most experts agree that 400°F is the perfect temperature for baking bacon.
At 400°F, the fat renders quickly while the meat crisps up evenly. The bacon cooks through without drying out. You get that ideal balance of crunchy texture and savory flavor that everyone loves. Some cooks prefer 375°F for a slightly chewier result, and others go up to 425°F for ultra-fast cooking. But 400°F remains the gold standard.
Here is a quick comparison of common bacon oven temperatures:
| Temperature | Cooking Time | Texture Result |
|---|---|---|
| 375°F | 18 to 22 minutes | Chewy and tender |
| 400°F | 15 to 20 minutes | Classic crispy perfection |
| 425°F | 12 to 15 minutes | Extra crispy, watch closely |
| 350°F | 22 to 28 minutes | Very chewy, slow render |
As you can see, the temperature you choose directly affects your bacon cooking time. Higher temperatures cook faster but require more attention. Lower temperatures take longer but give you more control. For most people, 400°F hits the sweet spot between speed and texture.
How Long To Bake Bacon Oven Style
Now we get to the heart of the matter. How long to bake bacon oven style depends on several variables. The thickness of your slices is the biggest factor. The starting temperature of the bacon matters too. And of course, your specific oven may run hotter or cooler than the dial says. But do not worry. I will break down the times so you know exactly what to expect.
The general rule for oven baked bacon at 400°F is 15 to 20 minutes. But this is just a starting point. Let us look at the details more closely.
Thin vs Thick Cut Cooking Times
The cut of your bacon changes everything when it comes to baking bacon in oven settings. Thin-sliced bacon is the most common type found in grocery stores. It cooks quickly and becomes crispy in about 15 minutes at 400°F. These thin bacon strips are great for sandwiches, salads, and snacking.
Thick cut bacon is a different story entirely. Because the slices are heavier and contain more fat, they need more time. At 400°F, thick cut bacon typically takes 20 to 25 minutes to reach crispy perfection. The extra time allows the fat to render fully while the meat stays tender inside. The result is a satisfying chew with a crispy outer layer.
Here is a quick breakdown of bacon cooking time by slice thickness:
- Thin sliced bacon: 15 to 18 minutes at 400°F
- Standard sliced bacon: 18 to 20 minutes at 400°F
- Thick cut bacon: 20 to 25 minutes at 400°F
- Extra thick or artisanal bacon: 22 to 28 minutes at 400°F
These times are guidelines, not strict rules. Every oven is different. The best approach is to start checking your bacon at the lower end of the time range. You can always put it back in for a few more minutes if needed. But you cannot undo overbaked bacon.
Temperature and Time Guidelines
When you are learning how long to bake bacon oven style, it helps to understand the relationship between temperature and time. This is really just a matter of heat management. Higher heat means faster cooking, but it also increases the risk of burning. Lower heat means slower cooking, which gives you more control but takes longer.
Here are some general bacon oven temperature and time guidelines to keep in mind:
- 350°F: Bake for 22 to 28 minutes. This low and slow approach gives you very tender bacon with a gentle crisp. It works well for thin slices but can leave thick cuts underdone.
- 375°F: Bake for 18 to 22 minutes. A solid middle-ground option that produces evenly cooked bacon with a pleasant chew.
- 400°F: Bake for 15 to 20 minutes. This is the most popular temperature for a reason. It delivers crispy bacon in a reasonable timeframe.
- 425°F: Bake for 12 to 15 minutes. Fast and furious. Great for thin slices but risky for thicker cuts.
No matter which temperature you choose, the key is to watch your bacon closely during the last few minutes of cooking. Ovens vary widely. Some hot spots can burn one strip while another is still underdone. Rotating the pan halfway through helps ensure even bacon cooking across all strips.
Expert Insight: Many professional cooks recommend starting bacon in a cold oven and then bringing it up to temperature. This slow render of fat creates a more uniform texture and reduces the risk of flare-ups from dripping grease.
Step-by-Step Instructions for Perfect Bacon
Now that you understand the basics of baking bacon in oven settings, let us walk through the actual process. Following these steps will give you perfect bacon every time. The process is simple, but the details matter.
What You Will Need
Before you start, gather your supplies. You do not need much, but having everything ready makes the process smooth and stress-free.
- Bacon strips: Thick cut or thin, whichever you prefer. Thick cut bacon gives you more flavor and chew, while thin bacon gets crispier faster.
- Baking sheet: A standard half-sheet pan works perfectly. Avoid using a dark-colored pan, as it absorbs more heat and can cause burning.
- Parchment paper or silicone baking mat: This prevents sticking and makes cleanup effortless. The parchment paper bacon method is a game changer.
- Wire cooling rack (optional but recommended): A wire rack elevates the bacon above the pan, allowing grease to drip away for crispier results.
- Tongs: For flipping and removing hot bacon strips safely.
- Paper towels: For draining excess grease after baking.
Quick Tip: If you do not have parchment paper, a light coat of oil on the baking sheet works as a substitute. But parchment paper is the easiest and cleanest option for oven baked bacon.
The Baking Process Step by Step
Follow these steps for flawless bacon oven method results every single time:
- Preheat your oven to 400°F. Let it fully heat before placing the bacon inside. A properly preheated oven ensures even cooking from the first minute.
- Line your baking sheet with parchment paper. This simple step saves you from scrubbing baked-on grease later. It also prevents the bacon from sticking to the pan.
- Lay the bacon strips flat on the pan. Do not overlap them. Each strip should have its own space so heat circulates evenly. Overlapping creates steamed, soggy spots instead of crispy perfection.
- Place the pan in the oven on the middle rack. The middle position allows the best air circulation around the bacon. Top racks can cause the ends to burn, while bottom racks may not crisp evenly.
- Set a timer for 12 minutes. This is your first check point. At 12 minutes, peek at the bacon and assess the color and crispness.
- Continue baking for 3 to 8 more minutes. Most oven baked bacon is done between 15 and 20 minutes total. Check frequently after the 12-minute mark to prevent burning.
- Remove the pan from the oven. The bacon will continue to crisp as it cools. So pull it off the pan when it still looks slightly underdone compared to your ideal texture.
- Transfer strips to paper towels. This drains excess grease and keeps the bacon crispy. Pat the tops gently with additional paper towels if needed.
That is it. Eight simple steps for how long to bake bacon oven style perfection. The entire process from prep to plate takes less than 25 minutes, including oven preheating.
Quick Tip: If you are cooking for a crowd, use two sheet pans and rotate them halfway through. This ensures all the bacon cooks at the same rate and comes out evenly crispy.
Tips for Ultra Crispy Bacon
You have baked your bacon. It is cooked through. But you want that next-level crunch. These tips will take your crispy bacon recipe results to the next level. They are small adjustments that make a big difference.
Using a Wire Rack for Even Cooking
The single best upgrade you can make to your baking bacon in oven routine is using a wire rack. A wire cooling rack placed on top of your baking sheet lifts the bacon off the direct surface of the pan. This allows hot air to flow underneath every strip. The result is crispy bacon on both sides, not just the top.
Without a wire rack, the bacon sits in its own rendered fat. The bottom side gets soggy from sitting in grease, while the top side crisps up in the oven heat. The wire rack solves this problem entirely. It is a small investment that transforms your results.
When using a wire rack, place the rack on the baking sheet first, then lay the bacon strips on top of the rack. The grease drips down through the rack and onto the sheet below. This keeps your bacon elevated and crispy throughout the entire cooking process.
Quick Tip: If you do not have a wire rack, you can crumple small balls of aluminum foil and place them under the bacon strips. This creates a makeshift elevation that mimics the wire rack effect.
The Parchment Paper Trick
Many experienced cooks swear by the parchment paper bacon method. Lining your baking sheet with parchment paper does more than just prevent sticking. It creates a thin buffer between the bacon and the metal pan. This buffer helps distribute heat more evenly and reduces the risk of hot spots that can burn the bacon.
Parchment paper also makes cleanup incredibly easy. When you are done, you simply lift off the parchment with the bacon strips still on it. The baking sheet stays clean. No scrubbing, no soaking, no greasy mess. For easy bacon recipe lovers, this is a must-have trick.
Use regular parchment paper, not wax paper. Wax paper can melt in a hot oven. Parchment paper is heat resistant and safe for baking up to 450°F, which is well above the oven temperature for bacon.
Quick Tip: For even easier cleanup, try using a silicone baking mat instead of parchment paper. It is reusable, eco-friendly, and works just as well for oven baked bacon.
The Cold Oven Start Method
Some chefs recommend starting your bacon oven method with a cold oven. This means you place the bacon in the cold oven and then set the temperature to 400°F. As the oven heats up gradually, the bacon fat begins to render slowly. This slow render creates a more uniform texture throughout the slice.
The cold start method works especially well for thick cut bacon. The gradual increase in heat gives the fat more time to melt and drain away before the meat starts to crisp. The result is bacon that is crispy on the outside but tender and juicy on the inside.
If you want to try this approach, simply follow the same steps but skip the preheating step. Place your prepared bacon in the cold oven, set the temperature to 400°F, and start timing once the oven reaches temperature. The total time may be a minute or two longer than the standard method, but the texture difference is noticeable.
Common Mistakes to Avoid When Baking Bacon
Even with the best crispy bacon recipe, mistakes can happen. Knowing what to avoid saves you from ruined bacon and wasted ingredients. Here are the most common errors people make when they bake bacon in oven settings, along with simple fixes.
Overcrowding the Baking Sheet
This is the number one mistake people make. When you cram too many bacon strips onto one pan, they overlap and steam instead of bake. Steam is the enemy of crispy bacon. It creates soft, flabby spots where the strips touch each other.
The fix is simple: give each strip its own space. If your baking sheet is too small, use two pans or bake in two batches. Yes, it takes a little more time. But the difference in texture is worth it. Nobody wants soggy bacon when they could have crispy perfection.
A good rule of thumb is to fit no more than four to six strips on a standard half-sheet pan. This gives each strip enough room for hot air to circulate freely. The result is evenly crispy bacon strips with no soft spots.
Wrong Temperature Settings
Setting your oven too low is another common mistake. At 350°F or below, the bacon takes too long to cook. The extended exposure to heat dries out the meat before the fat has fully rendered. You end up with tough, chewy bacon that lacks the satisfying crunch.
On the other hand, cranking the oven up to 450°F or higher can burn the bacon before the fat renders. The edges blacken while the center remains undercooked. The oven temperature for bacon needs to be high enough to render fat quickly but not so high that it scorches the meat.
Stick with 400°F for the best balance of speed and texture. This temperature renders fat efficiently while crisping the meat evenly. It is the sweet spot that works for almost every type of bacon.
Forgetting to Check the Bacon
Ovens are not all created equal. Some run hot, some run cold. Some have hot spots in the back, some on the left side. This means that the bacon cooking time listed in any recipe is just an estimate. The only way to know your bacon is done is to check it.
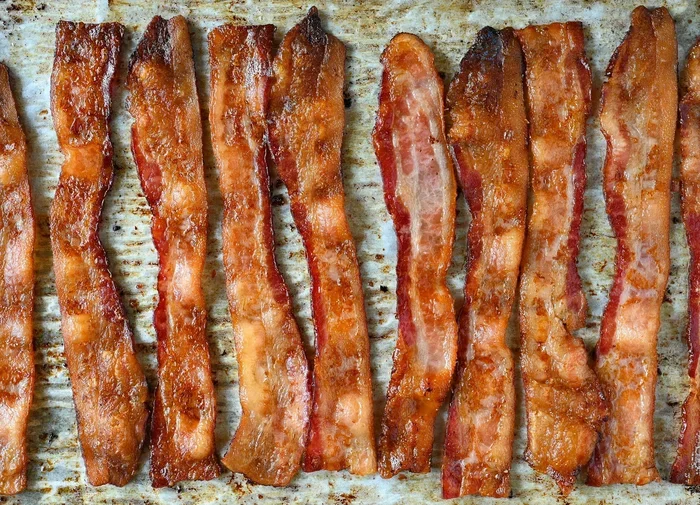
Start checking at the 12-minute mark. Look at the color and texture. The bacon should be golden brown and the fat should look rendered and slightly bubbly. If it still looks pale and floppy, give it a few more minutes. If it is already dark brown, pull it out immediately. Bacon continues to crisp as it cools, so pulling it slightly early is always better than pulling it too late.
Expert Insight: Professional chefs often recommend keeping a close eye on bacon during the last 3 to 5 minutes of cooking. This is when the transition from perfectly crispy to burnt happens very quickly. Set a timer and stay nearby during this critical window.
Other mistakes to watch for include forgetting to line the pan (leading to a greasy mess), using a warped baking sheet (causing uneven cooking), and skipping the paper towel drain step (leaving your bacon soggy from excess grease). Each of these small oversights can make a big difference in your final result.
What to Do With Leftover Bacon Grease
One of the best parts of baking bacon in oven is the generous amount of bacon grease left behind. Instead of pouring it down the drain (which can clog your pipes), save it. Bacon grease is a flavorful cooking fat that adds incredible depth to all kinds of dishes.
Storing and Reusing Bacon Fat
After you remove your bacon from the pan, let the grease cool for a few minutes. Then pour it through a fine mesh strainer into a heat-safe jar or container. This removes any bacon bits that could cause the grease to spoil faster.
Store your bacon grease in the refrigerator. It will keep for several months. The grease will solidify as it cools, making it easy to scoop out when you need it. Just like butter, bacon grease is a versatile kitchen staple that deserves a spot in your fridge.
You can use stored bacon grease for sautéing vegetables, frying eggs, cooking potatoes, or even making cornbread. The smoky, savory flavor it adds is unmatched by any store-bought cooking oil. It is one of those ingredients that makes everything taste better.
Cooking With Bacon Grease
The flavor of bacon grease is hard to beat. A spoonful melted into scrambled eggs adds a rich, smoky depth that regular butter cannot match. Use it to roast potatoes for an incredible crispy exterior. Fry up some vegetables in it for a breakfast side dish that everyone will love.
You can also use bacon grease for making cornbread, biscuits, or even popcorn. The savory, smoky flavor transforms simple dishes into something extraordinary. Once you start cooking with bacon grease, you will never go back to plain cooking oils.
Just remember that bacon grease has a lower smoke point than some other cooking fats. It works best for medium-heat cooking. For very high-heat searing, you may want to use a different oil. But for everyday cooking, bacon grease is a delicious and economical choice.
Quick Tip: Freeze leftover bacon grease in ice cube trays for easy portioning. Pop out a cube or two whenever you need a burst of smoky flavor in your cooking.
Conclusion
Baking bacon in the oven is one of the simplest and most rewarding cooking techniques you can master. It is easy, it is hands-off, and it delivers crispy bacon that is better than anything you can get from a skillet. Once you try the oven baked bacon method, you will never go back to the stovetop.
The key to how long to bake bacon oven style is understanding your variables. Temperature, thickness, and personal preference all play a role. But with 400°F as your baseline and 15 to 20 minutes as your starting point, you really cannot go wrong. Use a wire rack, line your pan with parchment paper, and check your bacon frequently during the last few minutes.
Save your bacon grease. It is liquid gold for the kitchen. Use it to cook eggs, roast vegetables, or make the best cornbread you have ever tasted. And always remember that practice makes perfect. Every batch you bake teaches you something new about your oven and your preferences.
Now that you have all the knowledge you need, it is time to put it into action. Preheat your oven to 400°F. Line a baking sheet with parchment paper. Lay out your bacon strips with care. And wait for the magic to happen. Your perfect bacon every time is just 15 minutes away.
Frequently Asked Questions
Can you bake bacon at 350°F?
Yes, you can bake bacon at 350°F. It will take longer, about 22 to 28 minutes, and the result will be slightly chewier. This works well if you prefer tender bacon over ultra-crispy strips.
Do you need to flip bacon when baking it in the oven?
No, you do not need to flip it. The circulating hot air in the oven cooks both sides evenly. However, if you notice one side is browning faster, you can flip the strips halfway through for more even results.
Can you line the baking sheet with aluminum foil instead of parchment paper?
Yes, but parchment paper is better. Aluminum foil can cause the bacon to stick and may create hot spots that lead to uneven cooking. Parchment paper gives you the best non-stick results and the easiest cleanup.
How do you know when oven baked bacon is done?
The bacon should be golden brown and the fat should look rendered and slightly bubbly. It will be slightly flexible but not floppy. Remember that it will crisp up a bit more as it cools on paper towels.
Is it better to bake bacon at 350 or 400 degrees?
400°F is generally better for most people. It cooks faster and produces crispier results. 350°F works well if you prefer chewier bacon and have more time. For perfect bacon every time, 400°F is the recommended temperature.
Can you bake thick cut bacon in the oven?
Absolutely. Thick cut bacon takes a bit longer, usually 20 to 25 minutes at 400°F. The extra time allows the thick slices to render their fat properly while the meat stays tender inside. The result is a wonderful balance of crispy edges and juicy center.