How Long Do Baby Back Ribs Take In The Oven At Home
Cooking baby back ribs in the oven takes about 2.5 to 3.5 hours at 275°F to 300°F. The exact time depends on your oven, the rib rack size, and whether you wrap them in foil. This guide covers everything you need to know to achieve tender, fall-off-the-bone ribs right at home.
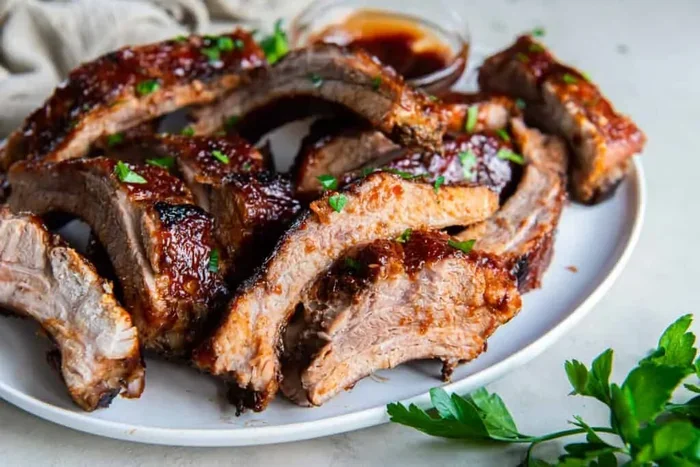
There is nothing quite like pulling a rack of ribs out of the oven and seeing that perfect bark form on the outside. Whether you are a weekend griller or a weeknight dinner hero, learning how long do baby back ribs take in the oven changes everything. This method gives you tender, juicy pork ribs without firing up the smoker.
Many people think ribs need a fancy grill or a dedicated smoker. The truth is, your kitchen oven can deliver incredible results. The secret lies in time, temperature, and a little patience. In this guide, we walk you through every step of the process. You will learn the ideal oven temperature, how long to cook, and tips that take your ribs from good to amazing.
Baby back ribs are a favorite for a reason. They are smaller, leaner, and cook faster than spare ribs. This makes them perfect for oven baking. Whether you are feeding a family of four or hosting a backyard gathering, oven-baked ribs are a showstopper. Let us dive into the details and get you cooking.
Key Takeaways
- Low and slow is the way: Cooking ribs at 275°F to 300°F yields the most tender results.
- Plan for 2.5 to 3.5 hours: Most baby back rib racks need this much time in the oven.
- Use a meat thermometer: Internal temperature of 195°F to 203°F signals doneness.
- Wrap in foil for moisture: The Texas crutch method keeps ribs juicy during cooking.
- Always remove the membrane: This simple step improves flavor and texture.
- Rest your ribs: Let them sit for 10 to 15 minutes before slicing.
- BBQ sauce goes on last: Apply sauce in the final 15 to 30 minutes to avoid burning.
📑 Table of Contents
- How Long Do Baby Back Ribs Take In The Oven At Home
- The Best Oven Temperature for Baby Back Ribs
- Step-by-Step Guide to Cooking Ribs in the Oven
- How to Know When Ribs Are Done
- Tips for Perfect Oven-Baked Ribs Every Time
- Common Mistakes to Avoid When Cooking Ribs
- Oven Ribs vs Smoker Ribs: What Is the Difference
- Frequently Asked Questions About Cooking Ribs in the Oven
- Conclusion
How Long Do Baby Back Ribs Take In The Oven At Home
The short answer is about 2.5 to 3.5 hours. But the full picture is a bit more nuanced. Several factors influence the total cooking time for your pork ribs. Understanding these helps you plan your cook with confidence.
The oven temperature is the biggest variable. Most experts recommend a low and slow approach. Cooking at 275°F is the sweet spot for tender ribs. Some cooks go up to 300°F, which shortens the time slightly. At 275°F, a full rack typically needs about 3 hours. At 300°F, you might be done in 2.5 hours.
The size of the rib rack matters too. A full rack of baby back ribs usually weighs about 2 pounds. Smaller racks may be ready in just 2 hours. Larger or thicker racks could need the full 3.5 hours. Always use a meat thermometer to check for doneness. The internal temperature should reach 195°F to 203°F.
Here is a quick reference for cooking times based on temperature:
- 275°F: About 3 to 3.5 hours for a full rack.
- 300°F: About 2.5 to 3 hours for a full rack.
- 325°F: About 2 to 2.5 hours, but results may be slightly less tender.
These times assume you are cooking a standard full rack of baby back ribs. If you are cooking a half rack, reduce the time by about 30 minutes. And if you wrap your ribs in foil, the cooking time stays similar, but the texture changes in a good way. The foil traps steam and keeps the meat moist.
Why Low and Slow Works Best for Ribs
Ribs are made of tough connective tissue and collagen. High heat dries them out before that collagen has time to break down. Low and slow cooking gently melts the collagen into gelatin. This is what gives ribs that silky, tender bite. The process also allows the fat to render slowly, basting the meat from within.
Think of it like braising a pot roast. You would never crank the oven to 450°F for a tough cut of beef. Ribs deserve the same gentle treatment. The low temperature also gives the bark time to develop. That dark, flavorful crust is a hallmark of great ribs.
The Best Oven Temperature for Baby Back Ribs
275°F is the gold standard for oven ribs. At this temperature, the meat cooks evenly without drying out. The fat renders slowly, and the connective tissue has plenty of time to transform. Your kitchen will smell incredible for hours, which is a bonus in itself.
If you are short on time, 300°F works well too. The ribs will cook faster, but you need to watch them more closely. Some cooks even go to 325°F for a quicker cook. This works for half racks or when you are in a rush. But you sacrifice some of that melt-in-your-mouth tenderness.
Here is a comparison of the three most common oven temperatures for ribs:
- 275°F: Best for tenderness. Longer cook time. Most recommended.
- 300°F: Good balance of time and texture. Slightly firmer bite.
- 325°F: Fastest option. Best for half racks or thinner cuts.
Every oven runs a little differently. Some ovens run hot, and some run cold. Get to know your oven. An oven thermometer can be a cheap and handy tool. Place it inside your oven and check the actual temperature. This small step can make a big difference in your rib recipe results.
Should You Use a Rib Rack?
A rib rack is not required, but it helps. It lifts the ribs off the baking sheet, allowing hot air to circulate around the meat. This promotes even cooking and better bark formation. If you do not have a rib rack, you can place the ribs directly on a lined baking sheet. Just make sure they are not crowded.
Some people use a cooling rack placed over a baking sheet. This works just as well and costs much less. The key is to allow air flow around the entire rack of ribs. Standing the ribs upright can also work if your oven is small.
Step-by-Step Guide to Cooking Ribs in the Oven
Now let us get into the nitty-gritty. Follow these steps for perfect oven-baked ribs every time. The process is simple, but each step matters.
Step 1: Prep the Ribs
Start by removing the membrane from the back of the ribs. This thin layer of tissue can be tough and chewy. Use a butter knife to loosen it at one edge. Then grab it with a paper towel for grip and peel it off. This step is easy and makes a huge difference in the final texture.
Next, pat the ribs dry with paper towels. Dry meat gets better bark. Season generously with your dry rub. A basic rub of brown sugar, paprika, garlic powder, onion powder, salt, and black pepper works beautifully. Apply the rub at least 30 minutes before cooking. Even better, rub them the night before and refrigerate overnight.
Step 2: Wrap in Foil (Optional but Recommended)
Wrapping ribs in foil is called the Texas crutch. It speeds up cooking and keeps the meat moist. Lay out two sheets of heavy-duty aluminum foil. Place the ribs meat-side down in the center. Add a few tablespoons of apple juice, beer, or broth for extra moisture. Wrap tightly, sealing the edges.
Some cooks skip the foil and go uncovered for the entire cook. This produces a thicker, crunchier bark. It is a matter of personal preference. If you love a smoky, crunchy exterior, skip the wrap. If you prefer tender, juicy meat, go with foil.
Step 3: Cook Low and Slow
Place the wrapped ribs on a baking sheet. Put them in the oven on the middle rack. Set your timer and let the oven do the work. Resist the urge to open the door and check too often. Every time you open the oven, heat escapes. This can add 10 to 15 minutes to your total cook time.
For a 275°F cook, plan on about 3 hours. At 300°F, check at the 2.5-hour mark. Use the bend test to check progress. Pick up the rack from one end with tongs. If the meat starts to crack and pull back from the bones, it is close to done.
Step 4: Unwrap and Sauce
After the initial cook, carefully unwrap the ribs. Be careful of the steam. Brush your favorite barbecue sauce on both sides. Return the ribs to the oven uncovered for 15 to 30 minutes. This lets the sauce caramelize and form a sticky glaze. Watch them closely so the sauce does not burn.
You can also add a second or third coat of sauce during this phase. Multiple thin layers create a richer flavor. Let the ribs rest for 10 to 15 minutes before cutting. This allows the juices to redistribute throughout the meat.
Step 5: Slice and Serve
Use a sharp knife to cut between the bones. Each slice should have a clean portion of meat. Serve with extra sauce on the side, coleslaw, and cornbread. Oven ribs pair well with almost any side dish. They are perfect for a casual dinner or a special occasion.
How to Know When Ribs Are Done
Knowing when your ribs are ready is one of the most important skills. Undercooked ribs are tough and chewy. Overcooked ribs fall apart and lose flavor. You want that sweet spot in between. Here is how to tell.
The most reliable method is the internal temperature. Insert a meat thermometer into the thickest part of the meat. Do not touch the bone. The target range is 195°F to 203°F. At this temperature, the collagen has fully broken down, and the meat is tender.
The bend test is another great indicator. Lift the rack from one end with tongs. The ribs should bend slightly and cracks should form in the surface. If they still hold their shape straight, they need more time. If they snap in half, they may have cooked too long.
The toothpick test works well too. Push a toothpick into the meat between the bones. If it goes in with little resistance, the ribs are done. The meat should feel tender and pull back from the bone ends by about a quarter inch.
Common Signs of Undercooked Ribs
- The meat is still very firm and does not bend.
- The toothpick meets strong resistance.
- The internal temperature is below 190°F.
- The bones are still white and visible through the meat.
Common Signs of Overcooked Ribs
- The meat has shrunk far from the bones.
- The ribs feel mushy or fall apart when lifted.
- The surface is dry and crusty.
- The internal temperature is above 210°F.
Tips for Perfect Oven-Baked Ribs Every Time
Even experienced cooks can benefit from a few extra tips. These small adjustments can take your ribs to the next level. Here are some of the best tricks from pitmasters and home cooks alike.
Use Apple Juice or Apple Cider Vinegar
Adding a splash of apple juice to the foil packet keeps the ribs moist. Apple cider vinegar adds a subtle tang that complements the pork. This simple addition boosts flavor and tenderness. It is a small step with a big payoff.
Let the Ribs Come to Room Temperature
Take the ribs out of the refrigerator about 30 minutes before cooking. This lets them cook more evenly. Cold meat in a hot oven creates uneven results. The outer edges may overcook while the center stays cold. A little planning goes a long way.
Double Wrap for Extra Protection
If you are worried about drying out, use two layers of foil. Heavy-duty foil is best. The double layer creates a tighter seal and traps more steam. This is especially helpful for thinner racks of ribs that cook faster.
Experiment with Different Rubs and Sauces
Once you master the basic method, start experimenting. Try a spicy rub with cayenne and chili powder. Or go sweet with a honey-based sauce. Different regional styles of barbecue ribs offer endless inspiration. Kansas City style uses a thick, sweet sauce. Carolina style leans on vinegar and spice. Texas style often skips sauce entirely and lets the rub shine.
Save the Drippings
After cooking, there is liquid left on the baking sheet. Do not throw it away. This is rich, flavorful pork juice. Use it to make gravy or drizzle it over sliced ribs. It adds moisture and deepens the flavor of your barbecue ribs.
Make Ahead and Reheat
Ribs taste great the next day too. Cook them ahead of time and reheat in the oven at 250°F. Wrap them in foil to keep them moist. This makes them perfect for entertaining. You can focus on your guests instead of the kitchen on the day of the event.
Common Mistakes to Avoid When Cooking Ribs
Even the best recipes can go wrong if you skip steps or make common errors. Here are mistakes to watch out for when cooking pork ribs in the oven.
Skipping the Membrane Removal
This is the number one mistake beginners make. The membrane on the back of the ribs blocks seasoning from reaching the meat. It also creates a chewy texture that nobody enjoys. Take the extra two minutes to remove it. Your ribs will taste noticeably better.
Cooking at Too High a Temperature
It is tempting to crank up the heat to save time. But high temperatures turn ribs into dried-out jerky. The collagen needs time to break down. Patience is the key to tender ribs. Stick with the low and slow approach for the best results.
Not Using a Meat Thermometer
Guessing when ribs are done leads to inconsistent results. A meat thermometer removes all the guesswork. It takes the mystery out of cooking and gives you confidence. They are inexpensive and available at any kitchen store.
Applying Sauce Too Early
Barbecue sauce contains sugar. Sugar burns at high temperatures. If you add sauce too early, it will char and turn bitter. Always apply sauce in the last 15 to 30 minutes of cooking. This gives it time to caramelize without burning.
Cutting Too Soon
It is tempting to slice into ribs right out of the oven. Resist that urge. The meat needs time to rest. Cutting too soon releases all the juices onto the cutting board instead of staying in the meat. Give your ribs 10 to 15 minutes of rest time. The difference is noticeable.
Oven Ribs vs Smoker Ribs: What Is the Difference
Many people wonder if oven ribs can match the flavor of smoked ribs. The honest answer is that they are different but both delicious. Smoker ribs have a deeper smoky flavor from the wood chips or chunks. Oven ribs develop a great bark and tender texture but lack that smokiness.
You can add smoke flavor to oven ribs using smoked paprika in your rub. Liquid smoke is another option, but use it sparingly. A few drops go a long way. Some cooks also add a smoking box or pouch of wood chips to their oven. This is not traditional, but it adds a subtle smoky note.
For most home cooks, oven ribs are the practical choice. They require less equipment and monitoring. The results are consistently tender and flavorful. Smoked ribs have a certain magic, but oven ribs hold their own in the world of barbecue ribs.
When to Choose the Oven Method
- You do not have access to a smoker or grill.
- You are cooking for a small group and want consistent results.
- You want to make ribs on a rainy day or in winter.
- You are short on time and want a reliable method.
When to Choose the Smoker Method
- You want authentic smoky flavor.
- You have several hours to monitor the cook.
- You are hosting a backyard barbecue or cookout.
- You enjoy the ritual and process of smoking meat.
Frequently Asked Questions About Cooking Ribs in the Oven
Can I cook ribs at 350°F to save time?
Yes, you can cook ribs at 350°F, but the results will be different. The meat will cook faster, but it may not be as tender. High heat dries out the outer layers before the inside has time to become soft. If you must cook at 350°F, use the foil wrap method and check the ribs early. A half rack at 350°F may be done in about 1.5 to 2 hours.
How do I store leftover oven ribs?
Let the ribs cool completely, then store them in an airtight container in the refrigerator. They will keep for up to 4 days. To reheat, wrap them in foil and warm them in the oven at 250°F for about 15 minutes. This keeps them moist and prevents the sauce from burning. Avoid reheating ribs in the microwave, as it tends to dry them out.
Can I freeze cooked ribs?
Absolutely. Cooked ribs freeze well for up to 3 months. Wrap them tightly in foil and place them in a freezer bag. When you are ready to eat them, thaw them in the refrigerator overnight and reheat in the oven. The texture may be slightly softer after freezing, but the flavor remains excellent.
What is the best barbecue sauce for oven ribs?
The best sauce is the one you enjoy most. Sweet and tangy sauces work great for oven ribs because they caramelize well. Kansas City-style sauces with tomato and molasses are popular choices. If you prefer a spicy kick, look for sauces with chipotle or cayenne. Apply the sauce in the last 15 to 30 minutes of cooking for the best results.
Do I need to flip the ribs during cooking?
If you are using foil, you do not need to flip the ribs. The steam inside the foil packet cooks the meat evenly. If you are cooking without foil, you can flip the ribs halfway through for more even browning. Flipping is not necessary, but it can help develop a more uniform bark on all sides of the ribs.
What sides go best with oven ribs?
Classic barbecue sides pair perfectly with oven ribs. Coleslaw adds a cool, crunchy contrast. Baked beans bring a hearty, savory element. Cornbread soaks up the juices beautifully. For lighter options, try a fresh cucumber salad or grilled corn on the cob. Mac and cheese is another crowd-pleasing choice that complements the rich flavor of pork ribs.
Conclusion
Cooking baby back ribs in the oven is one of the most rewarding things you can do in the kitchen. The process is simple, the results are impressive, and the aroma fills your entire home with mouthwatering goodness. With the right temperature, timing, and a little patience, you can serve ribs that rival any barbecue restaurant.
Remember the key points. Keep the oven at 275°F to 300°F. Plan for 2.5 to 3.5 hours. Remove the membrane. Use a meat thermometer. Let the ribs rest before slicing. These small steps make all the difference. Your oven-baked ribs will be tender, juicy, and full of flavor.
Now it is your turn. Grab a rack of baby back ribs, preheat your oven, and give it a try. Once you master this method, you will never go back to dry, overcooked ribs again. Enjoy the process, experiment with flavors, and most importantly, have fun with it. Great ribs start with a little knowledge and end with a whole lot of deliciousness.