How To Caramelize Ribs In Oven For Mouthwatering Results
Discover the simple secrets to caramelizing ribs in the oven for a sticky, sweet, and deeply flavorful finish. This guide walks you through every step from choosing the right rack of ribs to achieving a perfect caramelized rib bark. You will learn the best ingredients, temperatures, and timing so your ribs turn out mouthwatering every single time.
There is something magical about pulling a rack of ribs out of the oven and seeing that gorgeous, sticky, caramelized glaze glistening on every bone. How to caramelize ribs in oven is a question many home cooks ask, and the answer is simpler than you might think. With the right ingredients, a little patience, and a hot oven, you can achieve restaurant-quality ribs right on your own kitchen counter.
Oven caramelized ribs bring the deep, rich flavors of barbecue without the hassle of managing a smoker or grill. Whether you are cooking for a family dinner, a weekend gathering, or just treating yourself, this method delivers consistent, mouthwatering results every time. In this guide, we will walk you through everything you need to know to make the best caramelized ribs you have ever tasted.
The beauty of oven-baked ribs lies in the control you have. You set the temperature, you choose the seasoning, and you decide how caramelized you want that sweet, sticky exterior. Once you master the basics, you can experiment with different rubs, glazes, and techniques to make the recipe your own. Let us dive into the details and get you started on your journey to perfect oven caramelized ribs.
Key Takeaways
- Low and slow cooking is the foundation: Caramelizing ribs in oven works best at moderate temperatures between 275°F and 325°F for tender results.
- The right rub and glaze make all the difference: Brown sugar, paprika, and honey-based glazes create that irresistible sticky caramelized exterior.
- Wrapping in foil partway through locks in moisture: This technique helps the meat stay juicy while the sugars develop a beautiful crust.
- Patience pays off: Rushing the process leads to dry, tough ribs. Plan for 3 to 4 hours for the best outcome.
- The final high-heat blast creates the bark: Unwrapping and increasing the temperature at the end gives you that signature caramelized rib bark.
- Resting the ribs matters: Letting them sit for 10 to 15 minutes before slicing keeps all those delicious juices locked in.
📑 Table of Contents
- What Does It Mean to Caramelize Ribs In The Oven
- Choosing the Best Ribs for Oven Caramelizing
- Essential Ingredients for a Perfect Caramelized Finish
- Step-by-Step Guide to Caramelizing Ribs In The Oven
- Tips for Achieving the Perfect Caramelized Rib Bark
- Common Mistakes to Avoid When Caramelizing Ribs In The Oven
- Expert Insights on Oven Caramelized Ribs
- How To Store and Reheat Leftover Caramelized Ribs
- Pairing Suggestions for Your Caramelized Ribs
- Conclusion
What Does It Mean to Caramelize Ribs In The Oven
Caramelizing ribs is all about transforming sugars into a rich, golden-brown crust. When heat meets sugar, a chemical reaction called the Maillard reaction takes place. This reaction creates complex flavors and that beautiful deep color we associate with perfectly cooked ribs.
When you caramelize ribs in oven, you are essentially using dry heat to develop a sweet, crispy outer layer while keeping the inside tender and juicy. Unlike grilling, where flames and smoke do much of the work, oven caramelizing relies on your seasoning, glaze, and precise temperature control.
The process typically involves three phases. First, you cook the ribs low and slow to break down the connective tissues. Then, you apply a glaze or sauce and increase the heat to caramelize the sugars on the surface. Finally, you let the ribs rest so the juices redistribute throughout the meat. Each phase plays a vital role in achieving that perfect balance of tender meat and crispy, flavorful bark.
Why Oven Caramelization Works So Well
Your oven provides a consistent, enclosed environment that is hard to replicate on a grill. The heat surrounds the ribs evenly, which means every part of the rack gets the same attention. This makes oven caramelizing a great option for beginners and experienced cooks alike.
You also have better control over moisture. By wrapping the ribs in foil partway through, you trap steam and keep the meat from drying out. Then, when you unwrap them for the final phase, the surface dries out just enough to allow a beautiful caramelized crust to form.
Choosing the Best Ribs for Oven Caramelizing
Not all ribs are created equal, and choosing the right type makes a huge difference in your final result. The two most popular options for oven-baked ribs are pork baby back ribs and pork spare ribs. Each brings something different to the table.
Baby back ribs come from the top of the rib cage near the spine. They are leaner, more tender, and cook faster than other cuts. Because of their lower fat content, they absorb seasoning beautifully and develop a lovely caramelized exterior when cooked properly.
Pork spare ribs come from the lower belly area. They are fattier, meatier, and have more connective tissue. This extra fat renders down during cooking and keeps the ribs incredibly juicy. Spare ribs also have a more robust flavor that pairs wonderfully with bold caramelized glazes.
What to Look for When Buying Ribs
When shopping for ribs, look for meat that is firm but not dry. The color should be a consistent pinkish-red with thin white streaks of fat running through. Avoid ribs that look gray or have a lot of liquid in the packaging.
Check the bone side of the rack. You want even spacing between the bones, which indicates consistent thickness. Thicker ribs near the center cook more evenly and give you a better caramelized finish on every piece.
For oven-baked ribs, a full rack of eight bones works perfectly. If you are cooking for a smaller group, you can buy a half rack and adjust your cooking time accordingly. Always remove the membrane from the back of the ribs before seasoning. This thin layer of tissue can block your rub from penetrating the meat and can create a chewy texture.
Essential Ingredients for a Perfect Caramelized Finish
The secret to amazing caramelized ribs lies in your ingredient choices. A great rib rub builds the flavor foundation, while a sweet glaze creates that sticky, glossy caramelized surface. Let us break down what you need.
The Perfect Rib Rub
A basic rub for oven caramelized ribs should include brown sugar, smoked paprika, garlic powder, onion powder, salt, black pepper, and a touch of cayenne for heat. Brown sugar is the star here because it caramelizes beautifully in the oven, creating that deep golden crust.
You can customize your rub based on your taste preferences. Some cooks add mustard powder for a tangy kick, while others prefer a touch of chili powder for smoky depth. The key is to balance sweet, savory, and spicy elements so the final flavor profile is complex and satisfying.
For a simple approach, try this classic blend:
- 1/2 cup brown sugar
- 2 tablespoons smoked paprika
- 1 tablespoon garlic powder
- 1 tablespoon onion powder
- 1 teaspoon salt
- 1 teaspoon black pepper
- 1/2 teaspoon cayenne pepper
The Best Glazes for Caramelized Ribs
While the rub builds flavor deep in the meat, the glaze creates that gorgeous sticky exterior. Honey, brown sugar, ketchup, apple cider vinegar, and Worcestershire sauce all make excellent glaze bases. You can also use cola or pineapple juice for a unique twist.
Apply your glaze during the last 30 to 45 minutes of cooking. This timing allows the sugars to caramelize without burning. A thin layer works better than a thick one, which can become sticky and overly sweet. You can brush on multiple thin coats for a deeper, more complex caramelized finish.
Quick Tips for Ingredient Selection
- Use real brown sugar: It contains molasses, which adds depth and promotes caramelization.
- Choose a quality honey: Raw, unfiltered honey gives the best flavor and browns beautifully.
- Add a splash of acid: Apple cider vinegar or citrus juice balances the sweetness and brightens the overall flavor.
- Do not skip the salt: Salt enhances every other flavor and helps the rub adhere to the meat surface.
Step-by-Step Guide to Caramelizing Ribs In The Oven
Now that you have your ribs and your ingredients ready, it is time to cook. Follow these steps for foolproof oven caramelized ribs every time.
Step 1: Prep the Ribs
Remove the membrane from the back of the rack. Use a butter knife to loosen one corner, then grip it with a paper towel and pull it off in one smooth motion. Pat the ribs dry with paper towels. Dry meat absorbs seasoning better and develops a better caramelized crust.
Generously apply your rub all over the ribs, pressing it into the meat with your hands. Make sure every surface is covered. Let the seasoned ribs sit at room temperature for about 30 minutes before cooking. This allows the salt to draw out some moisture, which helps the rub form a flavorful crust.
Step 2: Set Up Your Oven
Preheat your oven to 275°F. This low temperature is the key to tender, fall-off-the-bone ribs. Line a large baking sheet with aluminum foil and place a wire rack on top. The rack allows air to circulate around the ribs, which promotes even cooking and better caramelization.
Place the ribs meat-side down on the rack. The bone side faces up, which protects the meat from direct heat and keeps it moist. Cover the entire rack tightly with another sheet of foil, creating a sealed pouch.
Step 3: Cook Low and Slow
Place the ribs in the oven and cook for about 2.5 to 3 hours. The exact time depends on the size of your rack and your oven’s accuracy. At this stage, the goal is to break down the collagen in the connective tissues, making the meat tender and juicy.
After about 2 hours, carefully open the foil and check the ribs. The meat should have pulled back from the bones by about a quarter inch. The surface should feel tender when you press on it with tongs. If the ribs look dry, you can spritz them lightly with apple juice or water.
Step 4: Apply the Glaze
Remove the top layer of foil and brush a thin coat of your glaze over the entire rack. Return the ribs to the oven uncovered. Increase the temperature to 325°F or even 350°F for the final 30 to 45 minutes.
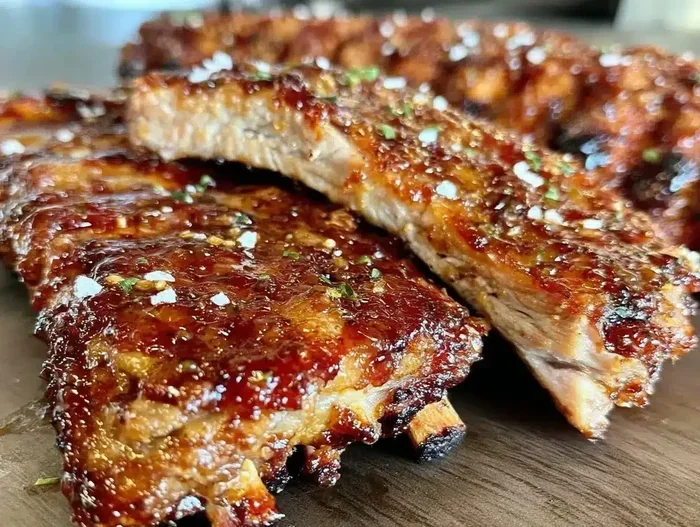
This higher heat is what creates the caramelized exterior. The sugars in your glaze and rub will brown and form a sticky, flavorful bark. Keep a close eye on the ribs during this phase to prevent burning. You may need to apply a second coat of glaze if the first one has mostly cooked in.
Step 5: Rest and Serve
Once the ribs have a deep golden-brown glaze, remove them from the oven. Let them rest on the cutting board for 10 to 15 minutes before slicing. This resting period allows the juices to redistribute, so every bite is moist and flavorful.
Use a sharp knife or meat cleaver to cut between the bones. Serve with extra glaze on the side and pair with coleslaw, cornbread, or baked beans for a complete meal. Your perfectly caramelized ribs are ready to enjoy.
Tips for Achieving the Perfect Caramelized Rib Bark
The rib bark is the crispy, flavorful crust that forms on the outside of the meat. It is one of the most sought-after qualities of great ribs, and achieving it in the oven is absolutely doable with a few simple techniques.
Dry the Surface Before Cooking
Moisture is the enemy of caramelization. The wetter the surface of your ribs, the harder it is for the sugars to brown. Pat the ribs thoroughly dry before applying your rub. You can even leave them uncovered in the refrigerator overnight. This dry-brining technique draws out surface moisture and helps the rub adhere better.
Use the Right Amount of Sugar
Sugar is the primary driver of caramelization, but too much can cause burning. Balance your rub with enough brown sugar to promote browning but not so much that it scorches during the final high-heat phase. If you are using a glaze, keep it thin and apply it in multiple coats rather than one heavy layer.
Do Not Skip the Unwrapped Phase
The time when the ribs cook uncovered is critical for bark development. During this phase, the surface moisture evaporates, and the sugars concentrate and brown. If you keep the ribs wrapped the entire time, you will end up with steamed meat that lacks that satisfying crust.
Monitor the Temperature Closely
Every oven runs a little differently. Use an oven thermometer to verify your temperature settings. If your oven runs hot, reduce the final temperature slightly to prevent the glaze from burning. If it runs cool, add a few extra minutes to the unwrapped phase.
Quick Tips for the Best Bark
- Apply glaze in thin layers and build up gradually.
- Place ribs on the upper third of the oven for better top-down heat exposure.
- Use a silicone brush for even glaze application.
- Rotate the rack halfway through the final phase for even browning.
- Let the ribs cool for just a few minutes after removing them to firm up the bark.
Common Mistakes to Avoid When Caramelizing Ribs In The Oven
Even experienced cooks can make mistakes when making oven caramelized ribs. Being aware of these pitfalls helps you avoid them and ensures better results every time.
Cooking at Too High a Temperature
One of the biggest mistakes is starting the ribs at a high temperature. This causes the outside to burn before the inside has time to become tender. Always start low and slow at around 275°F, then increase the heat only during the final phase.
Using Too Much Glaze Too Early
Applying a thick glaze too early in the cooking process causes the sugars to burn and turn bitter. The glaze should only go on during the last 30 to 45 minutes when the ribs are already tender and just need that final caramelized finish.
Skipping the Resting Period
Cutting into ribs immediately after removing them from the oven releases all those precious juices onto the cutting board instead of staying in the meat. Always let your ribs rest for at least 10 minutes before slicing.
Forgetting to Remove the Membrane
The membrane on the back of the rack prevents seasoning from reaching the meat and creates a chewy texture that no one enjoys. Take the extra two minutes to remove it before you start cooking. Your taste buds will thank you.
Not Letting the Ribs Reach Room Temperature
Placing cold ribs directly into a hot oven leads to uneven cooking. The outside may cook faster than the inside, resulting in a tough exterior and a raw center. Letting the ribs sit out for 30 minutes before cooking promotes even heat distribution and better caramelization.
Overlooking the Importance of Quality Ingredients
Cheap rubs with fillers and low-quality glazes full of high-fructose corn syrup will not give you the same results as real, quality ingredients. Invest in good brown sugar, pure honey, and a well-made smoked paprika for noticeably better flavor and caramelization.
Expert Insights on Oven Caramelized Ribs
Professional pitmasters and barbecue enthusiasts agree that oven caramelized ribs are a fantastic alternative to smoking. Chef Myron Mixon, a famous barbecue competitor, has often shared that oven-baked ribs with a great glaze can rival any smoker-produced rack when done correctly.
The key insight from experts is that patience is everything. Low temperatures and longer cooking times break down the collagen in pork ribs, transforming tough connective tissue into gelatin. This is what gives oven ribs that signature fall-off-the-bone tenderness that people love.
Another expert tip is to use a digital meat thermometer. Internal temperature is the most reliable indicator of doneness. For caramelized ribs, aim for an internal temperature of 195°F to 203°F. At this range, the collagen has fully broken down, and the meat is incredibly tender and juicy.
Many barbecue enthusiasts also recommend a technique called the “3-2-1 method” for oven ribs. You smoke or bake the ribs for 3 hours, wrap them in foil with a liquid for 2 hours, then uncover and glaze for the final hour. While this method is traditionally associated with smokers, it works wonderfully in the oven too and produces outstanding caramelized results.
How To Store and Reheat Leftover Caramelized Ribs
If you have leftover ribs, proper storage keeps them delicious for days. Let the ribs cool completely, then wrap them tightly in aluminum foil or place them in an airtight container. Refrigerate within two hours of cooking. Properly stored caramelized ribs keep in the refrigerator for up to 4 days.
To reheat, wrap the ribs in foil with a splash of apple juice or broth. Heat at 250°F for about 20 to 30 minutes. This gentle reheating method prevents the meat from drying out and helps the glaze rehydrate. For an extra-crispy finish, you can uncover the ribs for the last 5 minutes and broil them briefly.
You can also freeze cooked ribs for up to 3 months. Wrap them tightly in plastic wrap and then in foil, or place them in a vacuum-sealed bag. Thaw overnight in the refrigerator before reheating for the best results.
Pairing Suggestions for Your Caramelized Ribs
The right sides elevate your caramelized ribs from a great meal to an unforgettable one. Here are some pairing ideas that complement the rich, sweet flavors of oven caramelized ribs.
- Classic coleslaw: The cool, crunchy texture and tangy dressing balance the sweetness of the ribs perfectly.
- Cornbread: A warm, buttery cornbread soaks up the glaze and adds a comforting Southern touch.
- Baked beans: Their savory, slightly sweet flavor pairs naturally with caramelized pork ribs.
- Grilled corn on the cob: The smoky sweetness of grilled corn echoes the caramelized flavors of the ribs.
- Mac and cheese: Creamy, cheesy mac and cheese is a crowd-pleasing side that works with almost any rib recipe.
For beverages, pair your ribs with a cold beer, sweet tea, or a sparkling cider. The carbonation and slight sweetness cleanse the palate between bites, keeping every mouthful as exciting as the first.
Conclusion
How to caramelize ribs in oven is a rewarding cooking technique that delivers incredible results with minimal effort. By choosing the right cut of ribs, building a flavorful rub, and following a low-and-slow cooking process, you can create ribs with a stunning caramelized crust and tender, juicy meat inside.
The key is patience. Give your ribs the time they need at each stage, and do not rush the caramelization phase. Whether you are a beginner or a seasoned home cook, this method gives you full control over the flavor and texture of your ribs. Try it for your next family dinner or weekend cookout, and you will wonder why you ever bothered with anything else.
Now that you have all the knowledge and techniques, it is time to fire up your oven and start cooking. Your kitchen is about to smell incredible, and your taste buds are in for a treat. Happy cooking.
Frequently Asked Questions
Can I caramelize ribs at a higher temperature to save time?
While you can increase the temperature, doing so risks burning the glaze and drying out the meat. The low-and-slow method at 275°F is the best way to ensure tender ribs with a perfect caramelized finish. Rushing the process compromises the texture and flavor.
Do I need to use a glaze, or is the rub enough for caramelization?
A glaze enhances caramelization and adds a sticky, glossy finish, but a rub with brown sugar can still caramelize beautifully on its own. The rub alone will create a flavorful bark, though adding a thin glaze layer gives you that extra shine and sweetness.
What is the best oven temperature for caramelizing ribs?
Start at 275°F for the low-and-slow phase, then increase to 325°F or 350°F during the final 30 to 45 minutes for caramelization. This two-temperature approach ensures tender meat and a beautifully caramelized exterior.
How long should I let my ribs rest after removing them from the oven?
Let your ribs rest for 10 to 15 minutes before cutting. This resting period allows the juices to redistribute throughout the meat, resulting in a more moist and flavorful bite when you serve them.
Can I use chicken ribs or beef ribs for this method?
Yes, you can adapt this method for beef ribs or chicken ribs, though cooking times will vary. Beef ribs are thicker and need more time, while chicken ribs cook faster. Adjust your temperature and timing accordingly for the best results.
Why did my caramelized ribs turn out dry?
Dry ribs usually result from cooking at too high a temperature, cooking for too long, or skipping the foil-wrapping phase. Make sure you start at 275°F, wrap the ribs in foil partway through, and check the internal temperature to avoid overcooking.
=== SEO TITLE ===
How To Caramelize Ribs In Oven For Mouthwatering Results
=== META TITLE ===
How To Caramelize Ribs In Oven For Mouthwatering Results
=== URL SLUG ===
how-to-caramelize-ribs-in-oven
=== META DESCRIPTION ===
Learn how to caramelize ribs in oven with our easy, step-by-step guide. Get sticky, sweet, fall-off-the-bone ribs that will impress everyone at your next dinner.