What Temp To Cook Sourdough In Dutch Oven Perfectly
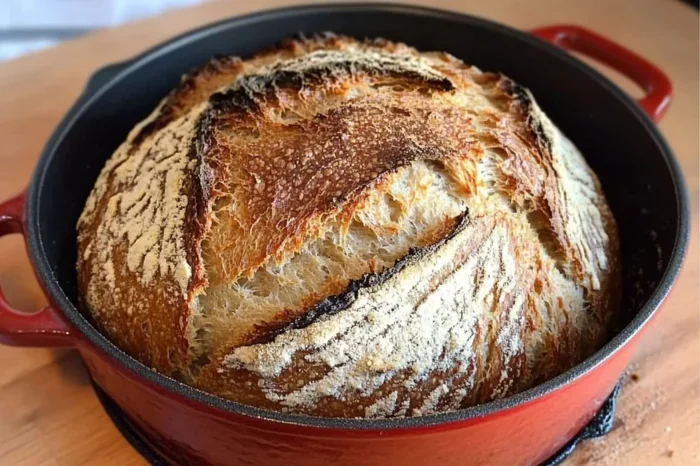
Learning what temp to cook sourdough in dutch oven is the key to bakery-quality bread at home. The ideal baking temperature ranges from 450°F to 500°F, depending on your crust preference and loaf size. Most bakers achieve the best results by starting hot and then lowering the heat partway through the bake. This method creates a stunning golden brown crust while keeping the interior crumb soft and airy. With the right dutch oven sourdough recipe and temperature control, you can bake perfect loaves every single time.
Baking sourdough bread in a Dutch oven is one of the most rewarding things you can do in a home kitchen. It gives you results that rival artisan bakeries. But the question almost everyone asks is, what temp to cook sourdough in dutch oven? The answer isn’t as simple as one number. It depends on the size of your loaf, your starter strength, and how thick you want the crust. In this guide, I will walk you through everything you need to know about dutch oven sourdough baking temperature, from preheating to pulling your loaf out of the oven.
If you have ever baked sourdough and ended up with a pale, dense loaf, the temperature was probably the culprit. Too low, and the bread does not get the oven spring it needs. Too high, and the outside burns before the inside cooks through. Getting the sourdough baking temperature right makes all the difference between a good loaf and a great one. Let us break it all down so you can bake with confidence every time.
Key Takeaways
- Optimal Temperature Range: Bake sourdough between 450°F and 500°F for the best balance of crust and crumb.
- Preheat Your Dutch Oven: Always preheat the Dutch oven with the oven for at least 30 minutes before baking.
- Start Hot, Then Lower: Begin baking at 450°F-500°F, then reduce to 425°F-450°F after 20 minutes for even baking.
- Internal Temperature Matters: Aim for an internal loaf temperature of 205°F to 210°F for a fully baked sourdough.
- Crust vs. Crumb Trade-Off: Higher temperatures create a thicker, crispier crust, while lower temperatures yield a softer exterior.
- Steam Is Your Friend: The Dutch oven traps steam naturally, which is essential for oven spring and crust development.
- Resting Time Is Key: Let your sourdough cool for at least one hour before slicing to set the crumb properly.
📑 Table of Contents
- Why the Dutch Oven Works So Well for Sourdough
- What Temp to Cook Sourdough in Dutch Oven: The Full Guide
- How to Know When Your Sourdough Is Done
- Common Mistakes When Setting the Temperature for Dutch Oven Sourdough
- Expert Tips for Perfect Dutch Oven Sourdough Every Time
- Understanding the Relationship Between Sourdough Fermentation and Baking Temperature
- Comparing Baking Methods: Dutch Oven vs. Baking Stone
Why the Dutch Oven Works So Well for Sourdough
The Dutch oven has become the go-to baking vessel for sourdough enthusiasts, and for good reason. It solves two of the biggest challenges in home sourdough baking: steam retention and even heat distribution. Understanding why it works helps you appreciate the importance of getting the temperature just right.
The Steam Factor
Professional bakeries use steam-injected ovens to create that signature crispy sourdough crust. Steam keeps the surface of the dough moist during the early stages of baking, which allows the loaf to expand fully before the crust sets. This is called oven spring, and it is what gives sourdough its beautiful, open interior crumb.
A Dutch oven traps moisture naturally. When you place your shaped dough into a hot, covered Dutch oven, the steam from the wet dough gets trapped inside. This creates a mini steam oven effect. No special equipment needed. No spraying water. Just a simple pot and great heat management.
Heat Retention and Even Baking
Cast iron Dutch ovens are heavy and thick. They hold heat incredibly well. This means that when you open the oven door to place your dough inside, the temperature does not drop as much as it would with a thin baking sheet. The even heat surrounding the loaf ensures that it bakes consistently on all sides.
This is especially important for sourdough bread baking because sourdough needs sustained, steady heat to develop flavor and rise properly. A Dutch oven sourdough recipe works so well because the vessel mimics the conditions of a professional stone oven.
What Temp to Cook Sourdough in Dutch Oven: The Full Guide
The ideal temperature for baking sourdough in a Dutch oven depends on a few factors. Most bakers agree on a range, but knowing exactly what to do at each stage makes a huge difference in your final loaf.
The Standard Baking Temperature
For most sourdough loaves, the recommended temperature is 450°F to 500°F (230°C to 260°C). Here is how it typically breaks down:
- 450°F (230°C): A safer, more forgiving temperature. Great for beginners. Produces a moderately crispy crust.
- 475°F (245°C): The sweet spot for many experienced bakers. Gives a beautiful golden brown crust with excellent oven spring.
- 500°F (260°C): The high-heat approach. Best for very wet doughs and bakers who want a thick, crackly crust.
Starting at the higher end of the range and then lowering the temperature partway through is the most common method. This approach gives your loaf maximum oven spring in the first phase and then gently finishes cooking the interior without burning the crust.
Two-Stage Baking Method
The two-stage baking method is the most popular approach for Dutch oven sourdough. Here is how it works:
- Phase 1 (Covered): Preheat your oven to 475°F to 500°F with the Dutch oven inside. Bake the loaf covered for the first 20 to 25 minutes. This is when the magic happens. The trapped steam helps the loaf rise dramatically. The crust stays soft enough to allow maximum expansion.
- Phase 2 (Uncovered): Remove the lid and reduce the temperature to 425°F to 450°F. Continue baking for another 20 to 25 minutes. Now the crust forms and turns golden brown. The interior finishes cooking and develops that tangy sourdough flavor you love.
This method works because the two phases serve different purposes. The first phase focuses on rise and structure. The second phase focuses on crust development and moisture control. Together, they produce a loaf with a thin, crispy shell and a soft, airy inside.
Temperature Adjustments Based on Loaf Size
Not all sourdough loaves are the same size, and that matters for temperature. A small boule (round loaf) and a large batard (oval loaf) will behave differently in the same oven.
- Small loaves (under 1 pound): Use 450°F for the first phase and 425°F for the second. Smaller loaves cook faster and can burn at high temperatures.
- Medium loaves (1 to 1.5 pounds): Stick with 475°F covered, then 450°F uncovered. This is the most common size for home bakers.
- Large loaves (over 1.5 pounds): Start at 500°F covered, then drop to 450°F uncovered. The extra mass needs more initial heat to achieve proper oven spring.
How to Know When Your Sourdough Is Done
Temperature is not just about the oven settings. It is also about knowing when your bread is fully baked. There are several reliable ways to check this, and using more than one method gives you the best results.
The Internal Temperature Test
The most accurate way to check if your sourdough is done is with a digital instant-read thermometer. Insert the probe into the center of the loaf. You are looking for an internal sourdough temperature of 205°F to 210°F (96°C to 99°C).
If the internal temperature is below 205°F, the bread needs more time. If it is above 210°F, you may have overbaked it, which can dry out the crumb. This is the single most important tool for consistent sourdough bread baking.
The Tap Test
Tap the bottom of your loaf with your knuckle. A fully baked sourdough will sound hollow. If it sounds dense or dull, it needs more time in the oven. This test takes practice, but after a few loaves, you will get a feel for it.
Visual Cues
Your sourdough crust should be a deep golden brown color when it comes out of the oven. If it is pale, it probably needs more time. If it is dark brown or almost black, you may have gone too long or the temperature was too high.
The loaf should also feel firm when you press the top. If it feels soft or doughy, give it a few more minutes. Trust your senses. Over time, you will develop an intuition for when the bread is ready.
Common Mistakes When Setting the Temperature for Dutch Oven Sourdough
Even experienced bakers make mistakes with sourdough temperature control. Here are the most common ones and how to avoid them.
Not Preheating the Dutch Oven
This is the number one mistake. If you put your dough into a cold Dutch oven, the bread will not get the oven spring it needs. The Dutch oven must be preheated along with the oven for at least 30 minutes. Some bakers preheat for a full hour, especially for larger loaves.
When the Dutch oven is properly preheated, the bottom of the dough immediately starts to set. This creates a barrier that allows the loaf to rise upward instead of spreading out. The result is a taller, more structured loaf with a beautiful shape.
Skipping the Temperature Drop
Baking at 500°F for the entire cook time will almost certainly burn your crust before the inside is done. The two-stage method exists for a reason. Lowering the temperature after the first 20 to 25 minutes allows the interior to finish cooking without over-browning the outside.
If you have been getting burnt sourdough crust with a raw center, this is probably why. Try the two-stage approach and see the difference it makes.
Opening the Lid Too Often
Every time you lift the lid, you release steam. Steam is essential during the first phase of baking. If you keep peeking, you lose the moisture that helps the loaf expand. Trust the process. Keep the lid on for the full 20 to 25 minutes of the covered phase.
If you really need to check on your bread, use the oven light and look through the window. Resist the urge to open the lid. Your patience will be rewarded with a better sourdough loaf.
Using the Wrong Size Dutch Oven
A Dutch oven that is too small will crowd the loaf and restrict its expansion. A Dutch oven that is too large will not trap enough steam. The ideal size for a standard sourdough boule is about 5 to 7 quarts. The dough should fit comfortably with a little room to grow.
For a batard or oval loaf, a 4.5 to 5 quart Dutch oven often works well. Make sure there is at least 2 to 3 inches of space above the dough so it can rise freely.
Expert Tips for Perfect Dutch Oven Sourdough Every Time
Here are some pro tips that will elevate your sourdough bread baking game. These are the small details that separate good loaves from great ones.
Use Parchment Paper for Easy Transfer
Shaping dough and then trying to lower it into a hot Dutch oven is stressful. The dough can stick to your hands or tear. A simple trick is to shape the loaf on a piece of parchment paper, then use the paper to lower the dough into the hot pot. The paper will slide right out, and the bread will bake perfectly.
Score the Dough Deeply
Scoring is the practice of cutting the top of the dough before baking. It gives the bread a controlled place to expand. Use a sharp blade, like a lame or a razor, and cut about half an inch deep. Deep scores open up more during baking and give your loaf a beautiful, rustic look.
Let the Bread Cool Completely
This is hard to do, I know. The smell of fresh sourdough bread is irresistible. But slicing into the loaf too early will release steam and ruin the crumb structure. Let the bread cool on a wire rack for at least one hour. The interior will set, and the crust will stay crispy.
Experiment with Different Flours
The type of flour you use affects how your bread responds to temperature. Bread flour with high protein produces a chewier crumb and can handle higher temperatures. Whole wheat flour absorbs more water and may need a slightly lower baking temperature. Rye flour behaves differently still. Experiment and find what works best for your sourdough starter and preferences.
Keep a Baking Journal
Every oven is different. What works perfectly in one Dutch oven may not work the same way in another. Keep a simple baking journal where you note the temperature, time, flour type, and results. Over time, you will build a personal reference guide that takes the guesswork out of sourdough temperature control.
Understanding the Relationship Between Sourdough Fermentation and Baking Temperature
Baking temperature does not exist in a vacuum. It is closely connected to how your sourdough fermentation went before the bread ever enters the oven. Understanding this relationship helps you make better decisions about what temp to cook sourdough in dutch oven.
If your dough was over-fermented, it will have a weaker structure. In this case, a slightly lower baking temperature (around 450°F) can help prevent the crust from setting too quickly before the interior is fully cooked. Over-fermented dough spreads more, and a gentler bake gives it a better chance of holding its shape.
On the other hand, if your dough was under-fermented, it will be dense and tight. A higher starting temperature (around 500°F) can help push the oven spring and open up the crumb. The strong initial heat gives the loaf the energy it needs to rise despite the weaker fermentation.
The strength of your sourdough starter also plays a role. A very active, well-fed starter produces more gas, which means more oven spring. More oven spring means you need that high initial heat to capture all that rising power. A weak starter produces less gas, so the temperature matters a bit less for rise, but the crust still benefits from the Dutch oven steam effect.
Paying attention to your fermentation timeline, the appearance of your dough, and the behavior of your sourdough starter all feed into your decision about baking temperature. This is what makes sourdough bread baking both a science and an art.
Comparing Baking Methods: Dutch Oven vs. Baking Stone
While this article focuses on the Dutch oven, it is worth comparing it briefly to the baking stone method. Both have their strengths, and knowing the differences helps you choose the right approach for each bake.
A baking stone or baking steel provides excellent bottom heat. You can achieve similar oven spring by adding steam with a pan of water or by spritzing the dough. However, the steam dissipates quickly in an open oven, so the crust development is different. The crust on a stone-baked loaf tends to be thinner and more uniform.
A Dutch oven traps steam much more effectively. The result is a thicker, more dramatic crust with deeper scoring marks. The crumb also tends to be more open and airy because of the extended steam exposure during the first phase of baking.
For most home bakers, the Dutch oven method is easier and more forgiving. It requires less equipment and less technique to get great results. If you are just starting out with sourdough baking, the Dutch oven is the best place to begin.
| Factor | Dutch Oven | Baking Stone |
|---|---|---|
| Steam Retention | Excellent (trapped inside pot) | Moderate (requires added steam) |
| Crust Thickness | Thick and crispy | Thin and even |
| Oven Spring | Very high | High (with added steam) |
| Ease of Use | Very beginner-friendly | Requires more technique |
| Crumb Structure | Open and airy | Moderately open |
| Equipment Needed | Dutch oven only | Stone/steel, steam source |
Both methods produce beautiful sourdough bread. The Dutch oven simply gives you more consistency and a more dramatic result with less effort. Once you master the Dutch oven method, you can explore the baking stone approach for even more variety in your baking.
Frequently Asked Questions
Can I bake sourdough at 400°F in a Dutch oven?
Yes, you can, but the results will be different. 400°F produces a softer crust and less oven spring. It works well for smaller loaves or if you prefer a more bread-like texture rather than a crackly artisan crust. If you go this route, extend the baking time slightly to ensure the interior reaches 205°F to 210°F.
How long should I preheat the Dutch oven before adding sourdough?
Preheat your Dutch oven for at least 30 minutes at your target baking temperature (typically 475°F to 500°F). This ensures the pot is evenly heated throughout. A properly preheated pot gives your loaf an immediate burst of heat, which is essential for oven spring and crust formation.
What is the best internal temperature for sourdough bread?
The ideal internal temperature for fully baked sourdough is 205°F to 210°F (96°C to 99°C). At this temperature, the starches in the bread have fully set, the proteins have coagulated, and the crumb will be soft and airy. Use a digital thermometer for the most accurate results.
Do I need to grease the Dutch oven before baking sourdough?
No, you do not need to grease the pot. The natural fats in the sourdough dough will release as it bakes, and the Dutch oven surface will naturally prevent sticking. If you use parchment paper, the loaf will slide out effortlessly. Greasing can actually make the crust soggy in spots.
Can I bake sourdough in an enameled Dutch oven?
Absolutely. Enameled cast iron Dutch ovens work great for sourdough. They provide the same heat retention and steam trapping as traditional bare cast iron. The enamel coating also makes cleanup easier. Just make sure the pot is rated for temperatures up to 500°F before using it.
Why did my sourdough get too dark even at the right temperature?
If your crust is too dark, the oven might run hotter than what it displays. Invest in an oven thermometer to verify the actual temperature inside your oven. You can also try reducing the temperature by 10 to 15 degrees. Darker crust can also result from too much sugar or fat in the dough, or from baking the loaf too long in the second uncovered phase.
=== CONCLUSION ===
Mastering what temp to cook sourdough in dutch oven is one of the most valuable skills you can develop as a home baker. The ideal range of 450°F to 500°F, combined with the two-stage baking method, gives you the best chance of producing a loaf with a crispy golden brown crust and a soft, airy interior crumb. Remember to preheat your Dutch oven thoroughly, use a digital thermometer to check the internal temperature, and always let your bread cool before slicing.
The beauty of Dutch oven sourdough baking is that it is accessible to everyone. You do not need a professional oven or fancy equipment. A Dutch oven, good sourdough starter, and attention to temperature are all you need. Start with the temperatures and methods described in this guide, pay attention to how your loaves turn out, and adjust over time. With practice, you will bake sourdough bread that rivals anything from a artisan bakery. Happy baking!